 kiduverse
How to make an air-dry clay pinch pot
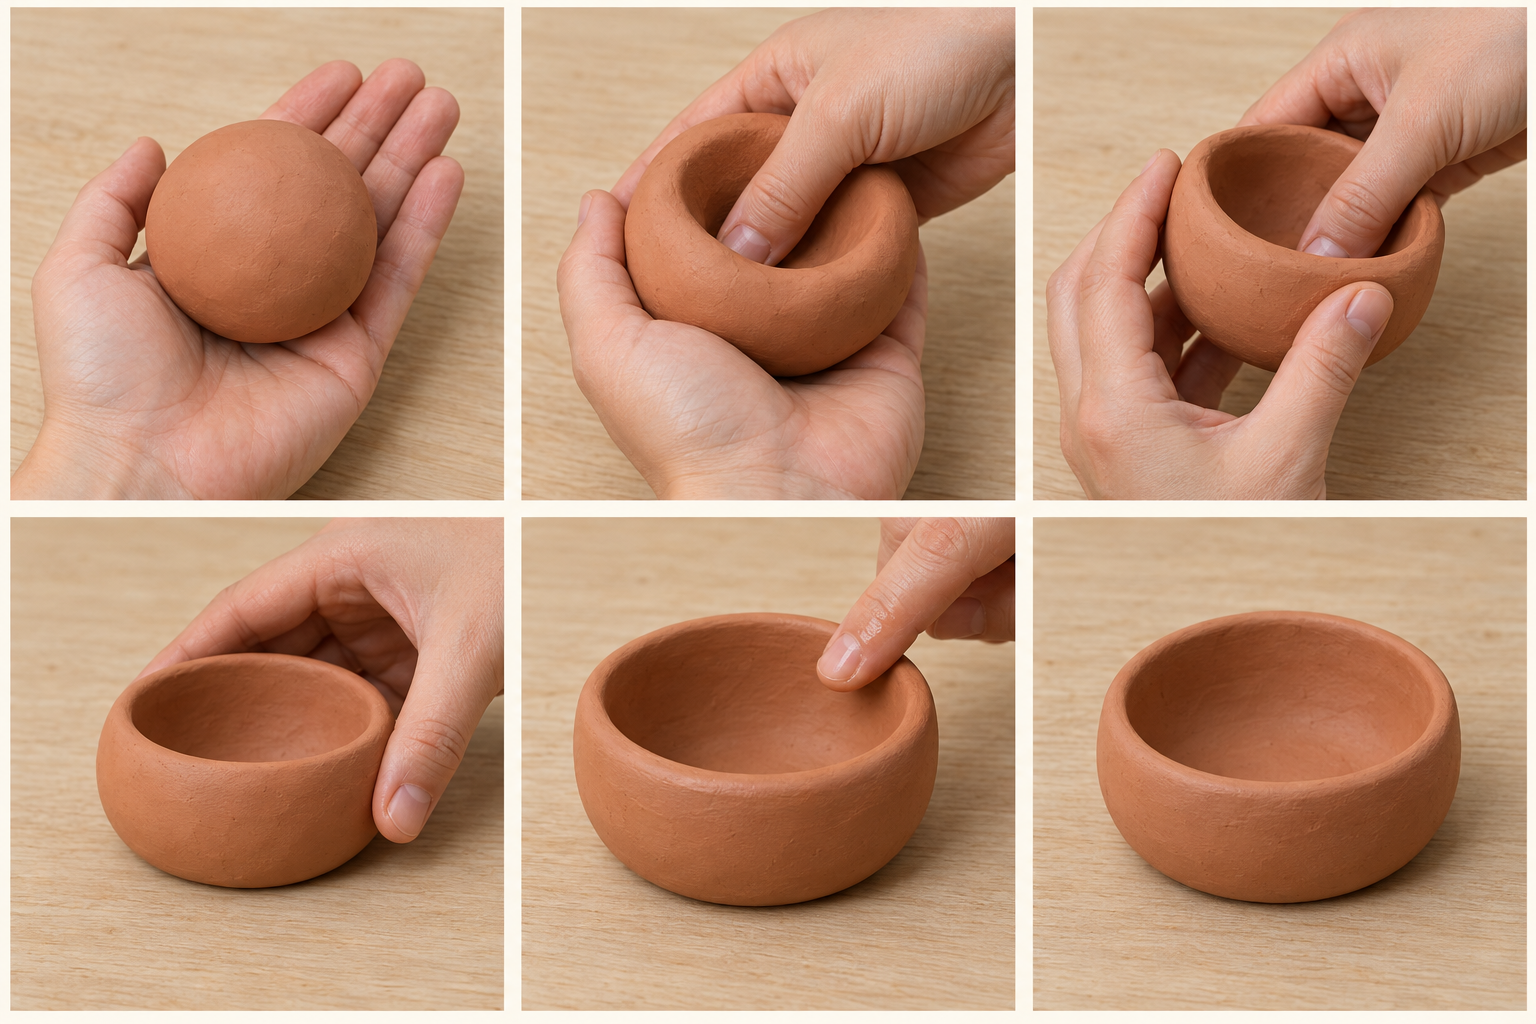
Roll an air-dry clay ball, press a hollow with your thumb and widen it with gentle pinches, turning the piece between each pinch. Flatten the base, smooth the rim and dry according to the package. You will make a small decorative bowl.
- About ages 5–9 · help as needed
- 20–30 minutes modeling · estimate
- Drying separately · follow package
- Thumb indentation and pinching
Materials and a little practice
- Prepared soft air-dry clay: one piece that fits comfortably in a palm.
- A board or washable mat and a cloth for hands.
- A little water for fingers, only if the clay instructions allow it.
Use air-dry clay for this lesson, rather than non-drying modeling clay or oven-bake polymer clay. Follow its age label and manufacturer instructions. An adult stays nearby; keep clay out of mouths. Wash hands and clean the surface afterward. The bowl is decorative: do not use it for food, drinks or holding water.
This bowl starts from one piece: no attached handles or supporting frame. The pictures use terracotta-colored clay. Choose prepared air-dry clay with a suitable age label. A low shape and broad base make stability easier to check.
First try light pressure on a small spare piece. Press a thumb hollow, then pinch its edge between thumb and index finger. Turn a little after each pinch. If the edge stretches into a thin ribbon, reduce the pressure.
Air-dry clay pinch pot: step by step
1 Roll a soft ball
Knead a small piece and roll it between your palms in circular movements. It should fit comfortably in a palm. Seal unused clay so it does not dry out.
Why: A soft, even ball opens into a bowl without dry cracks.
- Check
- The surface has no deep cracks and yields to your fingers.
- If it needs fixing
- Knead firm patches again. Add water only as the manufacturer directs; wet clay can lose its shape.
2 Press a thumb hollow
Support the ball in one palm. Gradually press the other thumb into the center. Stop before your thumb reaches the supporting palm: leave a thick, intact base.
Why: The hollow creates the inside while an intact base supports the shape.
- Check
- The hollow is roughly centered and there is no hole through the bottom.
- If it needs fixing
- While the clay is soft, bring the edges of a tiny hole together and smooth both sides. For a large tear, knead the piece back into a ball.
3 Pinch and turn the walls
Place your thumb inside and index finger outside a wall. Make one gentle short pinch, then turn the bowl a little. Repeat around the opening to widen it gradually. Do not pull the rim upward.
Why: Turning spreads the pressure instead of stretching one thin spot.
- Check
- The bowl stays low, the walls feel similar in thickness and the rim does not droop.
- If it needs fixing
- Pinch a thick patch separately. Stop stretching thin patches; lower their soft edge slightly and smooth it. About 6–8 mm is a thickness guide unless the package specifies otherwise.
4 Set it on a flat base
Set the bowl gently on the board, supporting its side. If the base is rounded, press very lightly from inside while supporting the outside wall. Remove your hands.
Why: A broad flat base lets the bowl stand on its own.
- Check
- It does not rock, the walls keep their height and the bottom is not pierced.
- If it needs fixing
- Flatten only the raised part of the base. Do not press the whole bowl down from above: the walls could fold.
5 Smooth the uneven rim
Support the outside wall and gently run a finger over rough places on the rim. Slightly dampen the finger only if the instructions allow water. Keep a thick rounded edge.
Why: Smoothing closes small tears without thinning the wall.
- Check
- There are no sharp projections or deep cracks, and the bowl stays upright.
- If it needs fixing
- Move soft clay across a tiny crack and smooth it. Do not pour water into the bowl or stretch a dry patch.
6 Check the shape and let it dry
Check stability and the intact base. Move the piece together with its board and dry in the conditions stated on the package. Time varies with brand and thickness; do not load the bowl before it is fully dry.
Why: Undisturbed drying helps preserve the shape; the package describes your particular material.
- Check
- Before drying, the bowl stands, its walls do not collapse and its base is intact.
- If it needs fixing
- While soft, return to evening the walls or base. Do not bend dried clay. Do not speed drying in an oven or on a radiator.
Fix common mistakes
A wall is too thin
Stop pulling the edge. Lower the soft rim a little and smooth it; continue only on thick patches.
Back to step 3The bowl rocks
Support the wall and gently flatten the raised base from inside. Remove your hands after each movement to check stability.
Back to step 4A crack appears
Smooth a small crack in soft clay by moving material across it. For a deep tear, start again with a ball.
Back to step 2Make a second bowl independently
Use a second equal-sized ball to make a wider, lower bowl without the step pictures. Decide where to use less pressure. Compare the stability and wall thickness of both shapes. Explain how turning helped you avoid a thin patch.
With adult help
An adult kneads and supports the piece while the child presses the hollow and makes a few pinches. A slightly uneven rim is fine.
More independently
Compare two bowls from equal-sized balls. Change the width while keeping a thick intact base and a stable shape.
Printable modeling guide: A4 PDF
Two pages with materials, all six pictures, actions and checkpoints. Print the guide to work without a screen. A4 at 100% scale.
Download PDF · 2 pagesQuestions about this lesson
Can I use non-drying modeling clay instead?
You can practice thumb indentation with soft modeling clay, but it will stay soft. Use air-dry clay for a bowl that hardens; oven-bake polymer clay needs a different process.
How long does the bowl take to dry?
Follow the instructions for your clay. Material, thickness and conditions affect the time; finishing the modeling session does not mean the piece is dry.
Can it hold water or food?
No. This practice bowl is decorative. Air-dry clay does not become food-safe tableware after drying or ordinary painting.