kiduverse
How to make a modeling clay snail
Roll a clay rope and coil it into a spiral. Make a broad body with a raised head, attach the shell to its back and add short feelers. Follow each illustrated step and check your work as you go.
- Around ages 4–7 · help as needed
- 15–25 minutes · estimate
- 6 steps · beginner
- Rope and spiral
Materials and a little practice
- Soft non-drying modeling clay in two colors; a little black is optional.
- A modeling board or washable mat.
- A cloth for hands and a clean work surface.
Non-drying modeling clay needs no drying or baking. Air-dry clay and other compounds behave differently: follow their packaging. This lesson uses no toothpicks, wire, glue or scissors. An adult stays nearby; small clay pieces do not go in mouths.
This small three-dimensional craft has two main parts: a body and a shell. Choose your own colors. The pictures use a green body and an orange shell so the separate parts and joins are easy to see.
Practice two techniques: rolling an even rope and coiling a spiral. Try a short rope with a spare piece first, then coil it on your board before making the snail.
Modeling clay snail: step by step
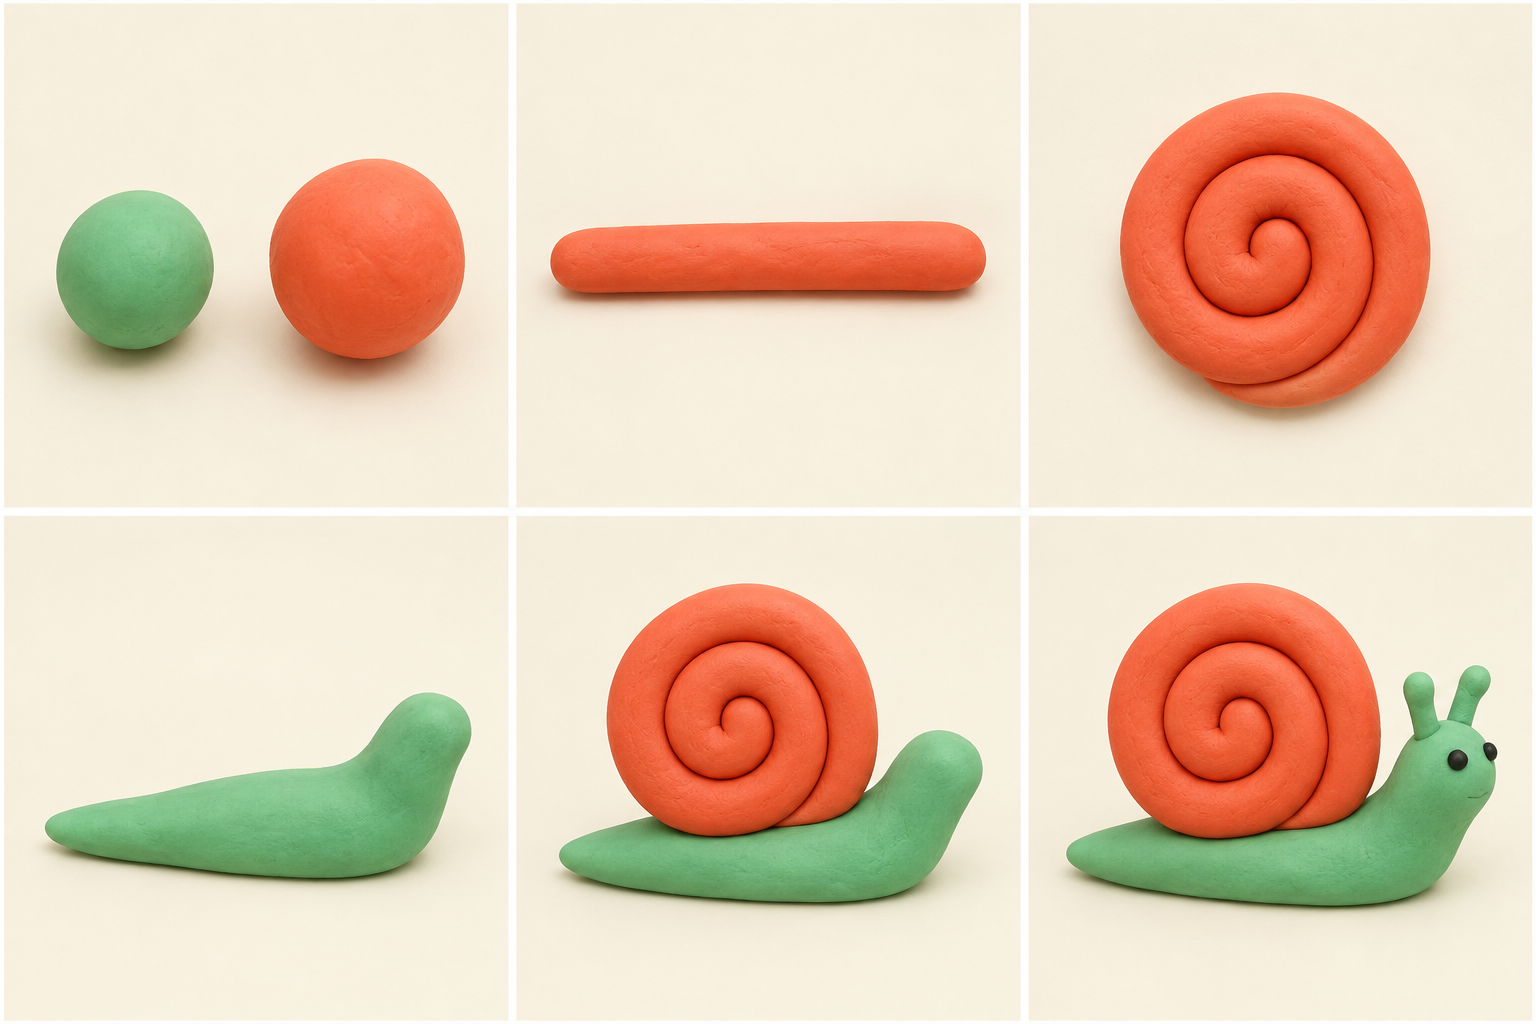
1 Soften the clay and roll two balls
Take one piece for the body and a slightly larger piece for the shell. Save two small pieces of green for the feelers. Knead each color separately, then roll two balls between your palms.
Why: Soft clay bends without cracking; a ball is an easy starting point for a rope.
- Check
- The surface is smooth and the clay bends rather than crumbles.
- If it needs fixing
- Knead stiff clay a little longer in your hands. Do not heat it on a stove or in a microwave.
2 Roll an even rope for the shell
Put the orange ball on your board. Roll your palm back and forth, moving from the middle toward the ends. Make a rope about as thick as a pencil.
Why: An even rope makes an even spiral. Thick patches can push neighboring coils apart.
- Check
- The rope is about the same thickness along its length and does not stick to your palm.
- If it needs fixing
- Avoid pulling the ends. Roll thick patches with short strokes; knead a very thin patch together and start again.
3 Coil the rope into a spiral
Lay the rope on the board. Curl one end into a small hook and wrap the remaining length around it. Each turn touches the previous one. Press the outer end gently against the side, keeping the spiral visible.
Why: The flat spiral becomes the shell. Coiling on a board is easier than holding it in the air.
- Check
- There are no large gaps, the spiral remains visible and the disk lifts as one piece.
- If it needs fixing
- Nudge a loose turn against its neighbor. If the coil is flattened, unroll it and try again with less pressure.
4 Make a broad body and raise the head
Roll the green ball into a short thick sausage. Taper one end for the tail. Keep the other end rounded and lift it slightly for the head. Press the underside gently onto the board.
Why: A broad flat foot supports the shell. A short neck is less likely to bend.
- Check
- The body sits steadily, with room behind the head for the shell and a visible tail.
- If it needs fixing
- Shorten and thicken a drooping neck. If the body rocks, flatten and widen its underside gently against the board.
5 Attach the shell to the back
Stand the orange spiral upright on the broad middle of the body. Support both sides and gently press only the bottom edge into the green clay.
Why: A broad contact joins the parts without glue. Pressing from above can squash the spiral.
- Check
- Let go: the snail stands, the shell stays upright and the head remains visible.
- If it needs fixing
- Flatten the shell’s bottom edge a little and widen the back. If the shell is too large, remove part of the outer turn.
6 Add short feelers and check the snail
Roll the saved green pieces into two short thick ropes. Press their bases onto the head. Add two tiny black clay dots on the head for eyes if you like. Lift the snail by its body and set it down again.
Why: Short feelers stay up without wire. The final check tests the joins.
- Check
- The feelers stay attached, the spiral is clear and the snail stands after being moved.
- If it needs fixing
- Shorten drooping feelers and thicken their bases. Skip tiny eyes if they are difficult for the child: the snail is still recognizable.
Fix common mistakes
The shell falls over
Widen the body and press the bottom of the spiral into it. Reduce the outer turn if the disk is too heavy.
Back to step 5The rope tears
Soften the clay and roll with your palm instead of pulling the ends. A short even rope is better than a long thin one.
Back to step 2The spiral disappears
Press only where the parts join. Keep pressure off the face of the shell so its coils remain visible.
Back to step 3Make a second snail independently
Make a second snail without the step pictures. Choose new colors and a smaller shell, and decide how broad its body needs to be. Explain why both snails stand. Then bend a short rope into a wave: how does its shape differ from a spiral?
Make it easier
An adult softens the clay while the child rolls and coils. Leave off the eyes and feelers if needed.
Try independently
Let the child divide the clay and compare the shell size with the body width. Add large flat dots without hiding the spiral.
Printable modeling guide: A4 PDF
Two pages with materials, all six pictures, actions and checkpoints. Print the guide to work without a screen. A4 at 100% scale.
Download PDF · 2 pagesQuestions about this lesson
Which clay should I use?
Use soft non-drying modeling clay and check the age guidance on its packaging. An adult can soften a stiff piece first.
Can a three-year-old try this?
Try just the rope and spiral with adult help and leave off tiny eyes. Age is a guide: the child should be able to roll clay and keep it out of their mouth.
Do the feelers need a wire frame?
No. Keep them short and thick. Shorten drooping feelers and widen their bases instead of adding wire.
How can I keep the finished snail?
Non-drying clay stays soft. Leave the snail on a board away from sunshine and heat. It is a practice craft rather than a durable toy.