kiduverse
Origami for beginners: your first folds
Start with one square of paper: easy origami instructions, clear folding diagrams, checkpoints and help with mistakes.
Get one square ready
For each lesson, use a ready-cut square about 15 × 15 cm, made from thin paper. Ordinary printer paper trimmed to a square works too. Card is harder to fold.
Use a flat table. Two different side colors make turns easier to see. A pencil is only for optional face decoration; the folding needs no glue or scissors.
Corners first, pressure second
Hold the matching corners with one hand. With the other, press the crease from the middle toward the edges. If an edge slips, reopen and align it before pressing hard.
How to read our diagrams
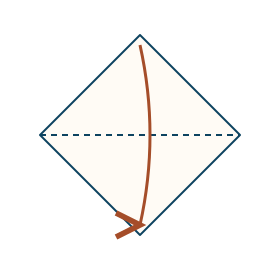
Dashed line — a new crease, or a center reference if the step asks you to unfold again.
Arrow — where to move the corner. Turning the whole model over is always a separate written step.
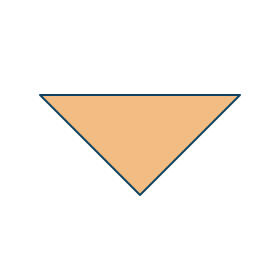
Before → after — the action is on the left, the result on the right. Shades distinguish visible paper sections; read the text for the number of layers.
Practice one aligned fold
Place the square lighter side up, like a diamond. Bring the top corner to the bottom corner and hold the tips. Wait to press until the side edges line up. Press along the diagonal from the middle outward, then open the sheet.
- Why
- One aligned fold creates equal corners for the next steps.
- Check
- The tips and edges meet; after opening, you see one diagonal crease.
- Repair
- If an edge sticks out, reopen and use lighter pressure until it lines up.
Valley and mountain
Open the crease slightly and look from the side. If the edges rise and the middle is lower, it is a valley, like V. Turn the sheet over: that same crease becomes a mountain, like a roof ∧. The name depends on which side you are looking at.
In these first lessons, corners fold onto the visible side. Turns and single-layer folds are named explicitly; you do not need special bases yet.
Try it independently
Take a fresh square and fold the other diagonal without the picture. Before pressing, name two signs of alignment: matching tips and matching edges. Then choose the dog lesson.
When a fold goes wrong
The edges do not match
Open the last fold. Match and hold the tips first, then smooth the crease. If the sheet itself is not square, use a ready-cut square.
The paper springs open
Place the fold on the table and press from the middle outward. Thick paper makes multiple layers hard to flatten; try a thinner sheet.
I cannot tell which layer to move
Compare with the previous result on the right. Find the two separate tips. In the cup, the top tips fold one at a time onto opposite sides; folding both together closes the opening.