kiduverse
Easy origami cat face
Fold a paper cat with upright ears. Reuse the center crease and learn to turn a model over.

Get one square ready
For each lesson, use a ready-cut square about 15 × 15 cm, made from thin paper. Ordinary printer paper trimmed to a square works too. Card is harder to fold.
Use a flat table. Two different side colors make turns easier to see. A pencil is only for optional face decoration; the folding needs no glue or scissors.
Corners first, pressure second
Hold the matching corners with one hand. With the other, press the crease from the middle toward the edges. If an edge slips, reopen and align it before pressing hard.
Paper and your first folds ↗How to read our diagrams
Dashed line — a new crease, or a center reference if the step asks you to unfold again.
Arrow — where to move the corner. Turning the whole model over is always a separate written step.
Before → after — the action is on the left, the result on the right. Shades distinguish visible paper sections; read the text for the number of layers.
Fold step by step
Check the result on the right before moving on. The diagrams show the shape; the text tells you which layers to fold.
1Make a triangle
Put the lighter side up. Bring the bottom corner to the top corner, align the tips and press. Put the long edge at the bottom.
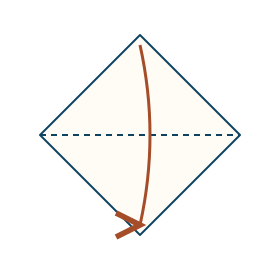
Before: make this move 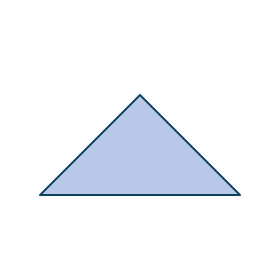
After: compare your result - Why
- An aligned diagonal gives equal corners for the ears.
- Check
- The triangle points upward, with its long edge below.
- Repair
- Reopen before pressing hard if the edges do not match.
2Mark the center
Fold left corner to right corner, press lightly, then reopen the triangle.
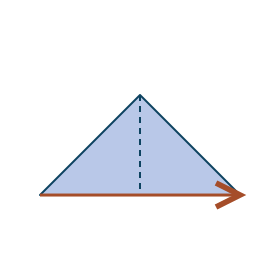
Before: make this move 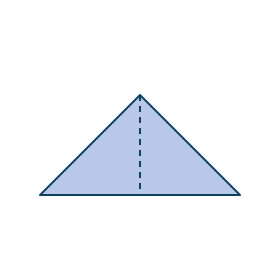
After: compare your result - Why
- The middle is a reference for the ear folds.
- Check
- A vertical crease connecting the top tip to the middle of the bottom edge.
- Repair
- Bring the corners together again if the crease is off center.
3Raise the left ear
Lift the left corner through both layers, along a fold from the bottom midpoint toward the left sloping edge. Aim the tip upward as shown.
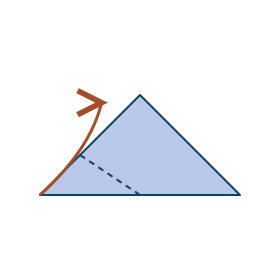
Before: make this move 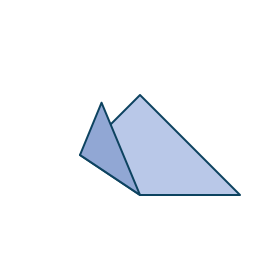
After: compare your result - Why
- An angled fold turns a wide corner into an upright ear.
- Check
- A pointed ear on the left; the bottom midpoint stays in place.
- Repair
- Open the ear and steepen or flatten the fold until its tip points upward.
4Raise the right ear
Repeat on the right, through both layers. Compare the two ear tips and keep the lower ends of the folds at the midpoint.
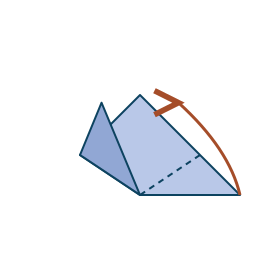
Before: make this move 
After: compare your result - Why
- The first ear gives you a visible reference for the second.
- Check
- Two upright ears of similar height, one on each side.
- Repair
- Reopen only the uneven ear and align its tip with the other.
5Lower the top point
Fold the central top point downward through both layers. Keep the new top edge below both ear tips.
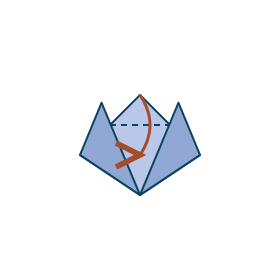
Before: make this move 
After: compare your result - Why
- This makes a flatter forehead and leaves the ears standing above it.
- Check
- The central point no longer rises between the ears.
- Repair
- If the ears disappear, make a smaller fold or reopen and raise them a little.
6Turn the whole model over
Lift the entire cat and turn it over from left to right, like a page. Keep the ears at the top. Do not unfold anything.
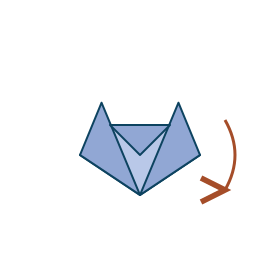
Before: make this move 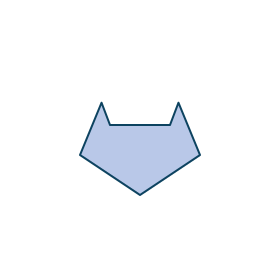
After: compare your result - Why
- The smooth reverse side becomes the front of the face.
- Check
- The forehead flap is hidden on the back; two ear tips are still visible.
- Repair
- If a flap opens, hold it against the model while turning it over.
7Decorate if you like
The folds are complete. Optionally draw eyes, a nose and whiskers on the smooth side.
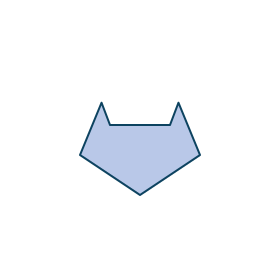
Before: make this move 
After: compare your result - Why
- You can give the same folded shape different expressions.
- Check
- A flat cat face that stays folded without glue.
- Repair
- Press the ear and forehead creases again if they spring open.
Now try it on your own
Make a second cat from a fresh square, without the diagrams. Try ears that lean a little farther apart. Use the center crease to compare them before pressing.
For paper: choose Print lesson or use your browser’s print command. You can select Save as PDF. The print button loads all diagrams before opening the print dialog.