kiduverse
How to draw a bear in pencil: three levels
Draw a sitting bear from simple forms: paws, muzzle, overlaps and shading. Three levels, illustrated steps and A4 lesson and practice PDFs.
- 3 detail levels
- Paper, HB/2B pencil, eraser
- 15 parts
Tap a drawing below to choose your level. The other levels hide and the “trial → after checking” pairs get bigger.
Draw a whole seated bear facing us. Choose your route: a simple line drawing, more constructed bent arms and soles, or volume under one light source. This is a stylised character rather than an anatomical study.
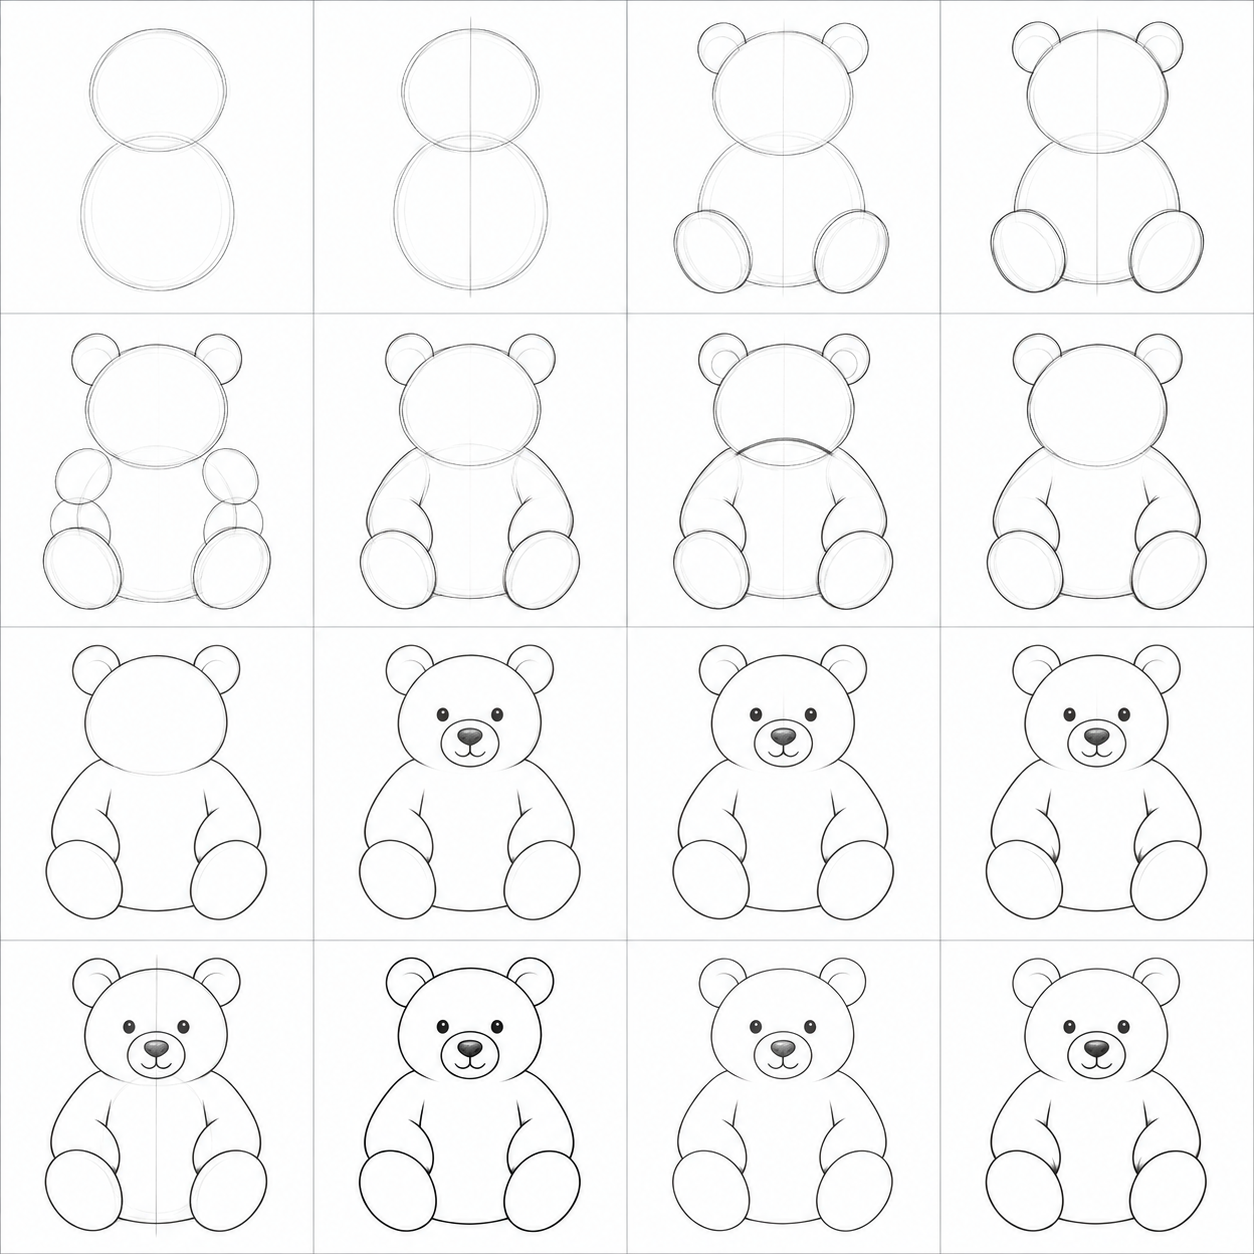
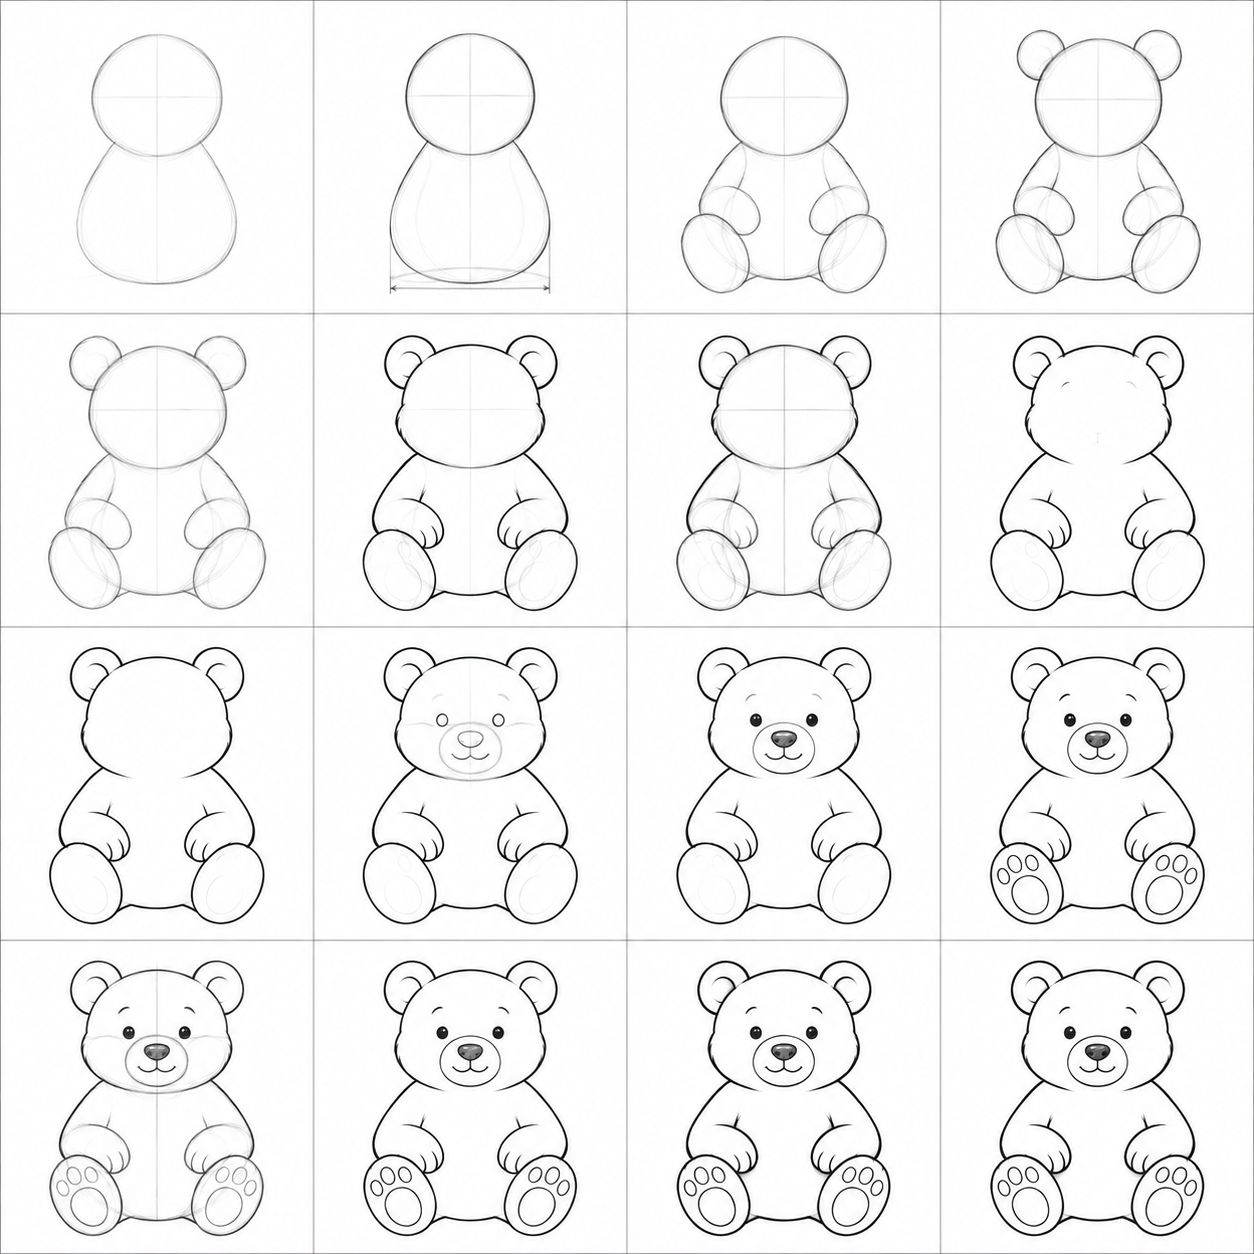
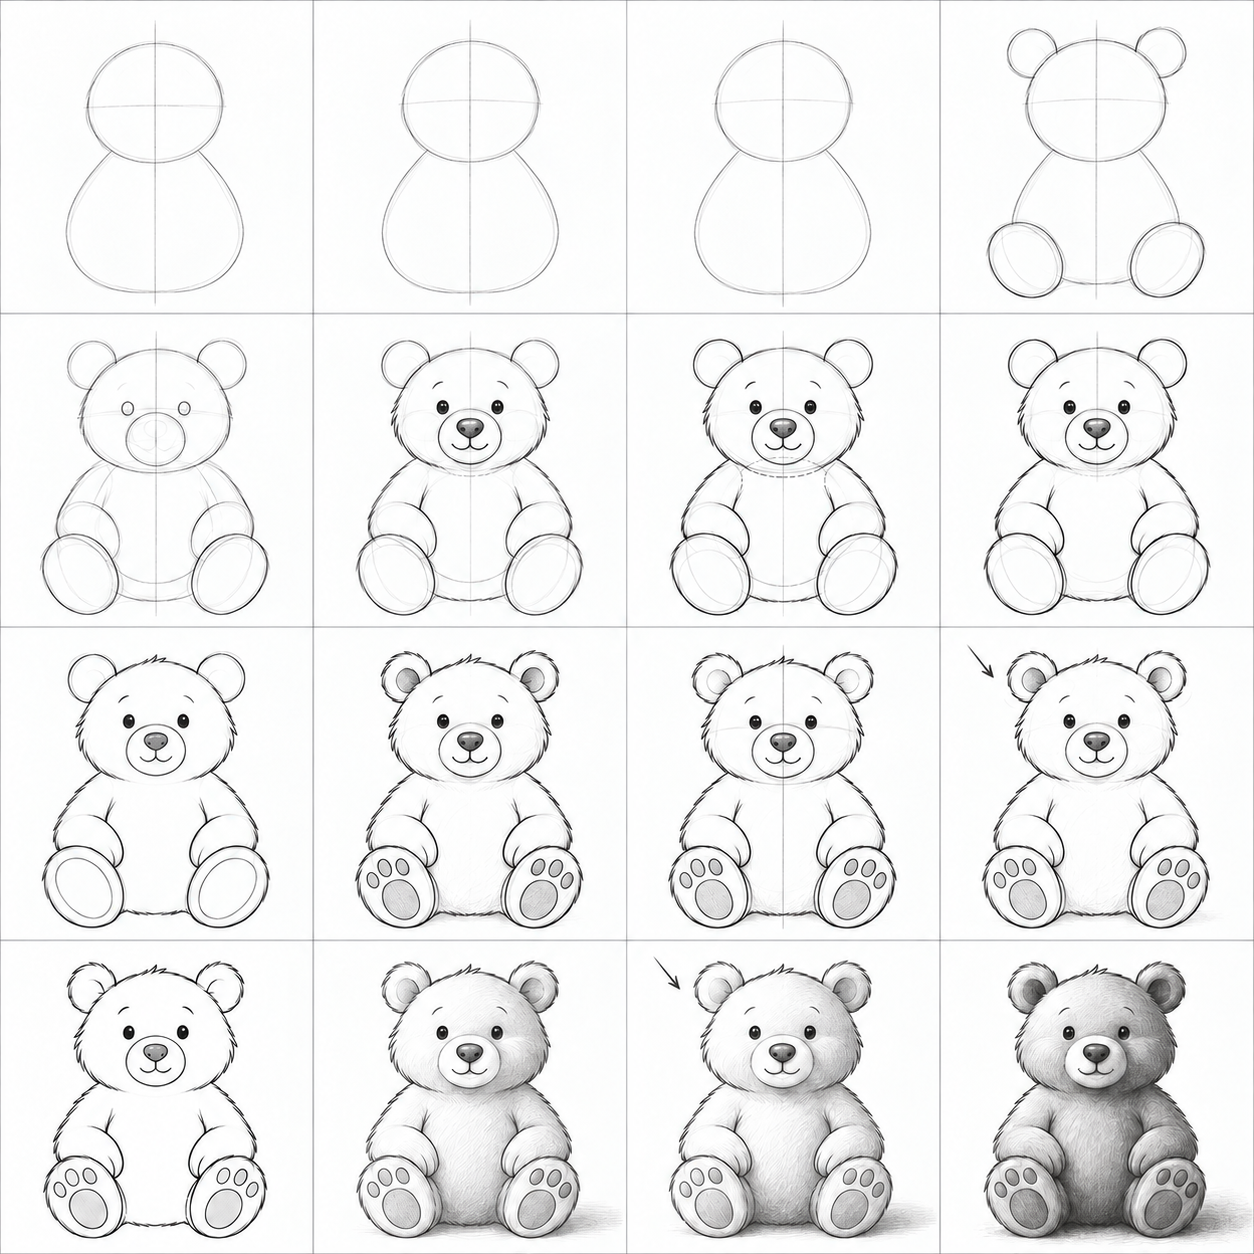
Goal and preparation
Learn to choose a joined silhouette over circles and ovals, then remove hidden edges. The detailed route preserves light and shows grounded volume. Use paper, an HB/2B pencil and an eraser. Start with rough circles, ovals and curves. Allow roughly 25–50 minutes with breaks; around age 7 is a suggestion, not an ability rating. Simplify by choosing the first route without pads or shading; extend by solving all three new conditions at the end.
Technique 1. Construction and overlap
A guide establishes mass, not a compulsory final edge. Choose the front of two intersecting circles and erase the covered rear arc. Bend an arm using two ovals and select a joined outside contour. Check: the rear edge stops at the front form and inner construction seams disappear. For a sole, establish the large oval tilt before aligning its pad.
Technique 2. Light and shadow
Use this in the detailed route. On a sphere choose upper-left light, preserve white, add a faint right-hand tone and deepen the lower right with another layer. A ground shadow touches the sphere and extends away from light. Check: can you distinguish light, midtone, own shadow and cast shadow? If everything is grey, lift the light area instead of darkening the whole outline.
Warm-up
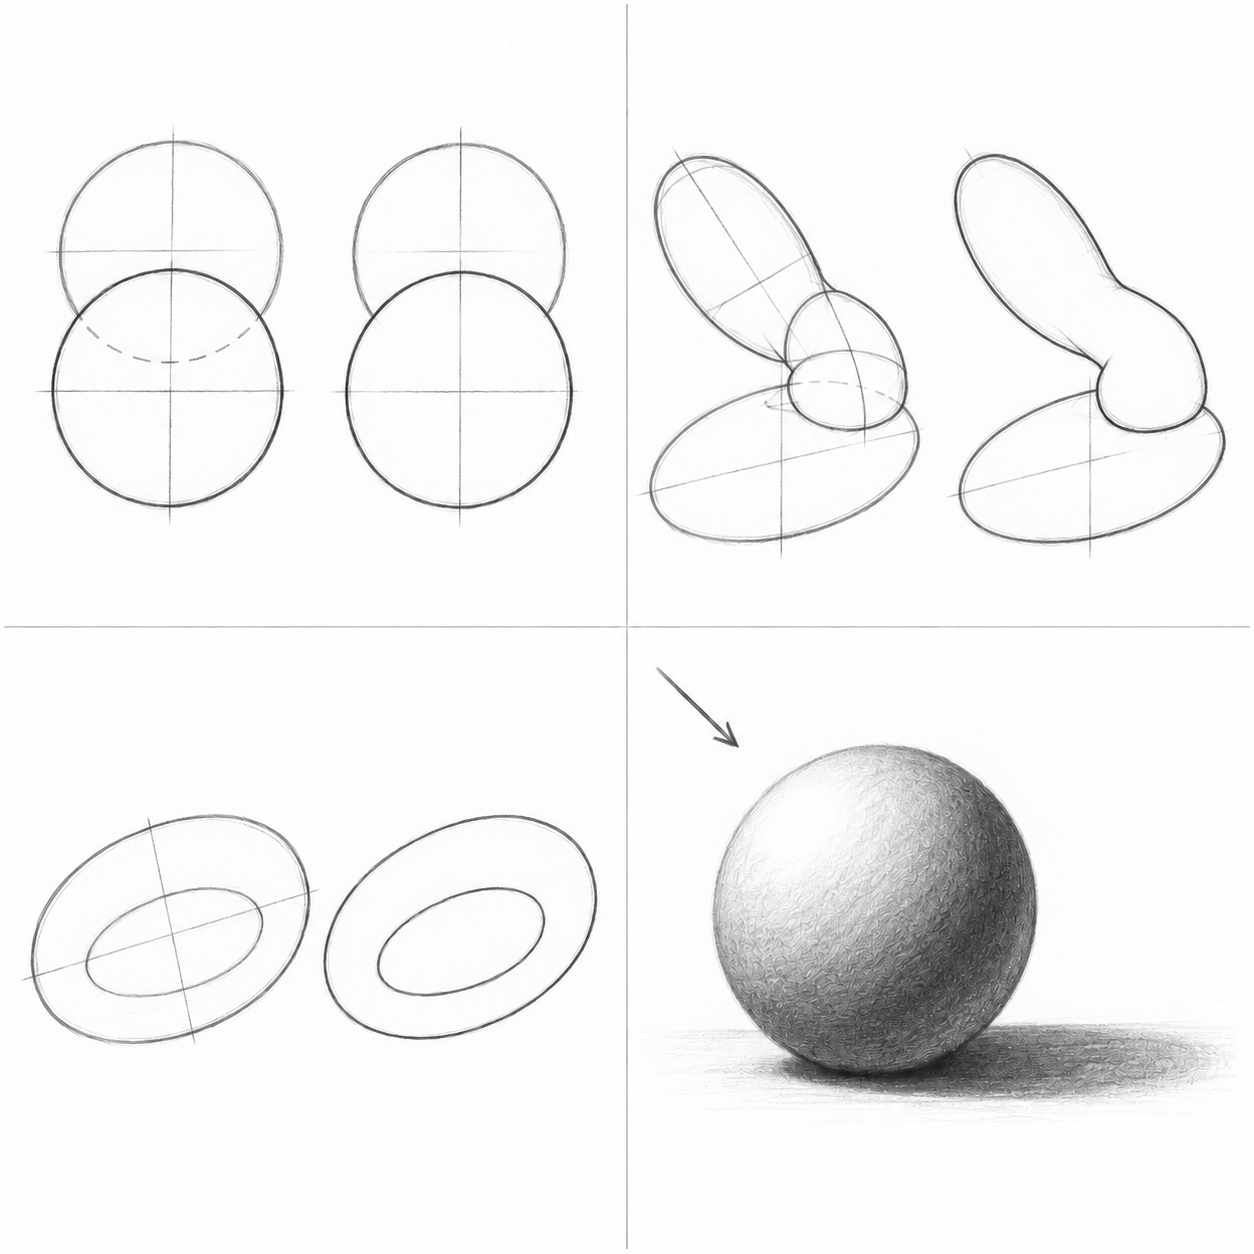
Name the hidden edge.
Join shoulder and hand through the bend.
Align the two oval tilts.
Find light and both shadows.
Try these on your own paper: swap the front circle, join two arm ovals, and rotate a sole together with its pad. For the detailed route, add a sphere with light and a ground shadow. Each time name an erased line or a paper area kept white.
Step 1. Place head and body
Trial
After checking
Trial
After checking
Trial
After checking
Simplest: Lightly place a head circle above an oval torso, overlapping its top. Leave room below for both feet.
A little more detail: Place a head and pear-shaped torso. Use a light centre axis and leave space beside the body for bent arms.
Best version: Compare head and torso widths. A vertical axis places the nose over the belly centre rather than to one side.
Why: Large masses establish space and proportions before eyes or fur. Axes are temporary, not seams.
Check: Is the head above the torso, with room for both feet?
Repair: Lighten only the oversized oval and move its edge; do not reinforce the wrong trial.
Step 2. Place ears and feet
Trial
After checking
Trial
After checking
Trial
After checking
Simplest: Add two round ears behind the head and two foot ovals below. Leave some belly visible between the feet.
A little more detail: Place ears and tilted sole ovals. Their broad faces turn towards us; both feet share a ground level.
Best version: Check the ears against the head, then the tilt and width of the soles. Lightly mark each sole’s long axis.
Why: Ears sit behind the head; feet sit in front of the torso. The oval tilt directs the sole before pads are added.
Check: Do both feet share a ground level, with ears attached behind the head?
Repair: Move only one foot base or reduce one ear, preserving the head.
Step 3. Join the forms
Trial
After checking
Trial
After checking
Trial
After checking
Simplest: Choose cheek and shoulder contours over the guides. Bring the outer arms towards the feet; do not trace the entire head circle.
A little more detail: Take the arm from shoulder to elbow, then turn towards the hand above the knee. Two short ovals help find the bend, but should not remain separate beads.
Best version: Build the same bent arms, soft cheeks and projecting muzzle. Align eyes on one light curve and put the nose at the muzzle centre.
Why: Select a contour over the scaffold. The turn at the elbow bends the arm; closed guide ovals are not finished limbs.
Check: Are shoulder, elbow and hand connected without an angular step? Is the detailed muzzle on the face?
Repair: Lighten one elbow corner and join it with a short curve; keep the rest of the pose.
Step 4. Erase hidden edges
Trial
After checking
Trial
After checking
Trial
After checking
Simplest: Find the upper torso curve inside the head. The left trial emphasises it for diagnosis. Erase it and the ear arcs covered by the head.
A little more detail: Follow the torso top into the head and the foot tops into the hands. Erase only the parts hidden by head and forepaws.
Best version: Remove the same covered curves. Keep foreground hand and muzzle edges, and exposed parts of the rear forms.
Why: An opaque foreground form hides a rear edge. The diagnostic line shows what to find, not an error you must copy.
Check: Does the torso stop at the head, and the foot at the hand, with foreground edges intact?
Repair: If you erased too far, restore only the short visible end up to the foreground edge.
Step 5. Construct muzzle and pads
Trial
After checking
Trial
After checking
Trial
After checking
Simplest: At the face centre add a small oval muzzle, nose, two short mouth curves and dot eyes above. Keep the soles plain.
A little more detail: Place nose and mouth on the projecting muzzle. A light curve aligns the eyes; keep the nose above the mouth centre. Pads come in the next step.
Best version: Clarify muzzle side planes and inner ear curves. Align pads with the soles; a few short cheek tufts replace a continuous fringe.
Why: Details belong to surfaces: the muzzle centre directs nose and mouth; the sole axis directs its pad. Details should not change the seated pose.
Check: Is the nose over the mouth centre? Does each large pad fit its sole and share its tilt?
Repair: Erase only a misplaced nose or rotate one pad oval; retain the whole foot.
Step 6. Check edges or choose light
Trial
After checking
Trial
After checking
Trial
After checking
Simplest: Add the inner edge of each forearm, stopping at the foot. Distinguish arm edges from the belly.
A little more detail: Construct one large oval pad inside each sole and smaller pads along its upper curve, following the sole tilt. Add inner ear curves and check elbows; no shading is needed.
Best version: Erase used axes. Choose upper-left light and reserve white paper on upper-left head, muzzle and belly. The light arrow in later pairs is a temporary teaching guide.
Why: Line routes refine construction. The detailed route now prepares light: preserve white paper before heavy pressure makes it difficult to recover.
Check: Do edges stay on their own forms? Do all detailed-route light areas face one source?
Repair: Shorten one escaped endpoint; for misplaced light move only the faint reserve boundary before shading.
Step 7. Remove guides or add midtone
Trial
After checking
Trial
After checking
Trial
After checking
Simplest: Erase head axis, trial ovals and remaining inner seams. Keep cheeks, face and arm boundaries.
A little more detail: Remove face axes and elbow and sole supports. Chosen contours remain while closed construction circles disappear.
Best version: Use the pencil side for a faint layer on right-hand head, body and paws. Curve strokes around the forms, keeping upper-left paper white. Add a light ground shadow extending right from the feet.
Why: Removing guides completes a line drawing. In the detailed route, midtone describes surfaces turned away from light; the cast shadow lies on the ground, not the belly.
Check: Are guides gone without broken contours? Does the detailed route show white and light grey, with ground shadow touching feet?
Repair: Restore only an accidental gap. Lift an accidentally shaded light area gently with an eraser, without rubbing the entire drawing.
Step 8. Finish your route
Trial
After checking
Trial
After checking
Trial
After checking
Simplest: Accent the nose and two or three foreground joins. Keep the remaining line light; this bear does not need shading.
A little more detail: Accent pupils, nose and selected joins under hands and muzzle. Keep soles clear rather than filling every pad equally.
Best version: Build a second layer on lower-right surfaces and contact points under the feet. Soften the cast shadow as it extends right. Remove the arrow and reserve boundaries; add no new features.
Why: An accent clarifies an overlap. Volume uses light, midtone and own shadow; contact shadow connects the bear with the ground.
Check: Were all details constructed first? Is light upper left, darker tone lower right and cast shadow right of the support?
Repair: Lighten a heavy black outline or lift the light area. Deepen a surface within the form rather than its entire rim.
If the drawing is unclear
The head looks transparent. Cause: The upper torso arc remains inside the head. Repair: Erase only that arc between the head edges.
The arm looks like beads. Cause: Guide ovals were traced as closed contours. Repair: Choose a joined shoulder/elbow contour and erase the inner seam.
A pad slipped off the sole. Cause: Its axis ignores the foot tilt. Repair: Rotate only the pad and keep a white margin around it.
The whole bear is equally grey. Cause: The first layer covered the reserved light. Repair: Lift tone at upper left; deepen only lower-right surfaces.
The bear floats above the shadow. Cause: The cast shadow is detached from contact points. Repair: Join it to the feet and deepen the narrow contact area.
Independent tasks
Choose one new condition. Draw your own supports before comparing with the example. A new pose does not require all details of the most detailed route.
1. Turn the head to three-quarter view
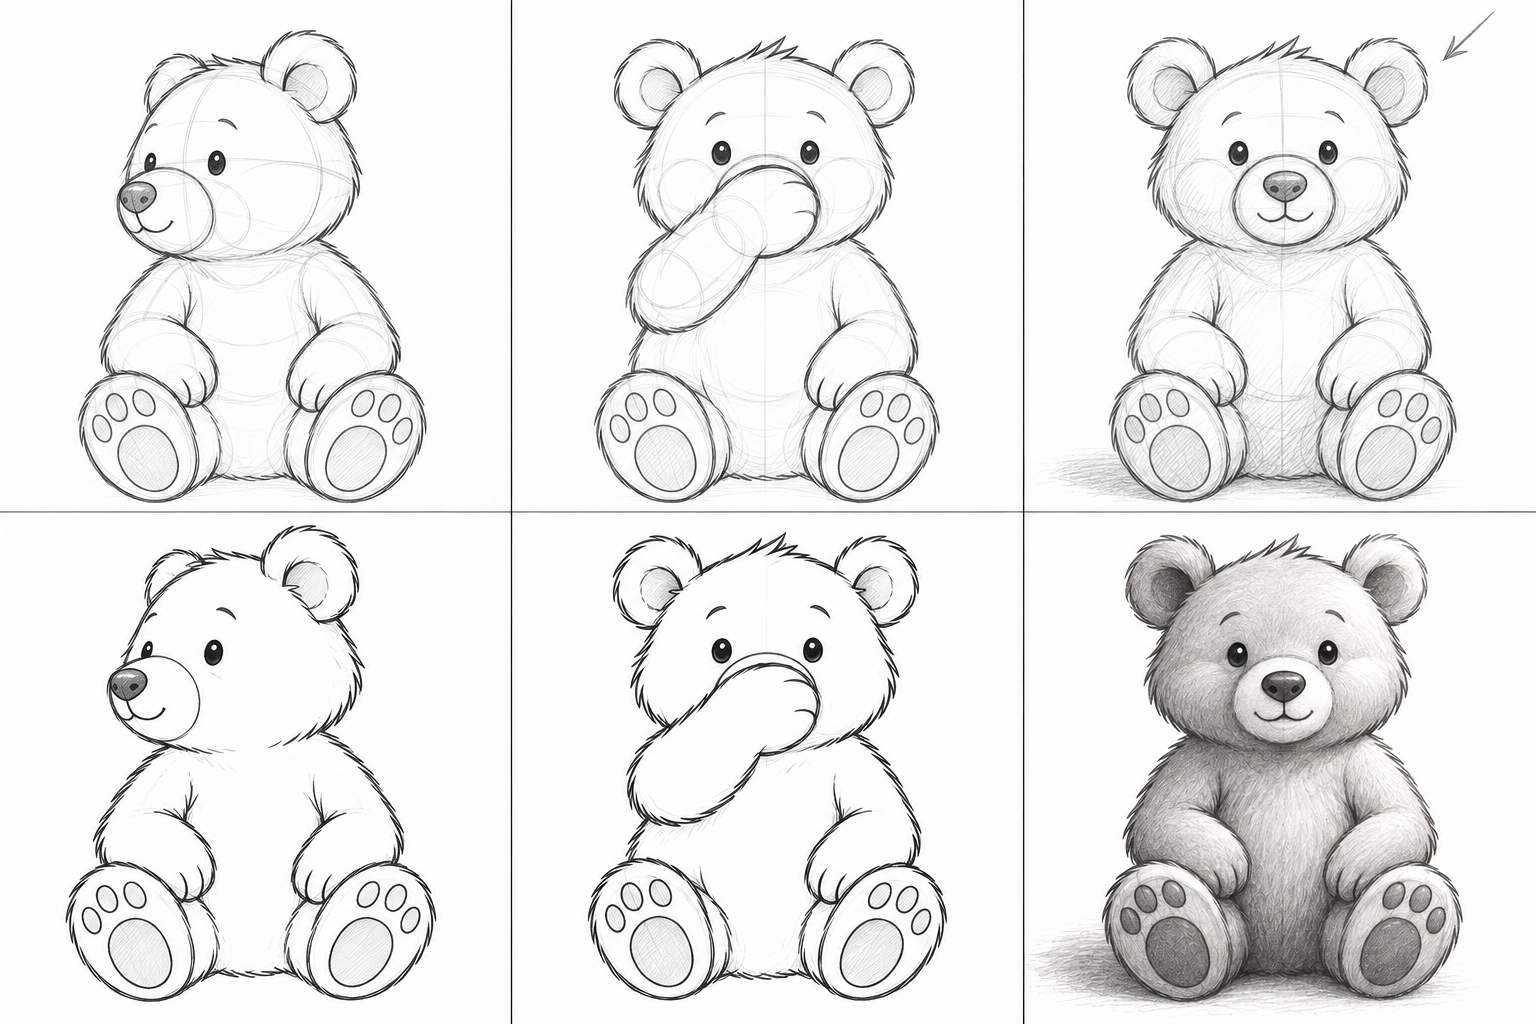
Keep the seated body but turn the head left. Curve the new face centre and project the muzzle left. Decide which far-ear edge the head covers before adding details.
Why: The face centre no longer matches the circle centre because the front plane has turned.
Check: Is the far ear partly hidden, with the nose following the new axis rather than the old vertical?
Repair: Move only the muzzle axis and erase the covered far-ear edge.
2. Raise a paw in front of the face
Raise one forepaw across the belly towards the muzzle. Two ovals establish its bend. Name and erase only belly and muzzle edges now hidden by the paw.
Why: The overlap order changes: the paw is now in front of the face, not only above the knee.
Check: Does the paw connect to the shoulder, without a covered mouth line crossing it?
Repair: Restore only the exposed mouth endpoint and remove its continuation inside the paw.
3. Move the light to the upper right
Return to the familiar pose with upper-right light. Reserve the new light area first; put midtone and own shadow lower left and cast the ground shadow leftwards.
Why: The forms stay the same but different surfaces face the source. The old tonal pattern cannot be reused.
Check: Is white upper right, darker tone lower left, with cast shadow touching the feet?
Repair: Lift tone on the right and add a faint left-hand layer, preserving the contour.
Self-check
Point to one erased hidden edge, one used guide and your chosen new decision. For shading, explain the source, own shadow and cast shadow.
Question: why does raising a paw change the visible muzzle? Answer: the paw becomes a foreground form hiding a new section, so facial lines stop at its edge. Moving light changes the light area and shadow direction, not merely outline darkness. Uneven lines and your own proportions are welcome.
What to draw next
All drawing lessons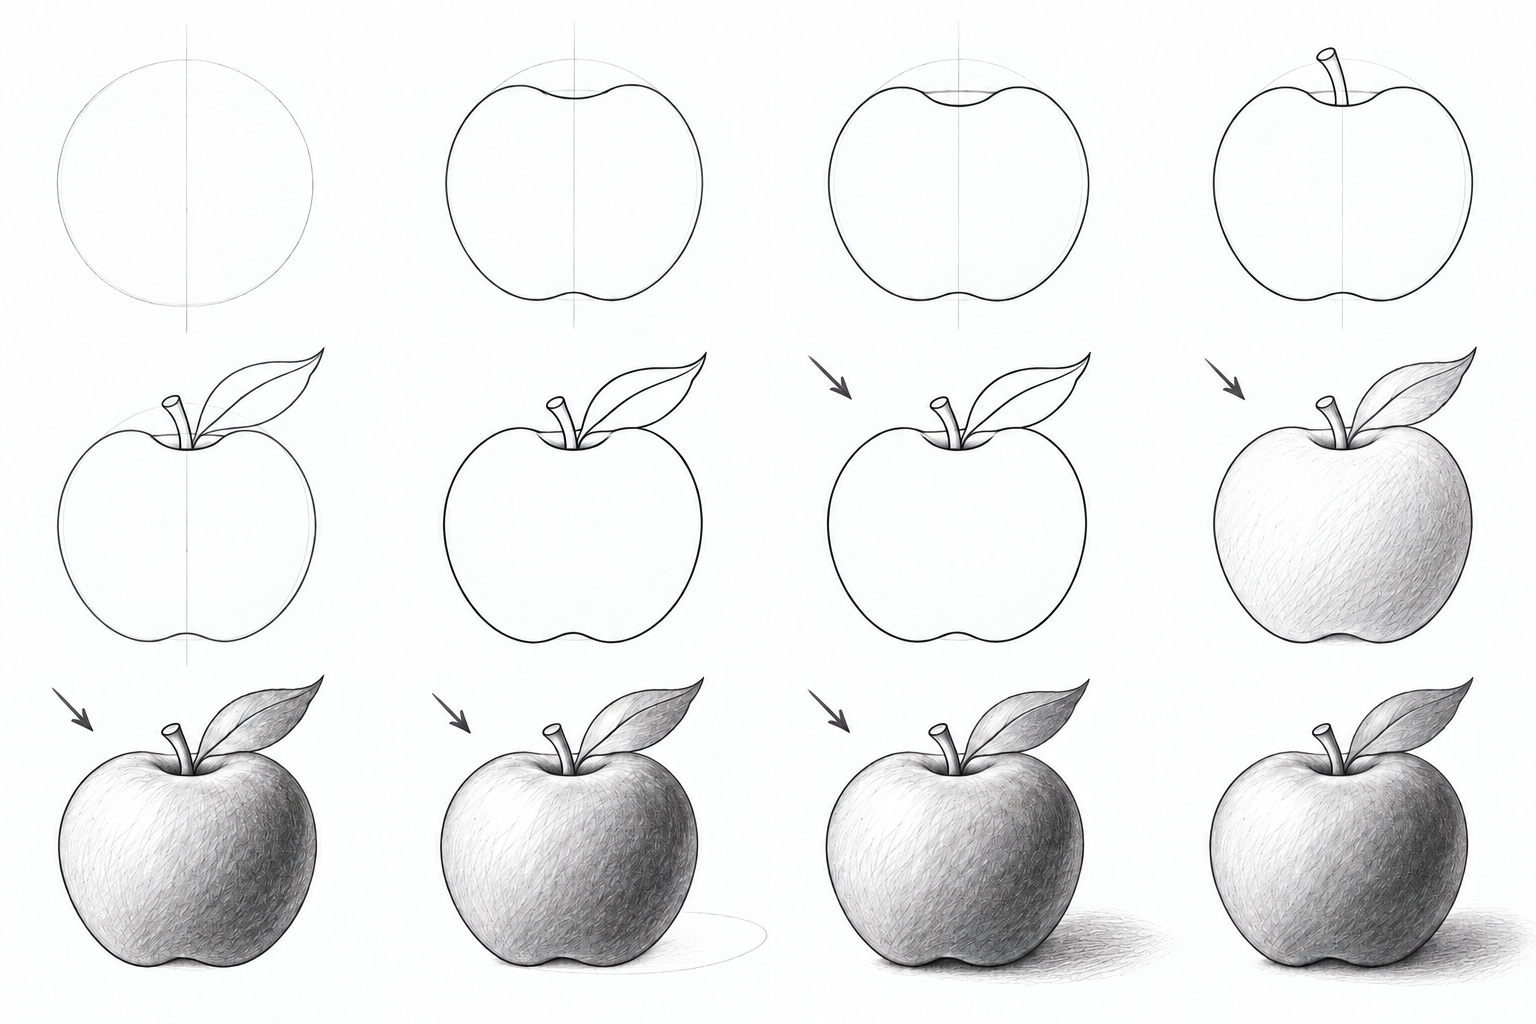 3 levels
How to draw an apple
Draw an apple at three levels: simple forms, a recessed top and bent leaf, then pencil light and shadow. Clear stages, small repairs and A4/Letter PDFs.
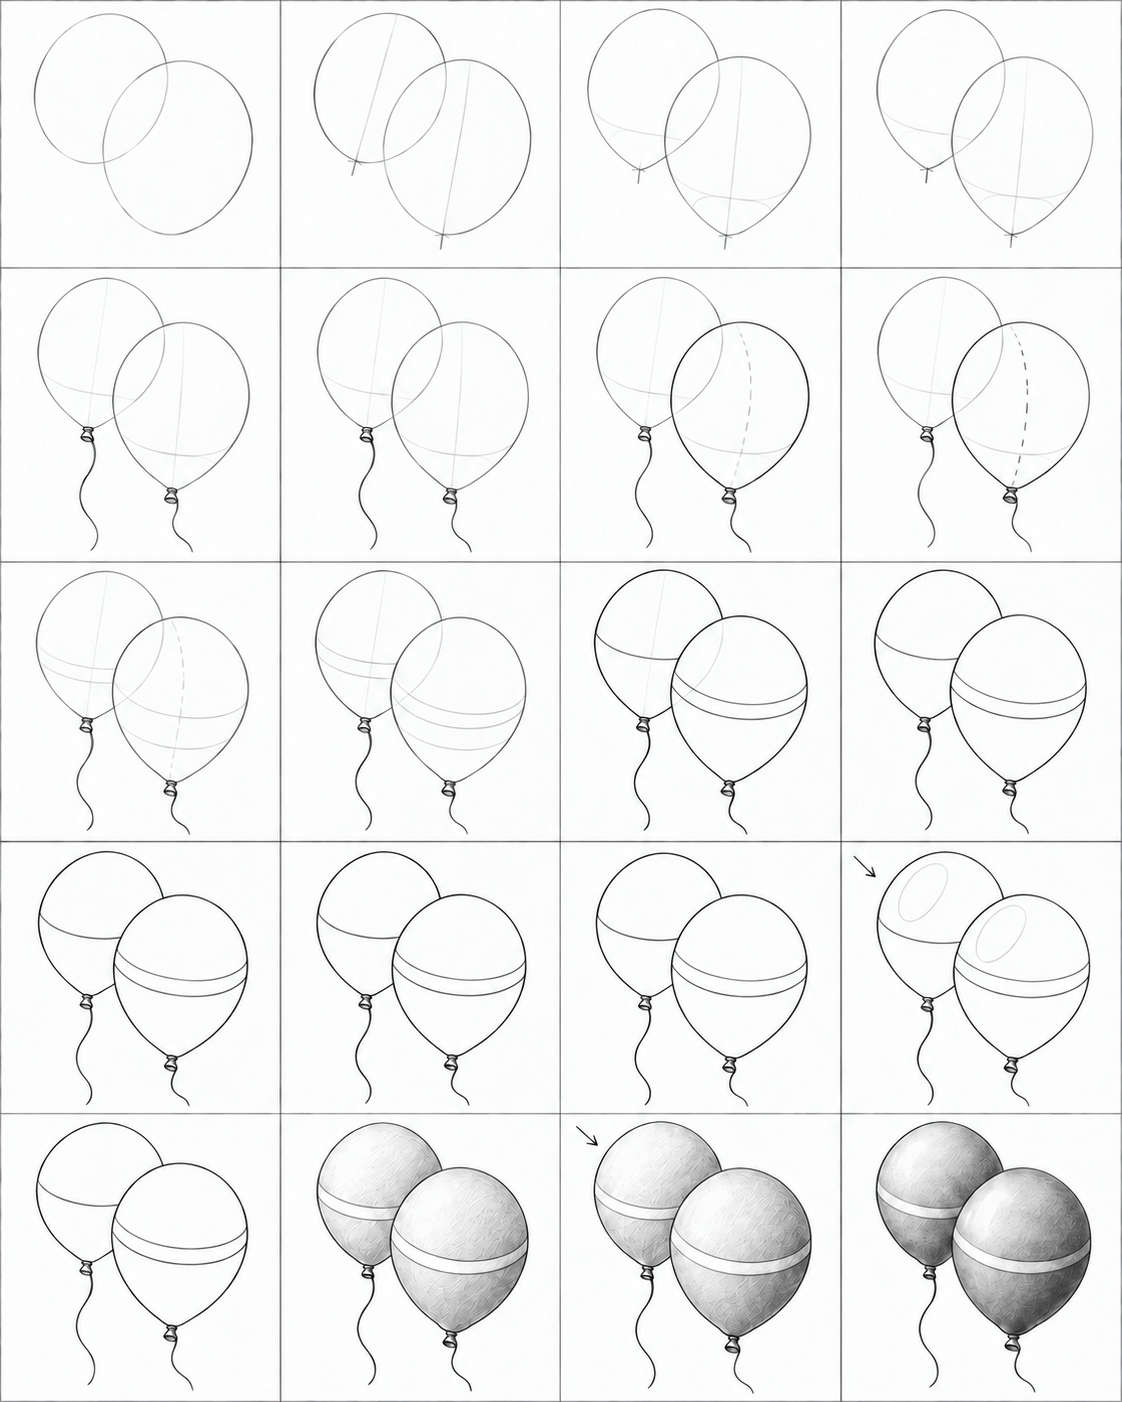 3 levels
How to draw balloons
Three balloon drawing routes, from two simple ovals to tapered necks and pencil volume. Illustrated steps, checks, small repairs and practice PDFs.
 3 levels
How to start drawing in pencil
Learn to construct simple forms, erase hidden edges and draw thickness, weaving and shading. Three levels, illustrated steps and A4 PDFs.