kiduverse
How to make a modeling clay apple
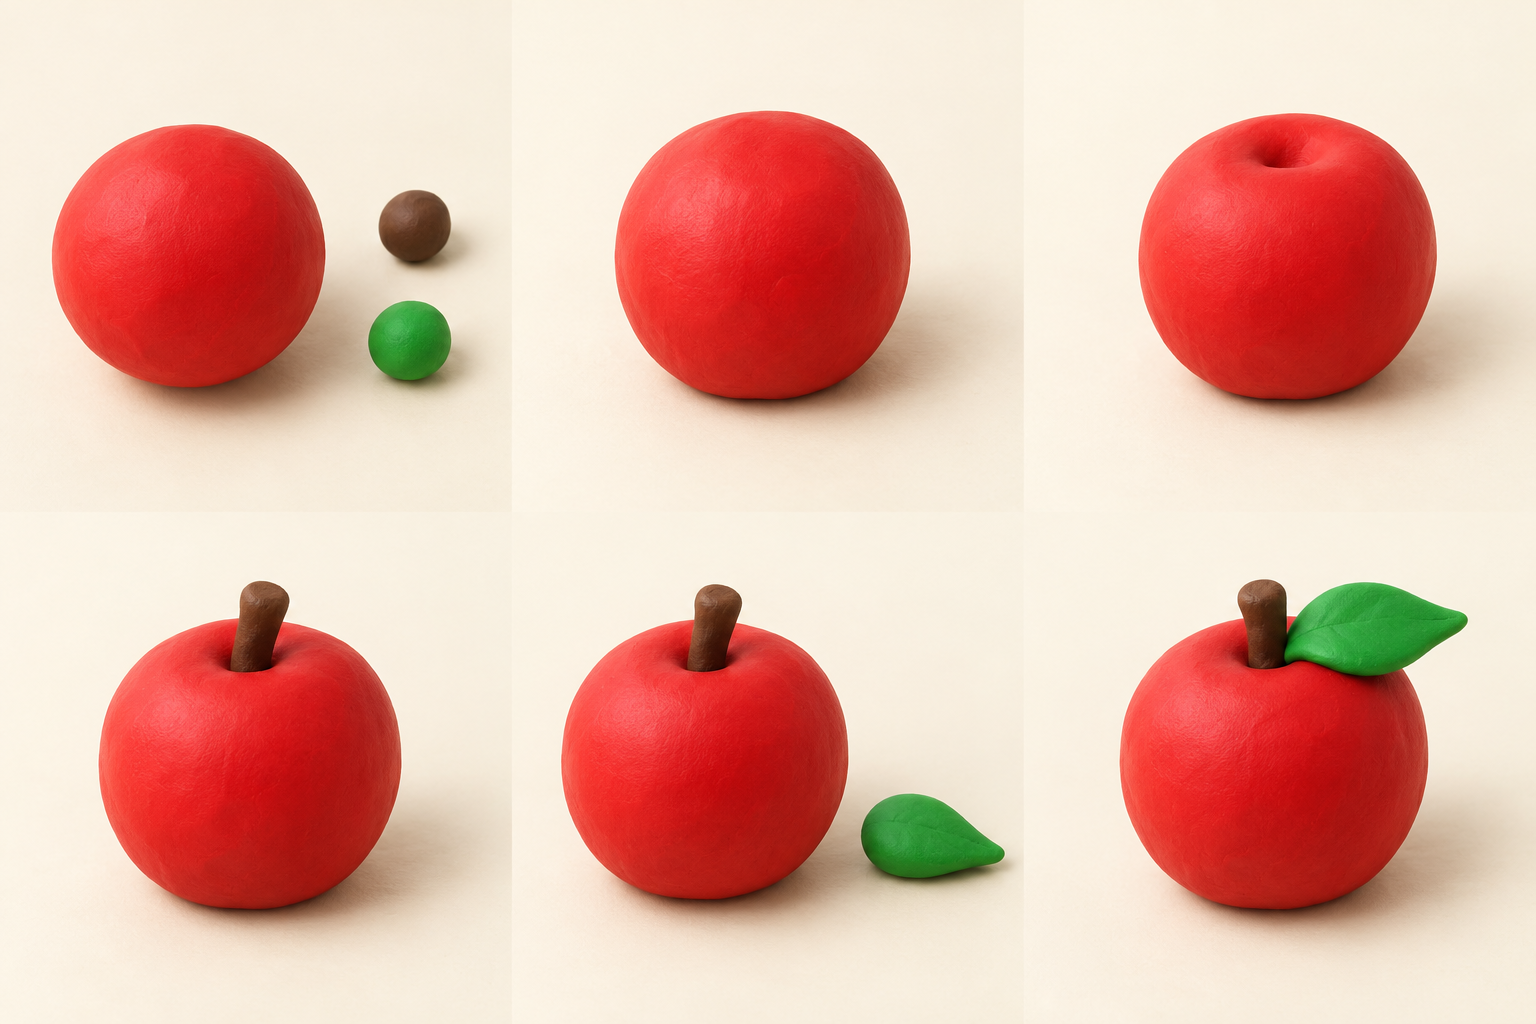
Roll a red ball and flatten its bottom slightly. Press a shallow dimple into the top. Seat a short brown stem in it, then press the broad end of a thick green leaf onto the apple beside the stem.
- About ages 4–8 · help as needed
- 15–20 minutes · estimate
- 6 steps · beginner level
- Shallow indentation and broad joins
Materials and a little practice
- Soft ordinary non-drying modeling clay: red, a little brown and green.
- A modeling board or washable mat.
- A cloth for hands.
Use ordinary non-drying modeling clay (plasticine). Do not dry or bake it. Air-dry and oven-bake clays need different methods. No wire, toothpicks, glue or sharp tools are needed. An adult stays nearby; keep clay out of mouths. The apple is a model, not food.
A ball, a short cylinder and a flattened teardrop become a small apple. Practice making a hollow without crushing the whole shape, then join a leaf across a broad patch. The leaf rests on the fruit so its weight does not pull on the stem.
Warm up on a spare ball: hold it loosely in one palm and press a fingertip gently into its top. Stop at a shallow dip, then smooth it closed and repeat. Compare a light press with a deeper one.
Modeling clay apple: step by step
1 Reserve three colors
Knead each color separately. Roll one large red ball and two much smaller balls, brown for the stem and green for the leaf.
Why: Portioning first leaves enough clay for each part.
- Check
- Three soft separate balls; red is much larger.
- If it needs fixing
- Warm firm clay in your palms and knead it before rolling.
2 Make a stable body
Roll the red ball between your palms. Set it on the board and press down very lightly to make a small flat patch underneath. Keep the sides round.
Why: A small flat bottom keeps the apple from rolling.
- Check
- The body stands on the board and is still nearly round.
- If it needs fixing
- If it becomes a pancake, gather it into a ball and press less.
3 Press a shallow dimple
Support the red body in your palm. Press one fingertip gently into the top center, making a wide shallow dip. Stop before the sides bulge.
Why: Supporting the body lets you indent one small area.
- Check
- The top has a visible dip; the apple has no hole through it.
- If it needs fixing
- Smooth a deep hole closed with red clay and press again more lightly.
4 Seat the short stem
Roll the brown ball into a short thick cylinder. Press its lower end into the dimple. Smooth a little red clay toward its base while supporting the apple.
Why: A short stem with a pressed-in base is easier to hold in place.
- Check
- The stem stays upright and its base does not lift when touched lightly.
- If it needs fixing
- Shorten a bending stem by pressing its ends together; reseat its broad base.
5 Shape a thick leaf
Roll the green ball into a teardrop by rolling one end more lightly between your fingers. Flatten it gently on the board. Keep a rounded broad base, pointed tip and thick edge.
Why: A thick teardrop leaf has enough clay for a broad attachment.
- Check
- One small leaf is separate beside the stemmed apple; its edges do not tear.
- If it needs fixing
- Gather a torn thin leaf into a ball and flatten the next teardrop less.
6 Join the leaf and check
Rest the leaf on the upper red shoulder beside the stem, tip pointing out. Press its broad end onto red clay and smooth the join edge. Lift the model from underneath, then set it down.
Why: The apple supports the leaf; a broad pressed patch holds it in place.
- Check
- The apple stands, the stem stays seated and the leaf join remains closed.
- If it needs fixing
- Remove a loose leaf, knead its base and the joining patch, then press them together again.
Fix common mistakes
The apple rolls over
Hold the sides and press the bottom lightly against the board. Keep a small flat patch rather than squashing the whole ball.
Back to step 2The leaf falls off
Make the leaf thicker. Press its broad end onto the red shoulder beside the stem and smooth that edge into the red clay.
Back to step 6Make a second fruit independently
Without the pictures, make a yellow or green apple. Choose a smaller leaf and decide how much to flatten the bottom. Check that it stands and both joins hold. What changed when you pressed more gently?
With help
An adult portions the clay and supports the apple while the child makes the shallow dip and presses on the leaf.
More independently
Make two apples with different leaf sizes. Compare their broad attachment patches and test which joins stay closed.
Printable modeling guide: A4 PDF
Two pages with materials, all six pictures, actions and checkpoints. Print the guide to work without a screen. A4 at 100% scale.
Download PDF · 2 pagesQuestions about this lesson
How do I stop the apple from rolling?
Flatten a small patch underneath by gently pressing the ball against the board. Keep its sides round.
How do I attach the stem without a toothpick?
Use a short thick clay cylinder. Press its lower end into the shallow dimple and smooth a little red clay toward its base.
Why does the leaf tear?
It may be too thin or held only at the stem. Roll a new teardrop, flatten it less and support its broad end on the apple shoulder.
Should I dry or bake the apple?
Ordinary non-drying modeling clay stays soft. Keep the model away from heat; this lesson includes no drying or baking.