kiduverse
How to make a modeling clay mushroom
Roll three balls. Shape the cream ball into a short thick stem, the brown ball into a domed cap and the green ball into a broad base. Press the cap onto the stem, then join the stem to the base. Check that the mushroom stands straight.
- About ages 4–8 · help as needed
- 15–25 minutes · estimate
- 6 steps · beginner level
- Controlled rolling and broad joins
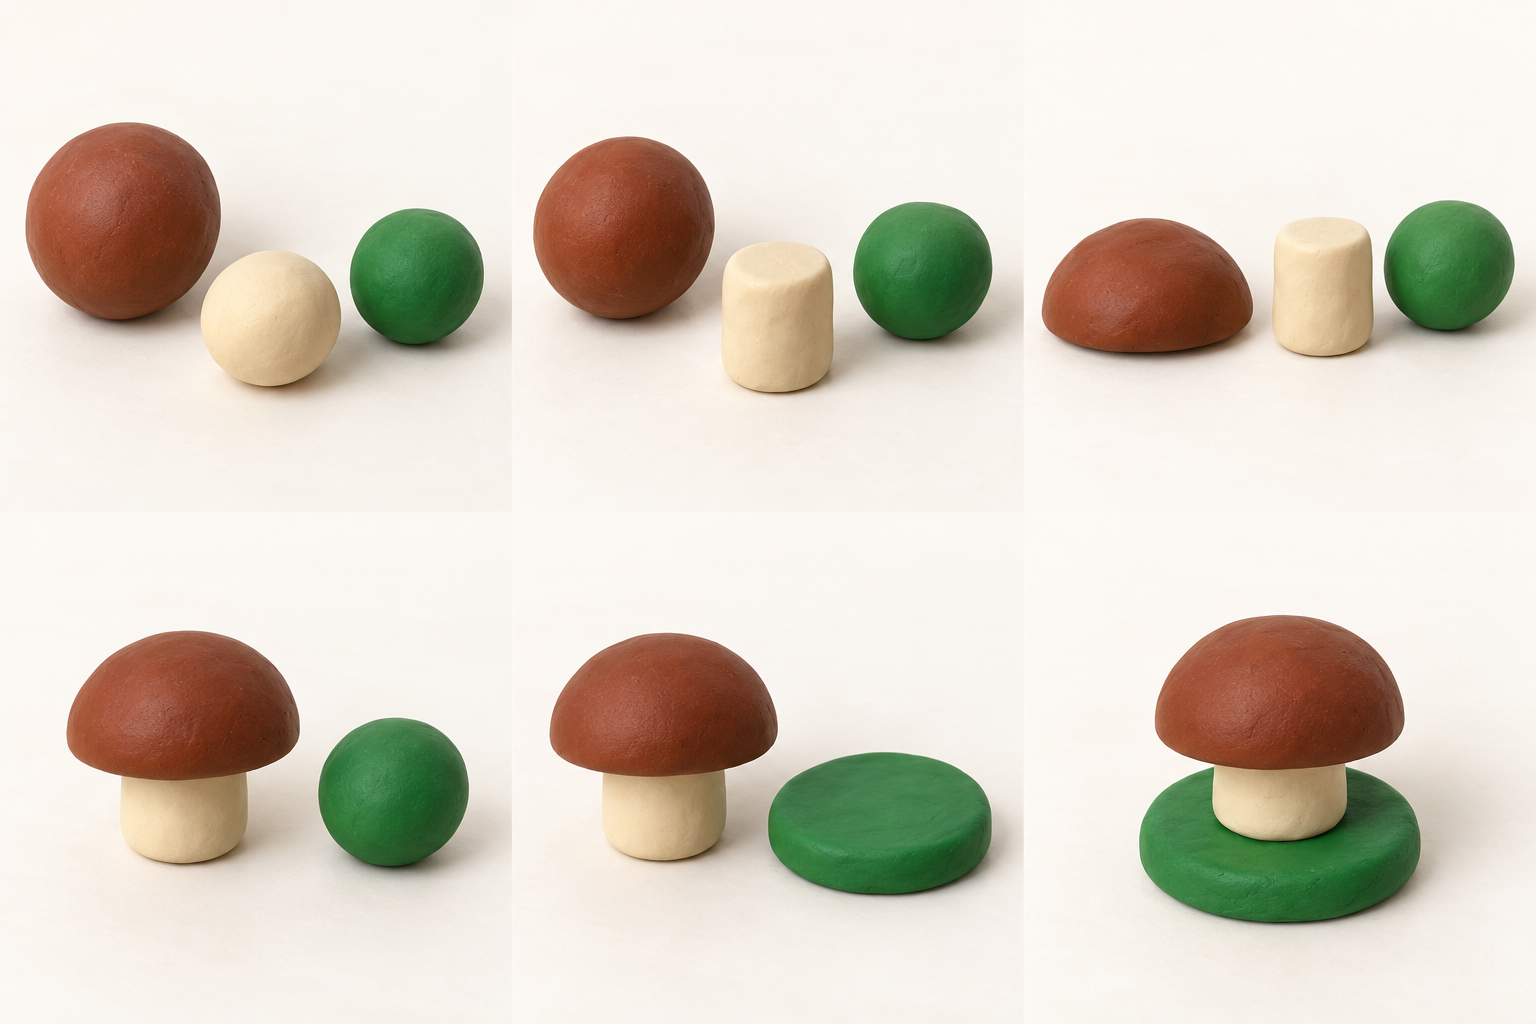
Materials and a little practice
- Soft ordinary non-drying modeling clay: brown, cream and green.
- A modeling board or washable mat.
- A cloth for hands and a level place for the model.
Use ordinary non-drying modeling clay (plasticine). Do not dry or bake it. Air-dry clay, lightweight drying compounds and oven-bake clay need different methods. No toothpicks, wire or glue are needed here. An adult stays nearby; keep clay out of mouths.
Start with three balls to make a mushroom with a plain brown cap. Its large parts need no decorations or internal frame. Practice rolling a short cylinder and joining soft clay by pressing broad surfaces together. Choose your own colors if you like.
Warm up by rolling a small ball back and forth on the board with two or three short palm movements. Watch it become a thick sausage. Avoid pressing only in the middle, which makes a narrow waist. Keep the mushroom stem short so the heavy cap is easier to support.
Modeling clay mushroom: step by step
1 Prepare three balls
Knead each color separately. Roll a large brown ball for the cap, a smaller cream ball for the stem and a green ball for the base. Make the green ball about the size of the cream one.
Why: Dividing first reserves material for all three parts.
- Check
- There are three soft balls; the brown one is the largest.
- If it needs fixing
- Warm firm clay in your hands and knead it. Add clay to a very small cream ball before rolling.
2 Roll a short stem
Roll the cream ball back and forth on the board with short palm movements. Stop when the thick cylinder is about as tall as it is wide. Gently press both ends against the board.
Why: A short stem with flat ends provides broad joining surfaces.
- Check
- The stem stands alone, with flat top and bottom; it is not a thin stick.
- If it needs fixing
- Compress a long stem from its ends and roll again with less pressure. Smooth a narrow waist with your fingers.
3 Shape the cap
Set the brown ball on the board and press lightly with your palm. Smooth the edge with your fingers, keeping a rounded top, flat underside and thick rim. Make it about twice the stem width.
Why: A thick dome keeps its shape; its flat underside meets the stem.
- Check
- The cap is domed with no thin drooping rim. The stem and green ball are still separate.
- If it needs fixing
- Gather a thin pancake into a ball and press less. Pinch a crack together and smooth it.
4 Join cap and stem
Rest the cap rounded-side down in your palm. Place the flat top of the stem in the center of its underside. Press the stem slightly into the cap. Smooth the join edge with a finger, then turn the mushroom upright.
Why: Pressure across the whole stem end joins soft clay; touching alone is not enough.
- Check
- The cap is centered and the stem stays thick. A gentle sideways touch does not open the join.
- If it needs fixing
- Remove the cap and knead both joining patches. Flatten the broad stem end and press again without stretching the stem.
5 Press a broad base
Leave the mushroom beside you. Press the green ball onto the board with your palm to form a thick round disc slightly wider than the cap. Smooth the rim while keeping the underside flat.
Why: A broad level support helps the model stand without leaning.
- Check
- The base does not rock and has a thick intact rim. The mushroom is still separate.
- If it needs fixing
- Gather a thin rim toward the middle and press less. Level the underside against the board.
6 Attach and check the mushroom
Set the stem in the center of the base. Hold the stem at its sides, press it down and smooth its lower edge into the green clay. Do not push on the dome. Move the model by supporting the base underneath.
Why: A broad pressed join holds the stem; support underneath protects the shape.
- Check
- After moving, the mushroom stands straight, both joins stay closed and the cap does not slip.
- If it needs fixing
- Remove a leaning mushroom, shorten the stem and flatten its ends. Press it back into the center of a level base.
Fix common mistakes
The cap falls off
Knead both joining patches. Flatten and widen the stem top, press it into the center of the cap underside and smooth the join edge.
Back to step 4The mushroom leans
Shorten the stem by compressing its ends. Level its bottom against the board, place it in the middle of the broad base and press down.
Back to step 6Make a second mushroom independently
Without the pictures, make a second mushroom in another color with a slightly wider cap. Decide how wide its stem and base need to be. Move both models and compare their stability. What did you need to change?
With help
An adult divides the clay and helps join the cap. The child rolls the stem and presses the ball into a base.
More independently
Compare two cap widths. Adjust stem thickness and base width until both mushrooms stand straight.
Printable modeling guide: A4 PDF
Two pages with materials, all six pictures, actions and checkpoints. Print the guide to work without a screen. A4 at 100% scale.
Download PDF · 2 pagesQuestions about this lesson
How do I attach the cap to the stem?
No glue is needed. Knead the joining patches and press the broad flat stem top into the center of the cap underside. Smooth the edge as shown in step 4.
Why does the mushroom fall over?
The stem may be too long or uneven, the cap off-center or the base rocking. Shorten the stem, flatten its ends and center the joins.
Should I dry the mushroom?
Ordinary modeling clay stays soft. Keep the model on its base away from sunshine and heaters. This lesson does not include baking.
Can I add spots?
Yes, after checking the joins. Press small flat discs onto the cap while supporting it underneath. A plain cap is enough for the first model.