kiduverse
How to make a modeling clay turtle
Make a low oval shell and four equal thick feet. Tuck the broad ends of the feet beneath the shell and press the overlapping areas together. Add a short head and tail, with eyes if you like. Check that the turtle rests steadily on the board.
- About ages 4–8 · help as needed
- 20–30 minutes · estimate
- 6 steps · beginner level
- Flattening and broad joins
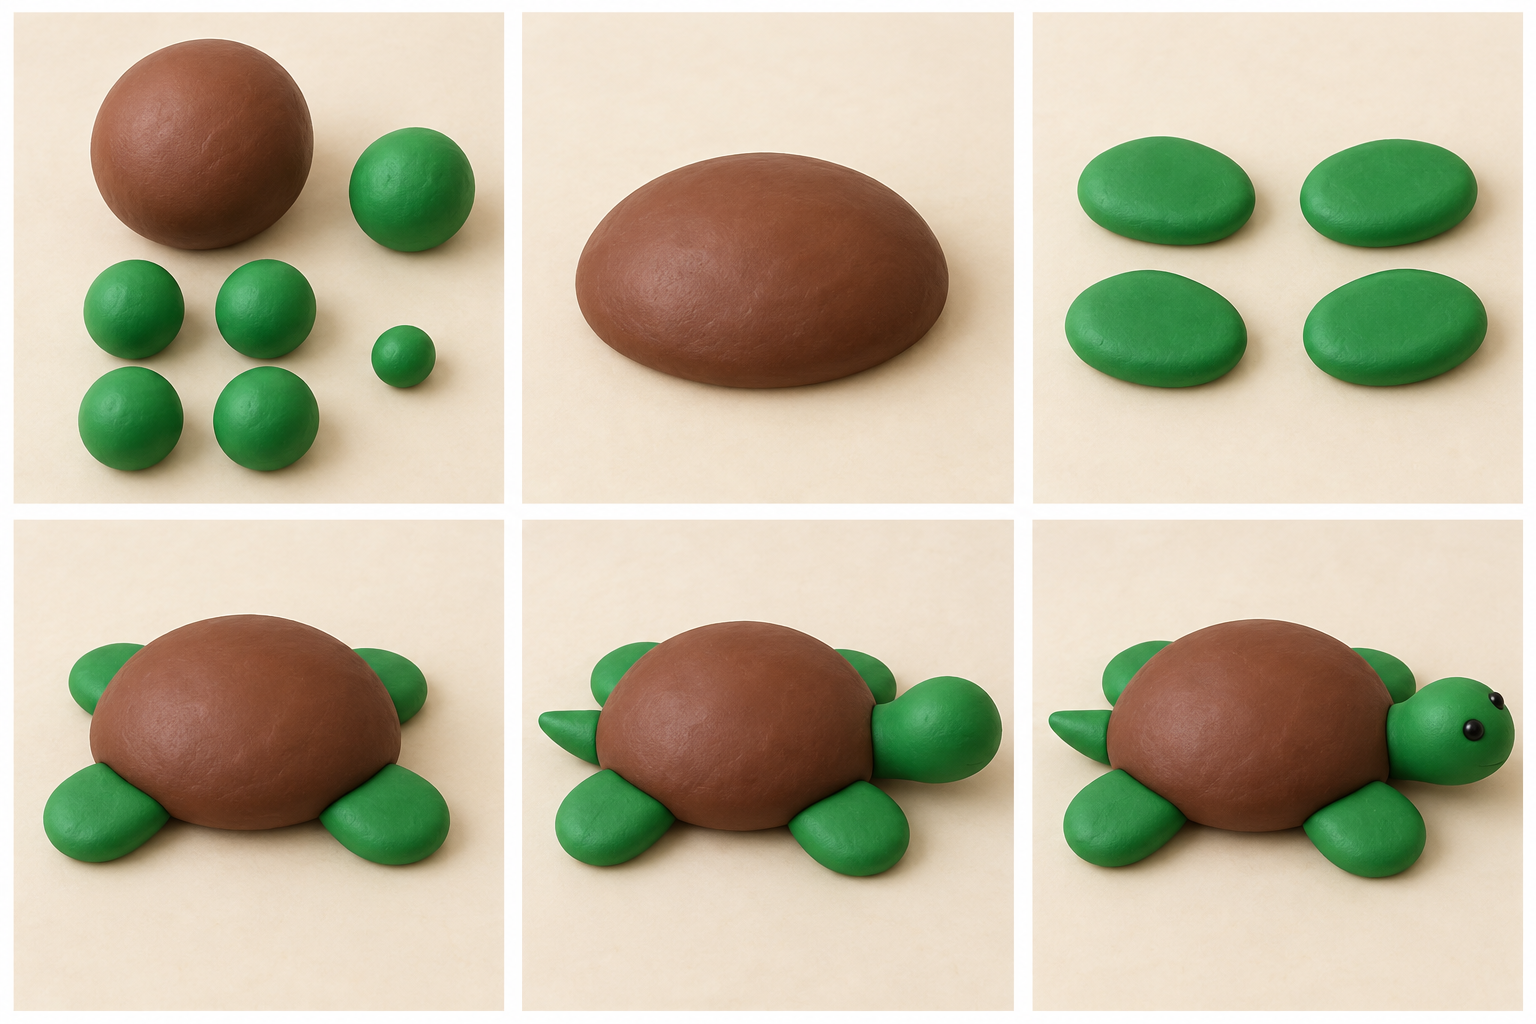
Materials and a little practice
- Soft non-drying modeling clay in two colors: one for the shell, one for feet, head and tail.
- A little black modeling clay for optional eyes.
- A board or washable mat and a cloth for hands.
Use ordinary non-drying modeling clay (plasticine): do not dry or bake it. Air-dry clay and lightweight drying compounds behave differently. This project needs no toothpicks, wire, glue or plastic eyes. An adult stays nearby; keep clay out of mouths. Leave off the eyes if tiny pieces are difficult for the child.
The turtle starts from simple shapes: a large ball for its shell, four small balls for its feet and separate pieces for the head and tail. The pictures use a brown shell and green parts. Choose other colors while keeping the proportions and broad joining areas. There is no separate body in this simple model: the feet, head and tail join to the flat underside of the shell.
Before starting, flatten two equal practice balls with the same gentle pressure. Feel their thickness: if one is thinner, roll it again and press more lightly. Then try joining the discs along broad edges. An overlapping pressed area holds better than two touching tips.
Modeling clay turtle: step by step
1 Prepare the balls
Knead each color separately. Roll one large brown ball for the shell. Make four equal green balls for the feet, one slightly larger green ball for the head and a small green ball for the tail.
Why: Dividing before assembly keeps feet equal and reserves enough material for the head.
- Check
- The four foot balls look similar in size; head and tail pieces are separate.
- If it needs fixing
- Compare the balls side by side. Move a little clay from a larger one to a smaller one and roll both again. Soften firm clay with your hands.
2 Shape a low shell
Set the large ball on the board and press lightly with your palm. Gently lengthen it into a thick oval dome with a flat underside. Do not flatten it into a thin pancake.
Why: A low shell puts less weight on the feet, while a flat underside gives a broad joining area.
- Check
- The top is rounded, the bottom flat; it is noticeably thicker than the feet will be.
- If it needs fixing
- If the shell is too thin, knead it back into a ball and press less. Lower an overly tall dome gently with your palm.
3 Flatten four equal feet
Press each of the four equal green balls lightly onto the board and lengthen it into a thick oval paddle. Use the same short gentle pressure. Set all feet together to compare them.
Why: Matching thickness helps all the feet rest on the same surface.
- Check
- There are four feet of similar length and thickness, with intact edges and no thin ribbons.
- If it needs fixing
- Roll a thin foot again and press less. Gently gather a longer foot toward its middle and smooth the edge.
4 Attach feet to the shell underside
Turn the shell flat-side up, supporting its dome in your palm. Flatten the inner end of a foot into a broad tab. Overlap about one third of the foot onto the shell underside; the rest sticks out. Press the tab into the brown clay with a finger and smooth its edge toward the shell. Attach two feet on each side, then turn the model upright.
Why: Pressure joins soft clay: a broad pressed tab holds better than a tip touching the shell side.
- Check
- Hold the shell and gently touch each foot: its base does not peel away. All four feet rest evenly on the board.
- If it needs fixing
- Remove a loose foot and knead its base and the joining patch on the shell. Widen the tab, overlap underneath again, press and smooth its edge.
5 Add a short head and tail
Shape the larger green ball into a short thick oval head. Narrow one end slightly and press it beneath the front shell edge, leaving the rounded head outside. Shape the small piece into a short thick pointed tail and attach it at the rear.
Why: Short parts with broad bases hold better than a long thin neck or threadlike tail.
- Check
- Head and tail point in opposite directions, their bases are joined and the head rests on the board.
- If it needs fixing
- If the head falls off, shorten the neck and widen its base. Knead a thin tail again and make it shorter and thicker.
6 Add eyes and check the joins
If you like, press two tiny black clay dots onto the head. Keep the shell plain. Carefully move the turtle, supporting it underneath with your palm, then set it back on the board.
Why: The final check shows whether the joins hold after moving the model.
- Check
- All four feet are attached, the head and tail stay in place and the turtle does not rock.
- If it needs fixing
- If a piece stays on the board, return to its join and widen the contact. Remove the eyes if needed: the shape still reads as a turtle.
Fix common mistakes
The turtle rocks
Compare foot thickness. Press an overly thick foot slightly against the board; remake a thin one from a ball, then attach its broad base.
Back to step 3A foot falls off
Turn the shell underside up. Soften the joining patch, flatten the foot base into a broad tab and overlap about one third of the foot onto the shell. Press with a finger and smooth the green edge toward the brown clay.
Back to step 4The head falls
Shorten a thin neck and widen its base. A low head can rest on the board; it need not stand upright.
Back to step 5Make a second turtle independently
Make a second turtle without the step pictures: choose different colors and a slightly wider shell. Decide how far its feet should stick out. Check both models after moving them and explain why a broad overlap holds better than touching tips.
With help
An adult divides the clay and helps compare feet. The child flattens balls and joins the pieces. Leave off tiny eyes if needed.
More independently
Compare a rounder shell with a more oval one. Keep four feet of matching thickness and a stable base.
Printable modeling guide: A4 PDF
Two pages with materials, all six pictures, actions and checkpoints. Print the guide to work without a screen. A4 at 100% scale.
Download PDF · 2 pagesQuestions about this lesson
How do I attach the feet to the turtle’s body?
The shell also serves as the body in this simple model. Turn it flat-side up. Flatten the foot base into a broad tab, overlap about one third of the foot onto the underside, press with a finger and smooth its edge toward the shell. No glue or toothpicks are needed. Step 4 gives the movements.
Can a three-year-old try this turtle?
Start with two practice discs and prepare the model pieces yourself. Help with joins and omit tiny eyes. Age is a guide: the child’s skills and keeping clay out of mouths matter more.
Does the head need a toothpick?
No. Keep the head short, give it a broad base and let it rest on the board. Shorten a thin neck instead of adding a frame.
Should I dry or bake the turtle?
Ordinary modeling clay stays soft. Keep the model on a board away from sunlight and heaters. This lesson does not describe oven-bake or air-dry clay.