kiduverse
How to make an origami corner bookmark
Fold one square of paper into a useful corner bookmark with a pocket that grips a page. This guide separates the diagonal, pocket, turn and tuck so a beginner can check every landmark and repair a loose flap.
- Paper15 × 15 cm square
- Steps9 illustrated actions
- LevelFirst folds
- ToolsPaper only
- Main skillPocket tuck
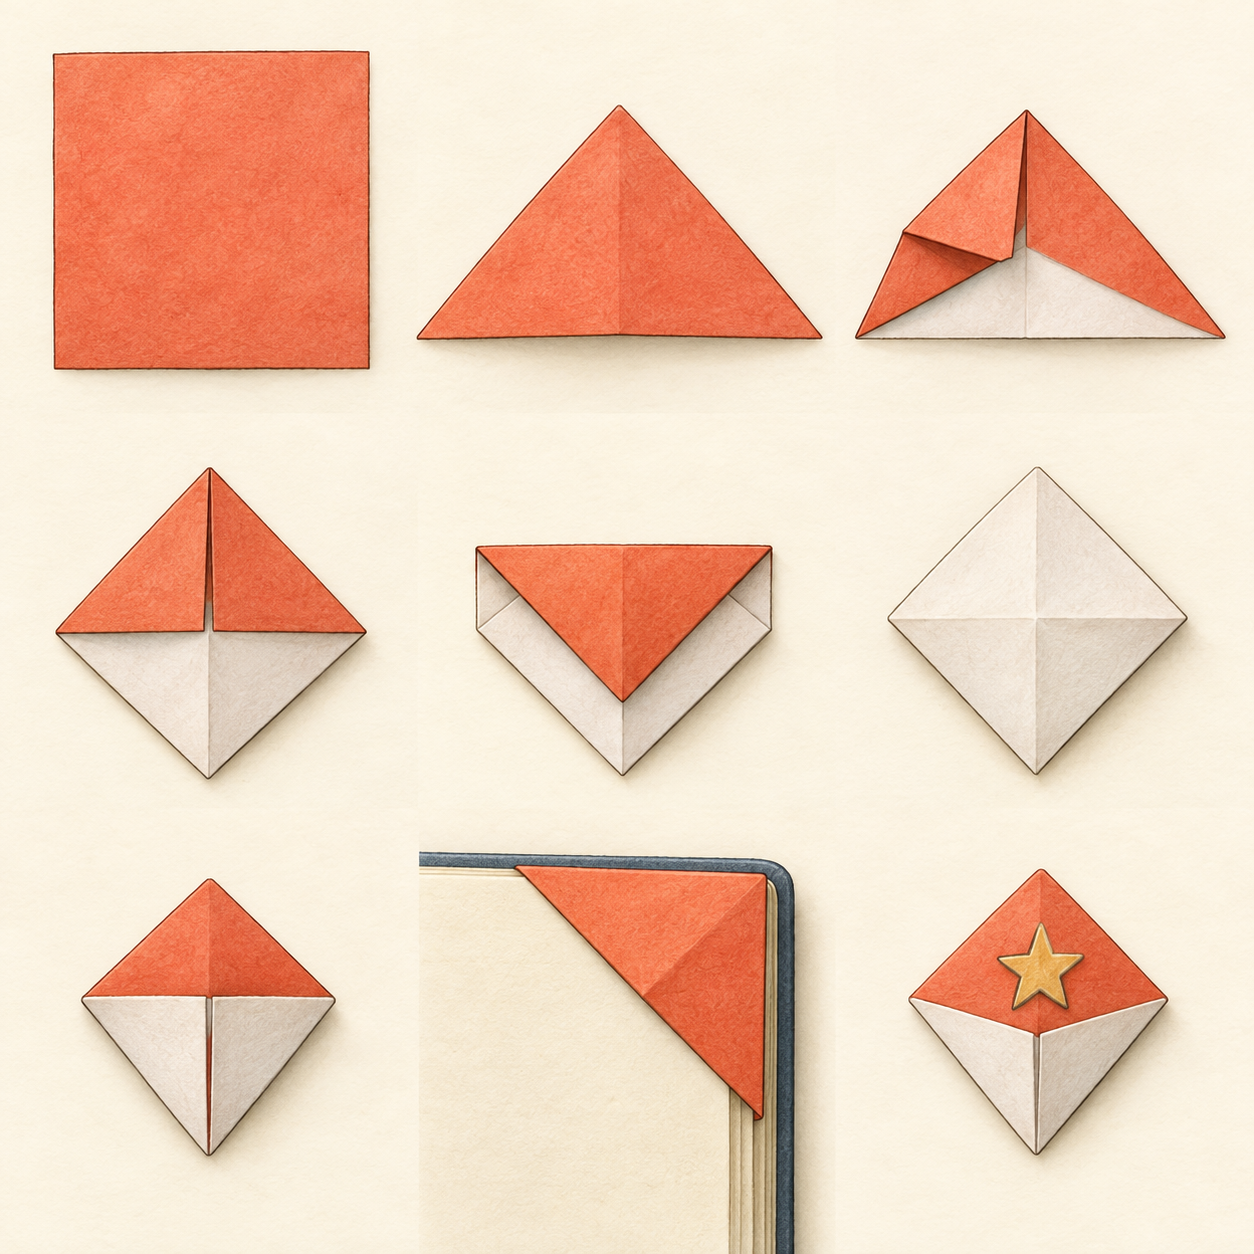
This corner bookmark turns one square into a small pocket that grips a page corner. It is useful as soon as the last tuck is finished and stays flat inside a book.
The key movement is opening the pocket before sliding in the point. Work on a firm table and use the named landmarks.
Paper and setup
One thin 15 × 15 cm square; no cutting, glue or scissors.
Use thin 15 × 15 cm paper for the first attempt. A colored front and pale reverse make layers easier to identify, but plain paper works too. Heavy card makes the pocket stiff.
Place the square like a diamond on a clean table. The downloadable lesson is an A4 instruction sheet; the folding material is a separate square. No glue or ruler is needed.
How to read the folding guide
- Dashed line. Make this new crease.
- Fine line. Keep this earlier crease as a guide.
- Curved arrow. Move the named corner in this direction.
- Inset mark. Slide the point inside the pocket.
A dashed line is the new hinge. A fine line is an earlier crease. Arrows name the moving corner, and the inset symbol means that a point goes behind a flap. When a step says whole model, keep every fold closed.
The pocket tuck
-
Step 4 · The side flaps meet to make the pocket. -
Step 5 · Lower the top flap without closing the pocket. -
Step 7 · Tuck the point inside and press the pocket flat.
At step 4, the side flaps make a shallow pocket. The top flap closes its upper edge but does not glue the layers. After the turn, widen the pocket only enough for the bottom point, then press the outside edges.
A loose bookmark usually comes from flattening the pocket too early or pushing in a point while layers are misaligned.
A physical folding trial has not been performed. Compare each illustrated state with your paper model.
Fold the bookmark
Read the action, make the fold, then use the check before moving on.
Make the pocket
Steps 1–4. Build the triangle and bring both side corners to the middle.
-
1 Place the square
Put the colored side down with one corner pointing toward you.
Why: A clear point keeps the diagonal easy to match.
- Check
- A square diamond has one corner nearest you and one farthest away.
- If it needs fixing
- Rotate the paper until the corners point up and down.
-
2 Make a triangle
Bring the bottom corner to the top corner. Match both side edges, then press the diagonal.
Why: The triangle gives the bookmark its straight outside edges.
- Check
- A two-layer triangle points up, with its long folded edge at the bottom.
- If it needs fixing
- Open the fold, match the tips first, and flatten from the center outward.
-
3 Mark the middle
Bring the left corner to the right corner, crease lightly, then reopen the triangle.
Why: The temporary crease gives both pocket flaps the same target.
- Check
- The wide triangle has a fine crease from its top point to its base middle.
- If it needs fixing
- Keep the base straight while matching the side corners.
-
4 Fold both pocket sides
Bring the left and right corners to the center crease, one at a time, and press their sloping folds.
Why: Two matching flaps create a pocket without another piece.
- Check
- The side tips meet at the center and the lower point remains visible.
- If it needs fixing
- Lift only the uneven flap and align its edge with the center.
Close the top
Steps 5–6. Fold the top flap and turn the model as one piece.
-
5 Lower the top flap
Fold the top point down over the meeting flaps, stopping at the straight base edge.
Why: This flap closes the upper edge while leaving the pocket mouth underneath.
- Check
- The broad top flap lies flat; the lower point and pocket opening remain visible.
- If it needs fixing
- Lift the flap and refold it to the base edge, not past it.
-
6 Turn the model
Turn the whole model over from left to right. Keep the point down and all folds closed.
Why: The reverse reveals the pocket for the final tuck.
- Check
- A diamond faces you with a pale pocket at the top and one point down.
- If it needs fixing
- Turn back, flatten the opened flap along its existing crease, and lift as one piece.
Tuck and use
Steps 7–9. Lock the point, test the grip and decorate lightly.
-
7 Tuck the point
Fold the bottom point up into the pocket, sliding its tip behind the top flap to the center.
Why: The tuck locks the layers together and grips a page.
- Check
- The point disappears inside and the outside edges form a neat triangle.
- If it needs fixing
- Widen the pocket with a fingertip and slide the point in without forcing it.
-
8 Test the corner
Slip the bookmark over one book-page corner. Press the top and side edges gently.
Why: A page test shows whether the pocket holds paper.
- Check
- The bookmark grips one corner and stays flat without glue.
- If it needs fixing
- Sharpen the two pocket folds and try a thinner page.
-
9 Add a small mark
Draw a pencil star or dot on the front, keeping ink away from the folded pocket.
Why: A light mark personalizes the bookmark without adding weight.
- Check
- The bookmark lies flat and its pocket remains open underneath.
- If it needs fixing
- Erase a heavy mark before using wet ink; moisture softens thin folds.
Common repairs
The triangle is crooked
Open the diagonal, match the opposite tips, and smooth from the center to each side.
Back to step 2The flaps do not meet
Open the last side flap and aim its tip at the existing center crease before pressing.
Back to step 4The point will not tuck
Open the top flap slightly and separate the pocket layers with a fingertip. Slide the point in shallowly first.
Back to step 7The bookmark slips off
Use one page corner. Sharpen the pocket folds and check that the tucked point is behind the top flap.
Back to step 8Try a variation
Make a second bookmark from a smaller square. Change the side-flap angle slightly, predict the pocket width, and test it on a book before adding a mark.
Make two colors and trade bookmarks after reading. Keep the folds simple so the pocket remains usable.
Make a second bookmark from a smaller square without the pictures. Change the flap angle slightly, predict the pocket, and test its fit on a book corner.
Printable A4 instructions
Choose the A4 overview for a compact sheet or the A4 storyboard for larger frames and full checks.
Questions
Can I use a rectangle?
Use a square for this sequence. A rectangle changes the diagonal and pocket proportions.
Will it hold several pages?
It is designed for one page corner. Several pages can stretch the pocket.
Do I need special origami paper?
No. Thin paper cut to a square works for practice.
Why did the point disappear?
That is intended at step 7: the point slides behind the top flap.
Can I decorate it?
Use a light pencil after the tuck. Wet paint can soften the paper.
Which PDF should I print?
The overview fits the lesson on one A4 page. The storyboard uses several A4 pages with larger frames.