kiduverse
How to draw a butterfly in pencil: three routes
Draw a butterfly from paired forms. Three routes, layered pencil light and shadow in the best version, changed-light practice and A4 PDFs.
- 3 detail levels
- Paper, HB/2B pencil, eraser
- 22 parts
Tap a drawing below to choose your level. The other levels hide and the “trial → after checking” pairs get bigger.
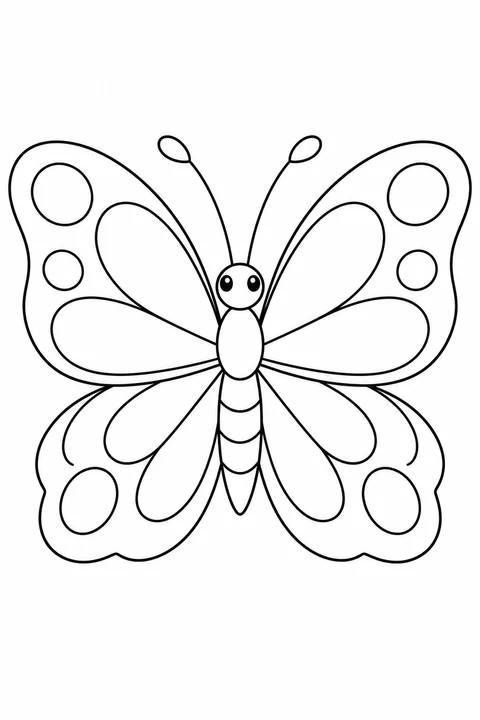
Draw a simple butterfly from above with open wings. Choose a route and compare your shapes using guides; you need not match the example exactly. This is a stylized character rather than an insect anatomy chart.
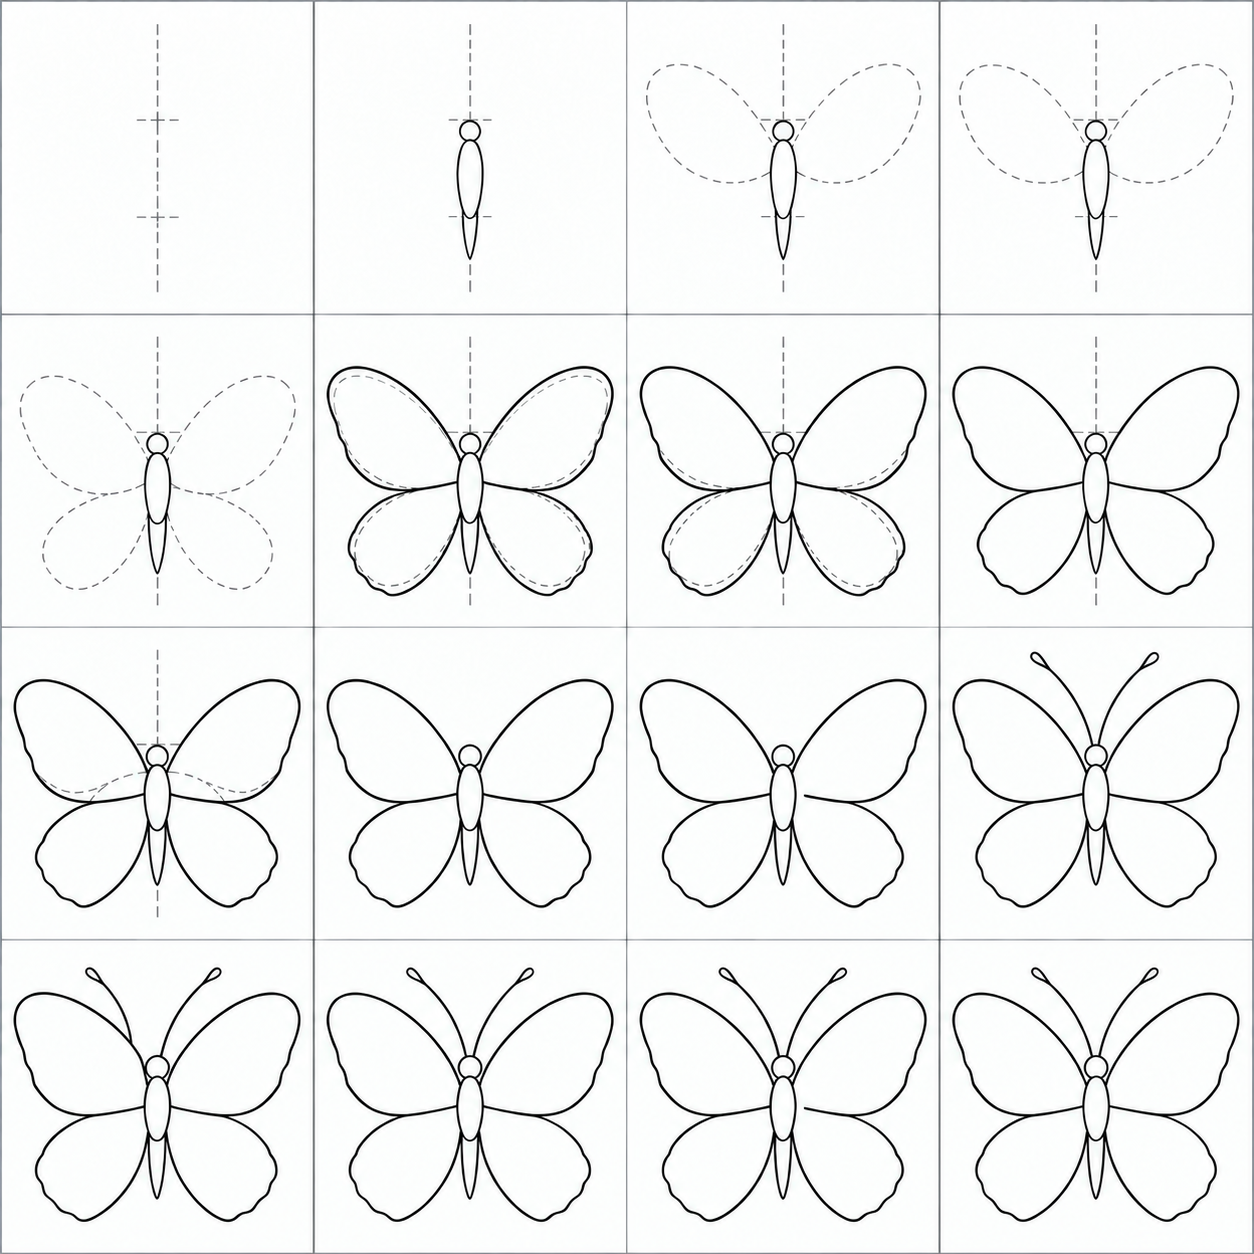
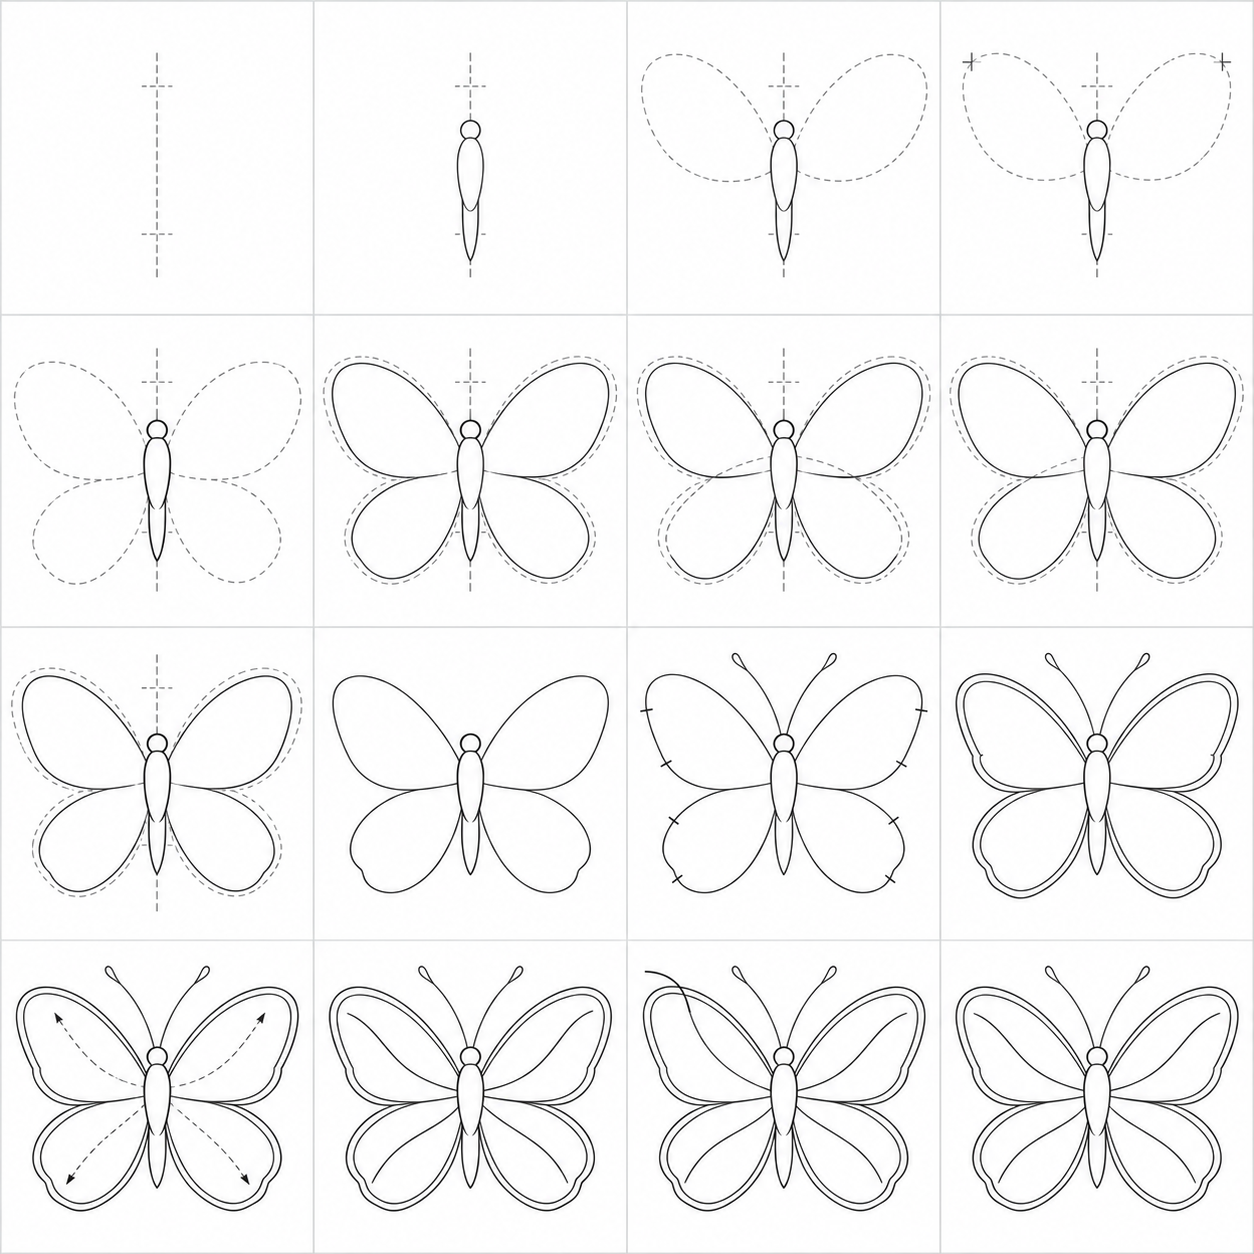
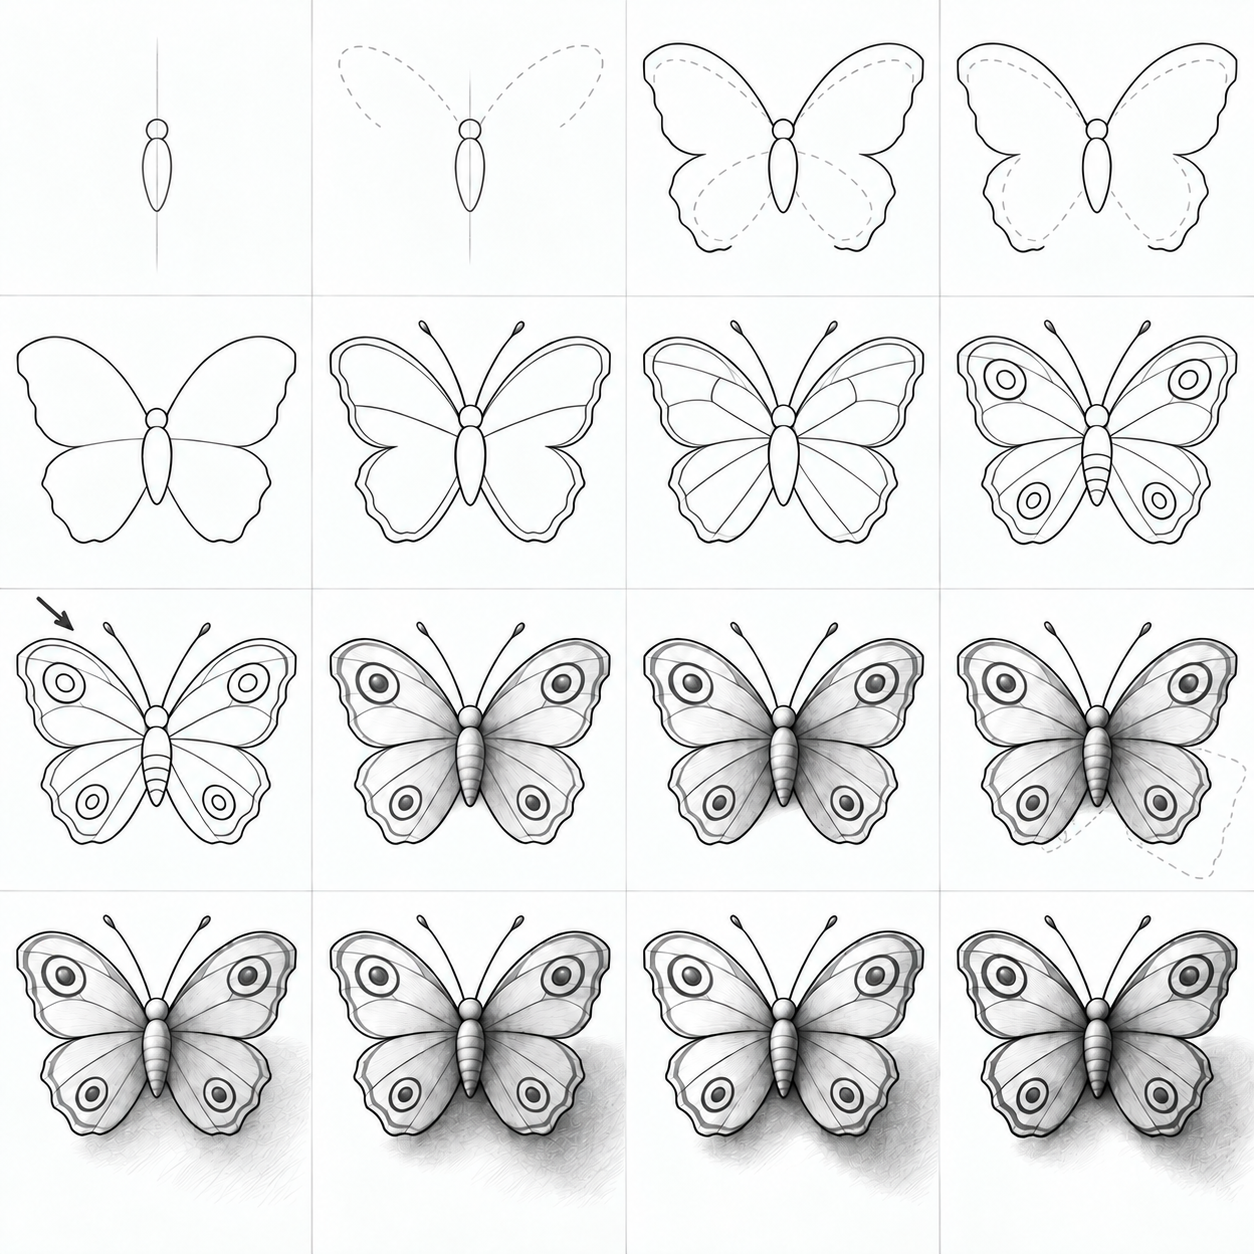
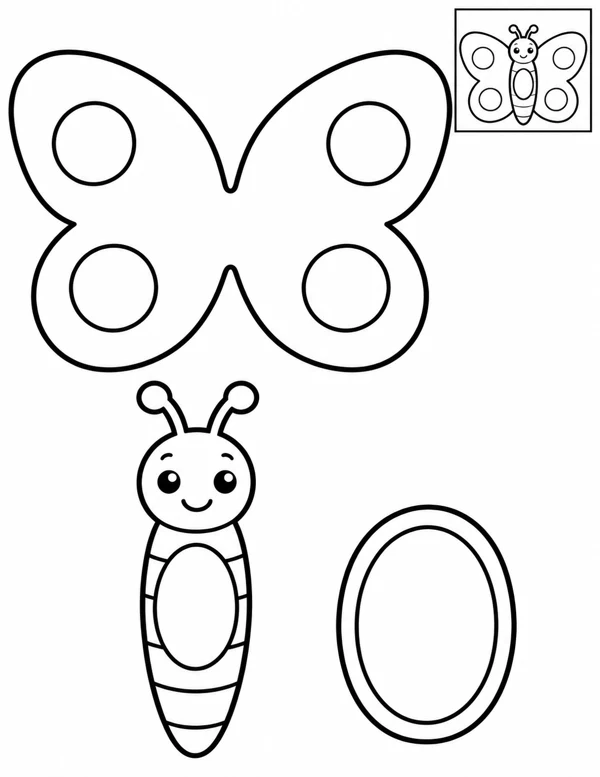
Simplest: a clean silhouette and antennae. A little more detail: inset borders and branching veins. Best version: broad panels and spots, layered pencil midtone, own shade and a cast shadow. Start with the first if large shapes are difficult; choose the next route to extend construction rather than adding tiny texture.
Your goal and materials
Construct paired wings against an axis and erase a covered rear edge. In the best route, distinguish paper light, midtone, own shade on the body and a cast shadow on the plane. Use paper, HB/2B and a soft eraser; begin with a light oval and curve. Allow about 25–60 minutes with breaks. Suggested age 6+ is guidance rather than an ability test. Simplify with a line route; to extend, practise three tones and a changed light first.
Two ideas
Form construction. Compare paired masses against an axis, select a silhouette and erase only a covered rear edge. On spare paper place two eggs, then overlap two leaves and swap the foreground. For detailed routes try an inset and root branch on one wing. Check: do tips relate to one axis and the rear line stop at the foreground? Repair: move one crowded edge or erase one hidden arc. Question: must spans match in an oblique view? Answer: no, the far projection narrows.
Light and shadow. One upper-left source leaves paper light, midtone and own shade on the rounded body. Thin wings keep broad lights; their dark pattern does not replace lighting shade. Separately build the cast shadow on the plane, from the body contact down-right. Trial: three values, a rounded oval and raised wing in the next warm-up. Check: does the plane shadow connect at contact and point away from light? Repair: join just a detached edge or lift a lost light patch. Question: are own and cast shade on the same surface? Answer: own shade is on the object; cast shade is on the support plane.
Warm up
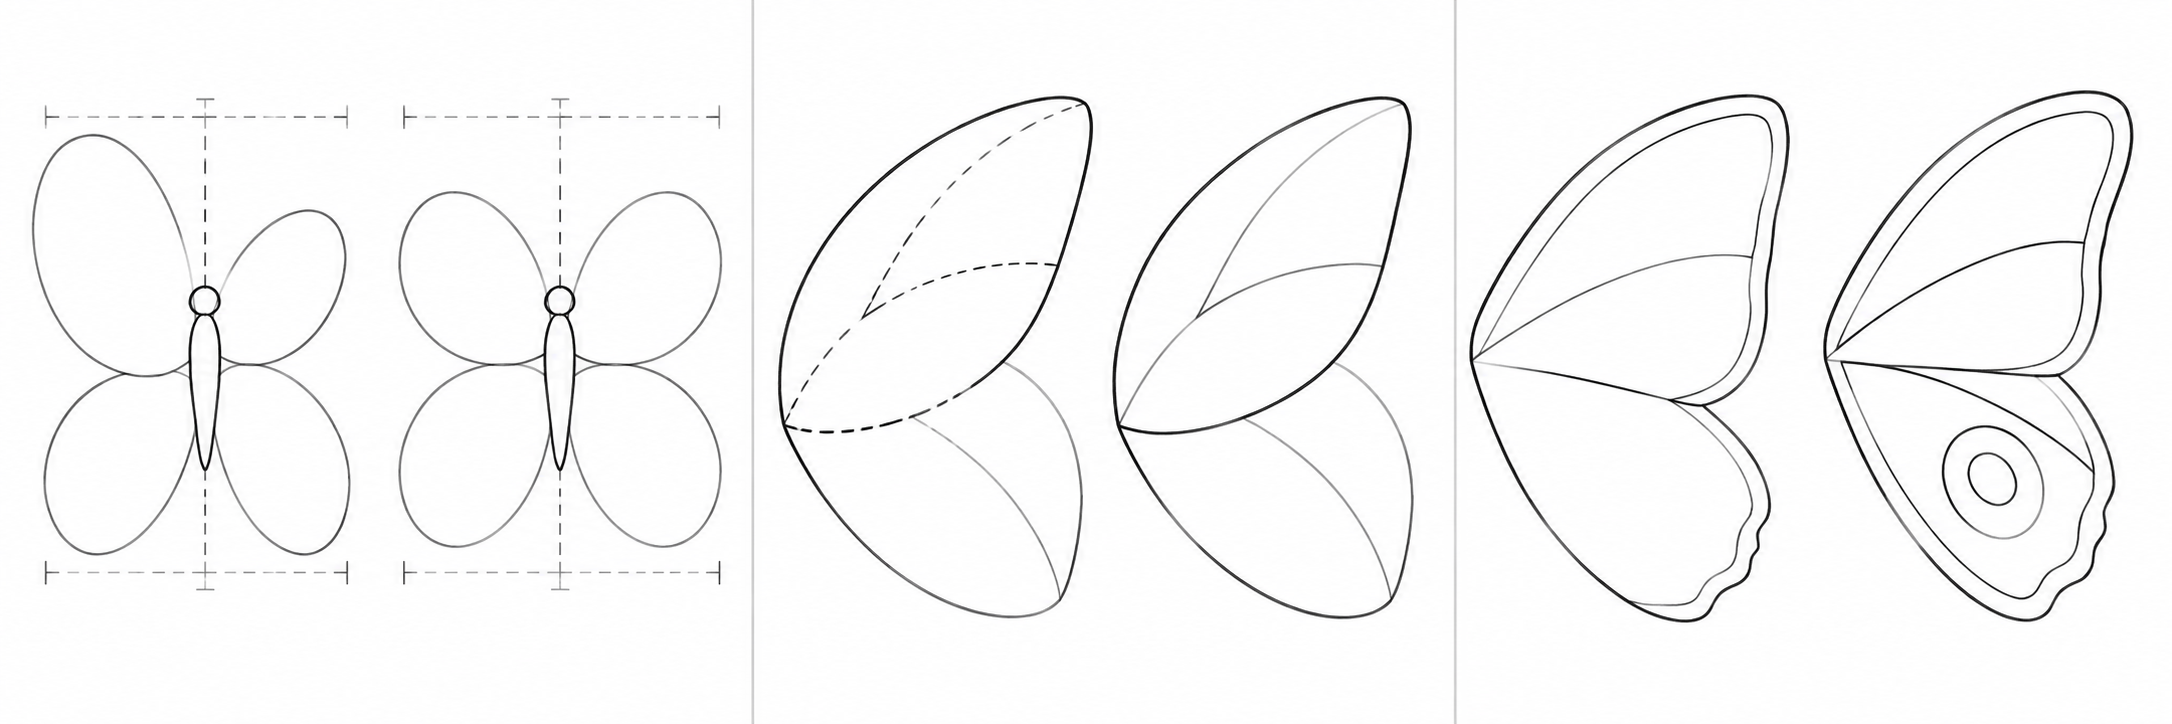
Left: compare two ovals against an axis and common tip height. Centre: choose the front leaf and remove the covered edge; swap the order in another trial. Right, for detailed routes: draw one wing, first an inset border, then two root branches. Divide a broad area with a curve and fit nested spot ovals with a gap. Check: are masses related to one axis, the rear line gone and the spot clear of boundaries? Repair: move one edge or reduce one oval while keeping the rest.
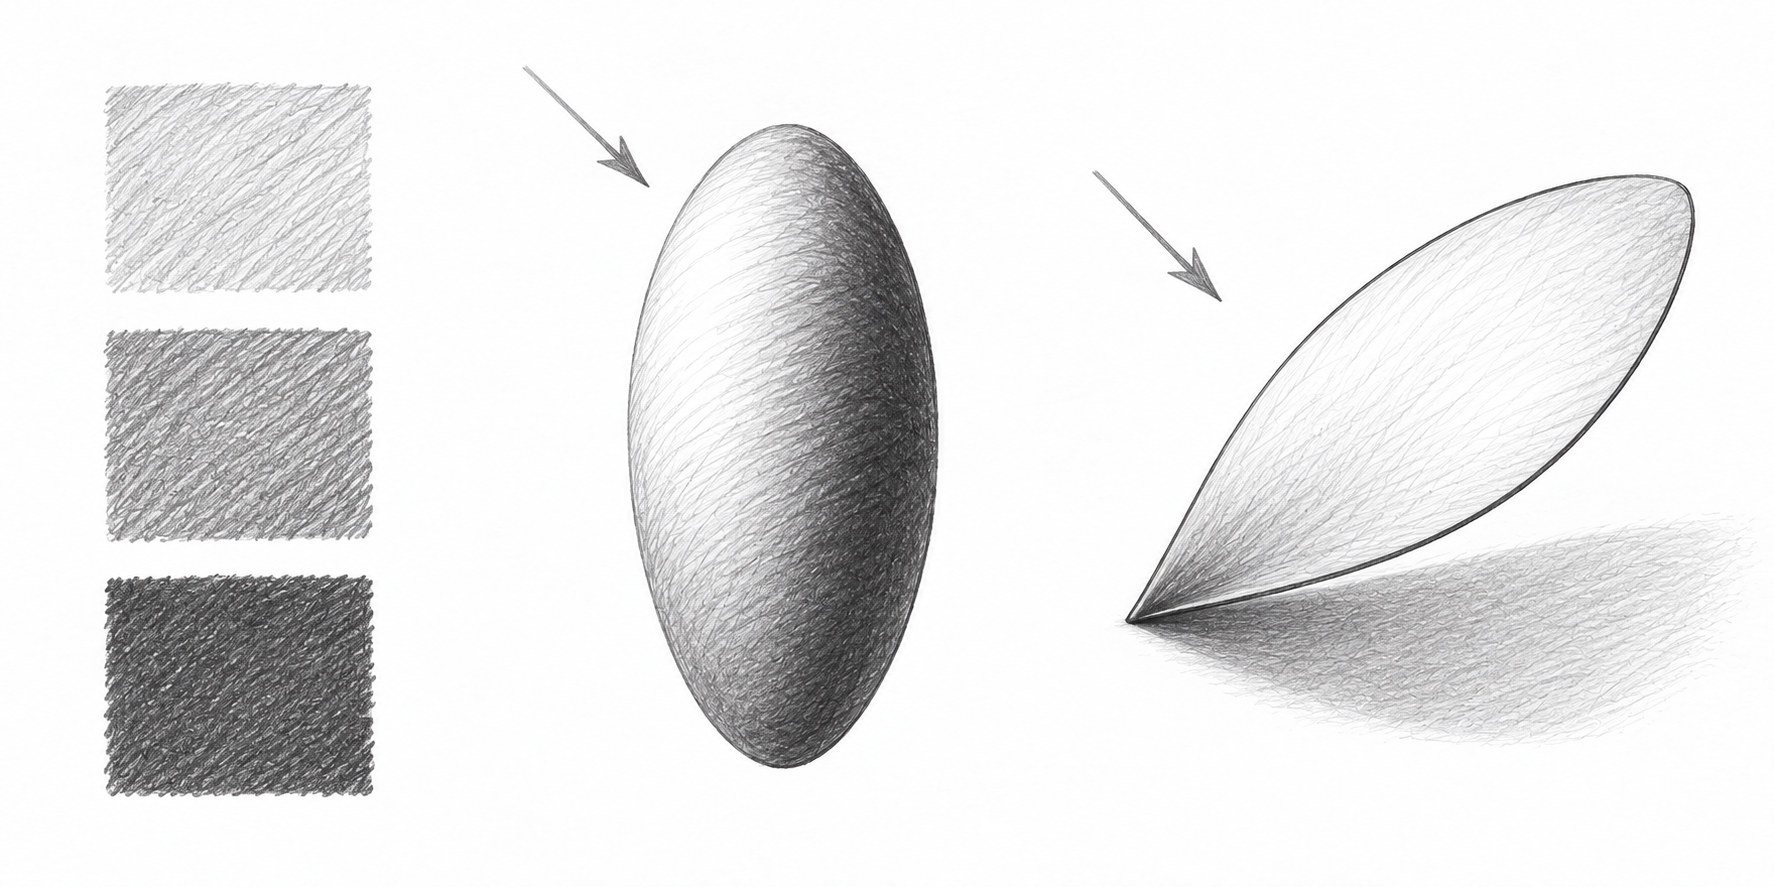
For the best route make paper-white, light and denser pencil values with repeated layers. Bend strokes around an oval: light on the left, midtone in the middle, own shade on the right. Then locate a thin wing above a plane and its down-right shadow from the root. Why: practise tone on an object separately from shade on paper. Check: are three values distinct and the shadow joined to the root? Repair: lift one light patch or join the shadow edge. Question: what changes with light on the right? Answer: own shade moves left and cast shade down-left; the wing pattern stays in place.
Read the pairs: left panels show supports or a diagnostic trial; right panels show the chosen solution. Do not reproduce an error on purpose. Each route keeps its own drawing throughout. Compare the changed area; an uneven line does not require starting over.
Step 1. Axis and body
Trial
After checking
Trial
After checking
Before the action
After the action
Simplest: Draw a light vertical axis. Place a small head, a thorax oval below it and a slim tapered abdomen underneath: three simple masses. Reserve generous space on both sides for wings and above for antennae. Why: The axis connects the parts and reserves space for paired wings before details. Check: Are the head and body centre on one axis? Repair: Move only the light body oval if it has drifted sideways.
A little more detail: Draw a light vertical axis. Place a small head, a thorax oval below it and a slim tapered abdomen underneath: three simple masses. Reserve generous space on both sides for wings and above for antennae. Why: The axis connects the parts and reserves space for paired wings before details. Check: Are the head and body centre on one axis? Repair: Move only the light body oval if it has drifted sideways.
Best version: Place a small head circle and short body oval on a light vertical axis. Leave room for four wings and antennae. Why: One axis relates the paired masses before details. Check: Are head and body centred on the same axis? Repair: Move only the light body oval.
Step 2. Upper pair
Trial
After checking
Trial
After checking
Before the action
After the action
Simplest: Sketch two large egg shapes beside the body, pointing up and out. Compare their upper tips against one crosswise tick and their spans from the axis. Why: In this top view both wings open equally; the axis helps you compare one pair. Check: Are the tips at similar heights with similar spans on both sides? Repair: Lighten only the narrow egg and move its outer edge. Small irregularities are fine.
A little more detail: Sketch two large egg shapes beside the body, pointing up and out. Compare their upper tips against one crosswise tick and their spans from the axis. Why: In this top view both wings open equally; the axis helps you compare one pair. Check: Are the tips at similar heights with similar spans on both sides? Repair: Lighten only the narrow egg and move its outer edge. Small irregularities are fine.
Best version: Place two large egg supports pointing up and out from the body. Compare their tips and spans against the axis. Why: The equally open wings in this top view need comparable large masses. Check: Are the upper tips at similar heights? Repair: Lighten and move just the crowded outer support.
Step 3. Lower lobes and silhouette
Trial
After checking
Trial
After checking
Before the action
After the action
Simplest: Below the upper pair, sketch two smaller eggs. Choose smooth upper wing edges and rounded lower lobes. Keep the old eggs pale until checking. Why: Eggs establish the large relationships; choose a living silhouette instead of tracing every support. Check: Are lower lobes smaller, with all four wings meeting the body? Repair: Replace only a sharp corner with a short curve; keep useful guides for now.
A little more detail: Below the upper pair, sketch two smaller eggs. Choose smooth upper wing edges and rounded lower lobes. Keep the old eggs pale until checking. Why: Eggs establish the large relationships; choose a living silhouette instead of tracing every support. Check: Are lower lobes smaller, with all four wings meeting the body? Repair: Replace only a sharp corner with a short curve; keep useful guides for now.
Best version: Place two smaller eggs below. Select the smooth upper contours and rounded lower lobes, keeping the supports pale. Why: Supports locate masses; the chosen silhouette replaces parts of the eggs. Check: Are lower lobes smaller, with all roots meeting the body? Repair: Replace a sharp corner with one short curve.
Step 4. Erase a hidden edge
Trial
After checking
Trial
After checking
Before the action
After the action
Simplest: Trace the lower wing edge near its root: the trial continues inside the upper wing. Choose the upper wing as foreground and remove only the covered lower curve. You need not copy the left-hand error. Why: An opaque front wing hides a rear edge; its endpoint shows the order. Check: Does the lower edge stop at the upper wing while its exposed section remains? Repair: If you erased too much, restore the short exposed endpoint up to their meeting point.
A little more detail: Trace the lower wing edge near its root: the trial continues inside the upper wing. Choose the upper wing as foreground and remove only the covered lower curve. You need not copy the left-hand error. Why: An opaque front wing hides a rear edge; its endpoint shows the order. Check: Does the lower edge stop at the upper wing while its exposed section remains? Repair: If you erased too much, restore the short exposed endpoint up to their meeting point.
Best version: Erase the lower wing root arcs covered by the upper wings. Keep the exposed lower outline and the remaining supports. Why: An opaque front wing hides the rear edge. Check: Does the lower outline stop at the upper wing? Repair: Restore only an exposed segment erased by mistake.
Step 5. Remove supports
Trial
After checking
Trial
After checking
Before the action
After the action
Simplest: Remove the axis, crosswise ticks and old egg edges. Keep the chosen silhouette, body and checked overlap. Why: Temporary supports have served their purpose; tracing them would leave extra seams. Check: Are the guides gone with one continuous visible edge for each wing? Repair: Erase only a remaining duplicate edge; restore an accidental gap with a short line.
A little more detail: Remove the axis, crosswise ticks and old egg edges. Keep the chosen silhouette, body and checked overlap. Why: Temporary supports have served their purpose; tracing them would leave extra seams. Check: Are the guides gone with one continuous visible edge for each wing? Repair: Erase only a remaining duplicate edge; restore an accidental gap with a short line.
Best version: Remove the axis and rejected egg edges. Keep the selected outline and short body. Why: Checked supports have finished their job; erasing prevents extra seams. Check: Is there one chosen outside edge? Repair: Lift just the doubled trial edge.
Step 6. Borders and root branches
Trial
After checking
Trial
After checking
Before the action
After the action
Simplest: Draw two gently curved antennae from the head. Spread their tips outward and keep them within the spare paper margin. Why: Antennae belong to the head rather than the wings. Check: Do both curves begin at the head and fit within the page? Repair: Shorten only an overly long tip.
A little more detail: Add antennae from the head. Put a few light inset ticks inside each wing and connect them with a border following the lobe turns. Why: The border follows the wing; a similar inset does not mean a straight frame. Check: Is the border inside the silhouette, following its turns without cutting off the lower lobe? Repair: Lighten only the section too close to the edge and move it inward.
Best version: Attach two antennae to the head. Follow each wing outline with an inset border and draw the long root-to-border branches: two directions on an upper wing and one on a lower wing. Why: An inset follows the same lobe; branches connect detail to its root. Check: Do borders turn with the outline and branches begin at the body? Repair: Move one border locally inward or reconnect one root.
Step 7. Broad wing panels
Trial
After checking
Trial
After checking
Before the action
After the action
Simplest: Compare the antenna bases. One starts on a wing in the trial; move such a start to the head in your own drawing. Why: The attachment matters more than matching the curves exactly. Check: Can you trace each antenna to the head? Repair: Erase only the wrong start and connect the curve to the head.
A little more detail: From each wing root, draw a broad gentle branch to its inset border. Try light directional curves first, then retain the chosen ones. Why: Veins connect a narrow root to a broad wing rather than floating as separate stripes. Check: Can you trace the branches from root to border entirely within the wing? Repair: Move only a disconnected branch start to the root.
Best version: Add broad curved partitions across the branches, leaving generous panels within the border. Why: Large panels organize the wing surface before small marks. Check: Do partitions stay inside the border without crowding? Repair: Erase only one unnecessary partition.
Step 8. Place the pattern
Trial
After checking
Trial
After checking
Before the action
After the action
Simplest: Check each wing/body join; restore a tiny accidental gap if needed. Leave the wings unpatterned. Why: A simple connected drawing is complete without small details. Check: Are the wings connected, with guides and extra seams gone? Repair: Close only an accidental gap without thickening the whole outline.
A little more detail: Find the vein endpoint escaping past the border in the trial. Shorten such an endpoint in your own drawing and erase leftover ticks. Why: A detail belongs to its visible wing plane and ends inside it. Check: Do all veins stay inside, with the border still readable separately? Repair: Erase only the escaping vein tail without damaging the silhouette.
Best version: Place one large oval spot and a smaller oval inside it on each wing; add three short curves inside the body. Why: Paired marks must fit their panels; short body curves suggest its rounded surface. Check: Are spots clear of veins and body divisions inside the oval? Repair: Reduce one crowded spot or shorten one body curve.
Step 9. Choose the light
Before the action
After the action
Simplest: This route is complete; keep the accepted line drawing. Check its large silhouette and joins before trying shading after the warm-up. Why: This route ends with a clean contour; new light decisions belong to the best route. Check: Are antennae joined to the head and borders/branches inside the wing? Repair: Repair only a small gap or doubled edge.
A little more detail: This route is complete; keep the accepted line drawing. Check its large silhouette and joins before trying shading after the warm-up. Why: This route ends with a clean contour; new light decisions belong to the best route. Check: Are antennae joined to the head and borders/branches inside the wing? Repair: Repair only a small gap or doubled edge.
Best version: Choose light from upper left, as the arrow shows. Find the upper-left body surface and broad wing areas that will remain paper-white. Why: Light direction determines the tonal choices; dark wing markings are a separate pattern. Check: Can you name the light surface and the opposite body side? Repair: Mark the light region lightly before shading; do not darken it.
Step 10. First light tone
Before the action
After the action
Simplest: This route is complete; keep the accepted line drawing. Check its large silhouette and joins before trying shading after the warm-up. Why: This route ends with a clean contour; new light decisions belong to the best route. Check: Are antennae joined to the head and borders/branches inside the wing? Repair: Repair only a small gap or doubled edge.
A little more detail: This route is complete; keep the accepted line drawing. Check its large silhouette and joins before trying shading after the warm-up. Why: This route ends with a clean contour; new light decisions belong to the best route. Check: Are antennae joined to the head and borders/branches inside the wing? Repair: Repair only a small gap or doubled edge.
Best version: Use a light first layer on the right-facing body and wing roots. Bend short strokes around the oval; leave broad wing lights open. Why: A thin first layer gives a midtone without losing the paper light. Check: Are paper white and light gray clearly different? Repair: Lift an overfilled light patch with a soft eraser.
Step 11. Build own shade
Before the action
After the action
Simplest: This route is complete; keep the accepted line drawing. Check its large silhouette and joins before trying shading after the warm-up. Why: This route ends with a clean contour; new light decisions belong to the best route. Check: Are antennae joined to the head and borders/branches inside the wing? Repair: Repair only a small gap or doubled edge.
A little more detail: This route is complete; keep the accepted line drawing. Check its large silhouette and joins before trying shading after the warm-up. Why: This route ends with a clean contour; new light decisions belong to the best route. Check: Are antennae joined to the head and borders/branches inside the wing? Repair: Repair only a small gap or doubled edge.
Best version: Layer more strokes on the right side of the body and near the shaded roots. Strengthen the border and spot pattern separately. Why: Repeated strokes build own shade where the rounded surface turns away from light; flat wing pattern is not a shadow. Check: Can you distinguish light, midtone and own shade on the body? Repair: Soften a dark outline strip and spread a few curved strokes inward.
Step 12. Plan the cast shadow
Before the action
After the action
Simplest: This route is complete; keep the accepted line drawing. Check its large silhouette and joins before trying shading after the warm-up. Why: This route ends with a clean contour; new light decisions belong to the best route. Check: Are antennae joined to the head and borders/branches inside the wing? Repair: Repair only a small gap or doubled edge.
A little more detail: This route is complete; keep the accepted line drawing. Check its large silhouette and joins before trying shading after the warm-up. Why: This route ends with a clean contour; new light decisions belong to the best route. Check: Are antennae joined to the head and borders/branches inside the wing? Repair: Repair only a small gap or doubled edge.
Best version: On the paper plane, lightly locate the projected wing-and-body shadow down-right. Begin it at the body contact and leave room under the raised wings. Why: The body rests on the plane while wings sit slightly above it; their cast shadow shifts away from the light. Check: Is the footprint on the plane, connected to the body and opposite the light? Repair: Move only the pale detached edge back to the contact.
Step 13. Shade the paper plane
Before the action
After the action
Simplest: This route is complete; keep the accepted line drawing. Check its large silhouette and joins before trying shading after the warm-up. Why: This route ends with a clean contour; new light decisions belong to the best route. Check: Are antennae joined to the head and borders/branches inside the wing? Repair: Repair only a small gap or doubled edge.
A little more detail: This route is complete; keep the accepted line drawing. Check its large silhouette and joins before trying shading after the warm-up. Why: This route ends with a clean contour; new light decisions belong to the best route. Check: Are antennae joined to the head and borders/branches inside the wing? Repair: Repair only a small gap or doubled edge.
Best version: Fill the planned cast shadow with a light layer of pencil strokes along the paper plane. Keep it distinct from the wing surface. Why: The shadow belongs to the support plane, rather than the butterfly outline. Check: Can you follow the shadow outside the lower-right wing edges? Repair: Lighten a patch accidentally drawn over a lit wing.
Step 14. Strengthen the contact
Before the action
After the action
Simplest: This route is complete; keep the accepted line drawing. Check its large silhouette and joins before trying shading after the warm-up. Why: This route ends with a clean contour; new light decisions belong to the best route. Check: Are antennae joined to the head and borders/branches inside the wing? Repair: Repair only a small gap or doubled edge.
A little more detail: This route is complete; keep the accepted line drawing. Check its large silhouette and joins before trying shading after the warm-up. Why: This route ends with a clean contour; new light decisions belong to the best route. Check: Are antennae joined to the head and borders/branches inside the wing? Repair: Repair only a small gap or doubled edge.
Best version: Build the cast shadow with another gentle layer, darkest beside the body contact and softer beneath the raised outer wings. Why: Contact blocks more light; a raised wing makes a softer, lighter projected edge. Check: Does the darkest contact join the body while outer cast edges remain softer? Repair: Connect a floating gap or lighten a uniformly black shadow.
Step 15. Restore the paper light
Before the action
After the action
Simplest: This route is complete; keep the accepted line drawing. Check its large silhouette and joins before trying shading after the warm-up. Why: This route ends with a clean contour; new light decisions belong to the best route. Check: Are antennae joined to the head and borders/branches inside the wing? Repair: Repair only a small gap or doubled edge.
A little more detail: This route is complete; keep the accepted line drawing. Check its large silhouette and joins before trying shading after the warm-up. Why: This route ends with a clean contour; new light decisions belong to the best route. Check: Are antennae joined to the head and borders/branches inside the wing? Repair: Repair only a small gap or doubled edge.
Best version: Lift excess graphite from the upper-left body and wing light patches with the eraser. Keep the midtone, right own shade and cast shadow. Why: Removing tone restores the light and makes the three values readable. Check: Is the light patch cleaner than before, with shape still intact? Repair: Lift only a small patch rather than erasing all the shading.
Step 16. Clean shaded result
Before the action
After the action
Simplest: This route is complete; keep the accepted line drawing. Check its large silhouette and joins before trying shading after the warm-up. Why: This route ends with a clean contour; new light decisions belong to the best route. Check: Are antennae joined to the head and borders/branches inside the wing? Repair: Repair only a small gap or doubled edge.
A little more detail: This route is complete; keep the accepted line drawing. Check its large silhouette and joins before trying shading after the warm-up. Why: This route ends with a clean contour; new light decisions belong to the best route. Check: Are antennae joined to the head and borders/branches inside the wing? Repair: Repair only a small gap or doubled edge.
Best version: Remove the light arrow and any remaining shadow guide. Check the clean outline, paper lights, curved body strokes and down-right cast shadow. Why: The final drawing keeps the construction and one coherent light after scaffolding is gone. Check: Does the shadow touch the body and agree with upper-left light? Repair: Repair just a contact gap or lift a misplaced dark patch.
Repair a small problem
Upper spans differ accidentally. Cause: Masses were judged separately in this top view. Repair: Restore one crosswise tick and move only the crowded edge. Equal widths are not required in an oblique view.
A wing looks transparent. Cause: A rear edge continues inside the front wing. Repair: Trace it back to the lower lobe and erase only its covered section.
Extra seams remain. Cause: Old eggs were traced along with the chosen silhouette. Repair: Lighten only the interior trial edge; keep the chosen outside edge.
A spot crosses a vein. Cause: Its size was chosen separately from the available panel. Repair: Reduce only the spot, leaving a visible gap to the vein.
Paper light disappeared. Cause: one gray layer covers everything. Repair: lift an upper-left patch while keeping the midtone.
Own shade became an outline. Cause: only the edge was strengthened. Repair: soften the strip and add curved strokes inward on the right body side.
Cast shadow floats separately. Cause: its footprint started far from contact. Repair: join the shade to the body while retaining a soft outer edge.
Shadow points toward the light. Cause: pattern was confused with lighting. Repair: lightly plan a new footprint away from the source on the plane, then lift the misplaced shade.
Independent tasks
Choose a new view or light. First decide which masses or shadows change. All three tasks are available in every route. For line routes mark the new light and shadow footprint lightly on a separate trial; use full tone after the warm-up.
1. Oblique view
What changes: Far wings have narrower visible spans than near wings.
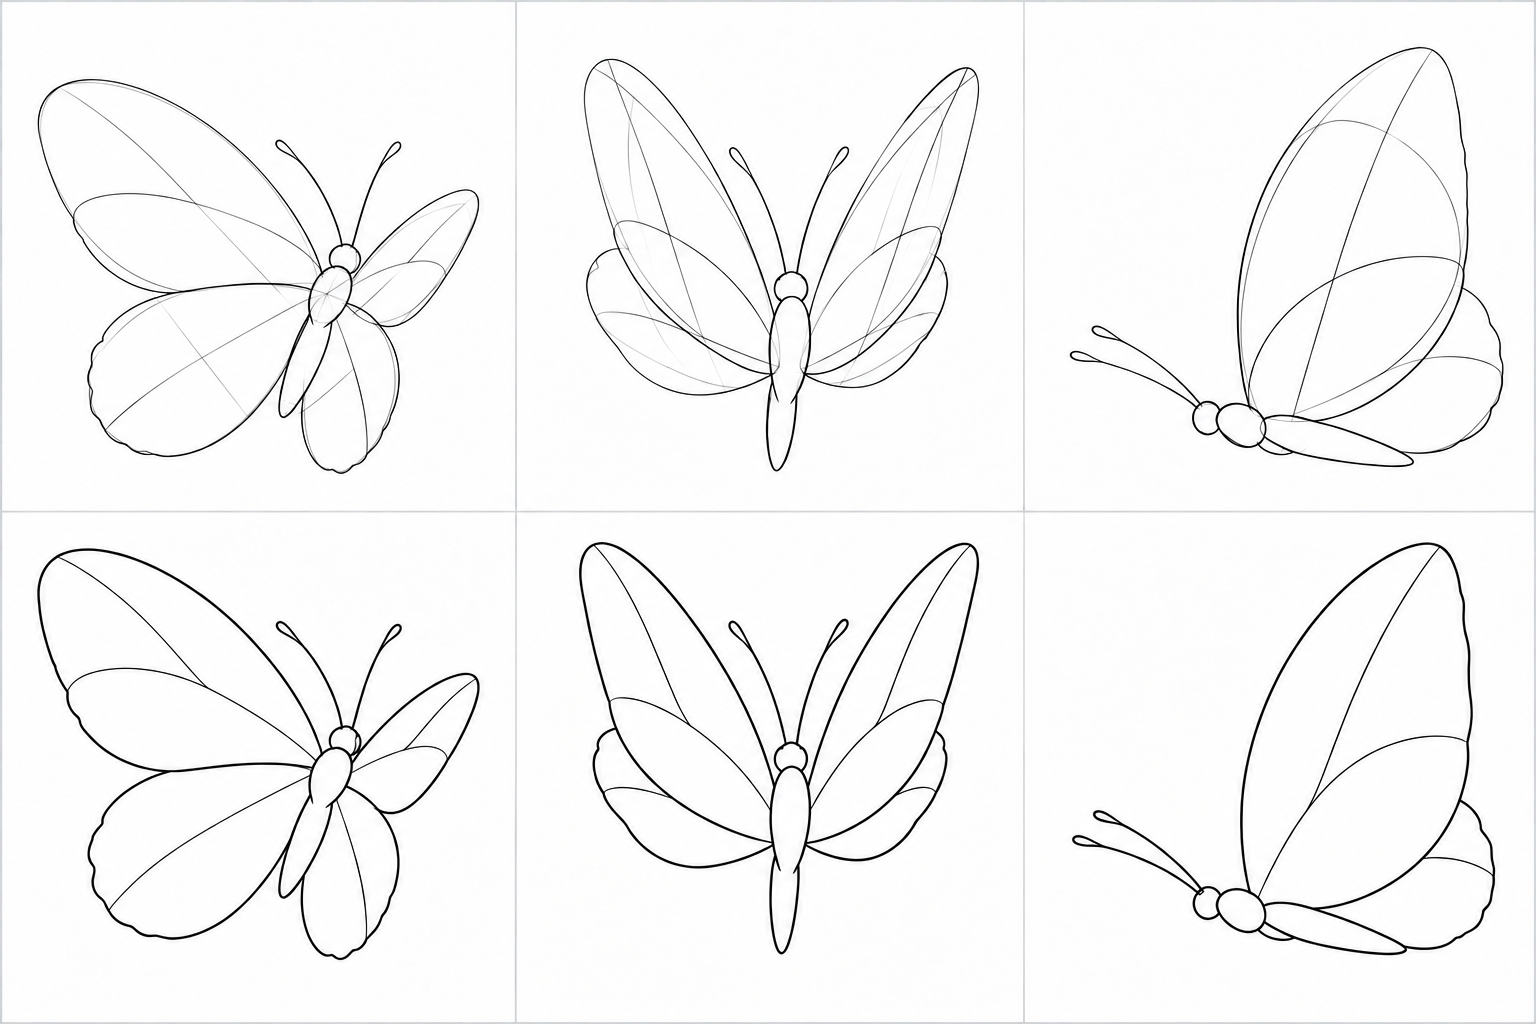
Sketch a slanted body axis. Reserve a broad span on the near side and a smaller one on the far side. Locate upper and lower pairs from these new ticks.
Why: In an oblique view equal wings can project to different widths; the axis is a reference rather than a demand for equal projection. Check: Is the far pair narrower, with both pairs attached to the same body? Repair: Lighten only the far outer edge and bring it closer to the axis.
Question: what did you choose again? Answer: spans and a hidden edge in a new view; the light side and projected shade from contact when the light changes. You need not match the example exactly.
2. Raised wings
What changes: Wings rise above the body, making their projection narrower.
Put the body axis between two tall upper masses. Place smaller lower masses at the roots and choose sections covered by the upper wings.
Why: The opening changes, so compare the new visible span and decide the overlap again. Check: Are wings narrower than the open butterfly, with the lower edge stopping at the front wing? Repair: Erase only a covered lower root or narrow one upper mass.
Question: what did you choose again? Answer: spans and a hidden edge in a new view; the light side and projected shade from contact when the light changes. You need not match the example exactly.
3. Light from upper right
What changes: Keep the top view but move the light from upper left to upper right.
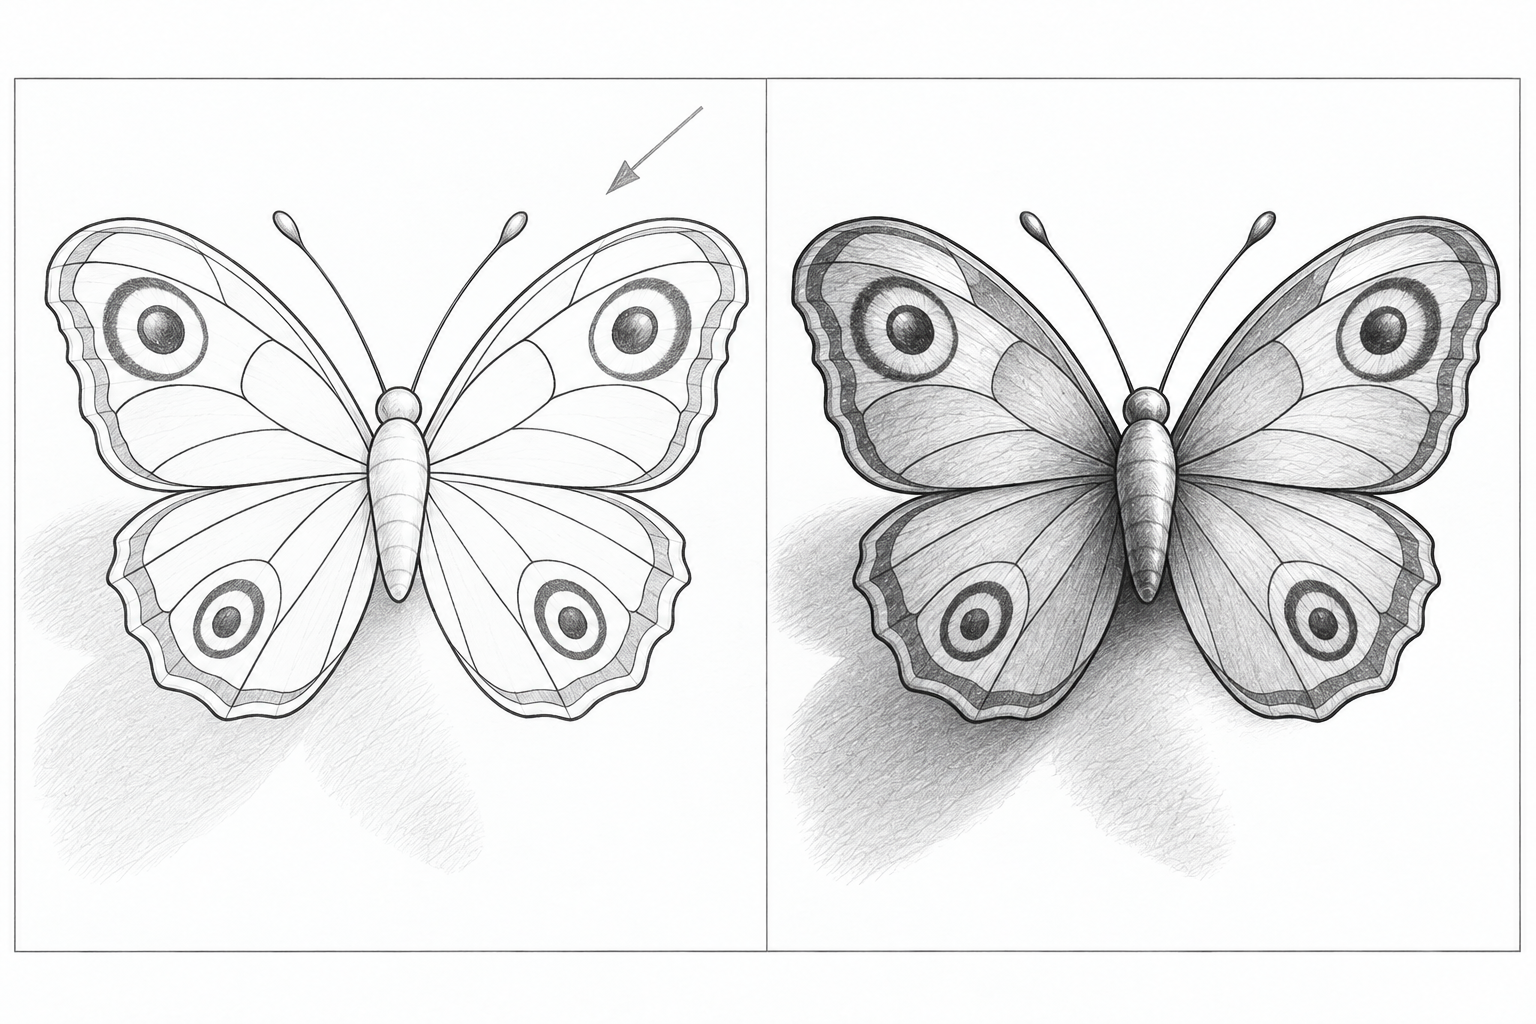
Before tone, place the new light on the right and a pale projected shadow down-left, beginning at the body. Then layer midtone and own shade on the left body/roots; hatch the cast shadow on the plane.
Why: Changing the light moves own shade and projected shade; wing pattern stays in place. Check: Is paper light on the right, with left body shade and a connected down-left cast shadow? Repair: Lift one wrongly shaded light patch or move only the pale cast edge before filling it.
Question: what did you choose again? Answer: spans and a hidden edge in a new view; the light side and projected shade from contact when the light changes. You need not match the example exactly.
Self-check
Point to your chosen axis and one erased edge. In the best route name paper light, midtone and body own shade; trace the separate cast shadow from contact. Question: with light moved to the right, does shade stay on the right? Answer: no, on the same plane cast shade projects away from the new source down-left and own shade moves to the left body side; pattern stays on the wing.
What to draw next
All drawing lessons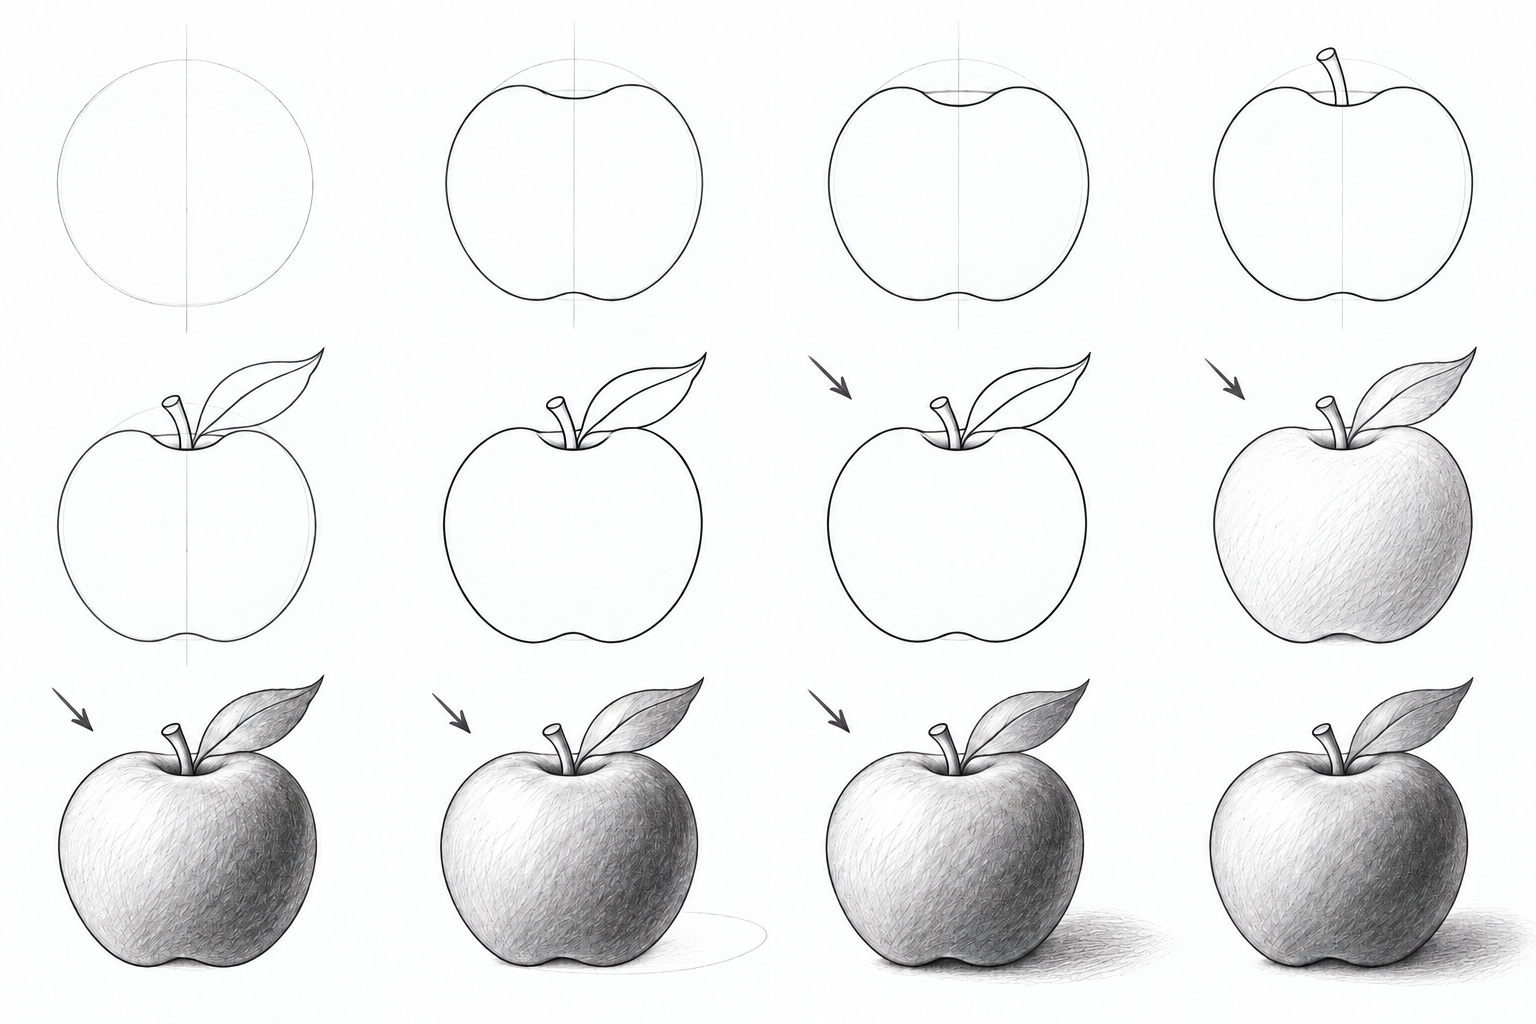 3 levels
How to draw an apple
Draw an apple at three levels: simple forms, a recessed top and bent leaf, then pencil light and shadow. Clear stages, small repairs and A4/Letter PDFs.
 3 levels
How to draw balloons
Three balloon drawing routes, from two simple ovals to tapered necks and pencil volume. Illustrated steps, checks, small repairs and practice PDFs.
 3 levels
How to draw a bear in pencil
Draw a sitting bear from simple forms: paws, muzzle, overlaps and shading. Three levels, illustrated steps and A4 lesson and practice PDFs.