kiduverse
How to fold a paper butterfly
Fold a three-dimensional paper butterfly from one square without cuts or glue. Learn to collapse a triangular base, move individual front layers and secure a small locking tab. Each illustrated step includes a checkpoint and a way to repair an uneven fold.
- Paper15 × 15 cm square
- Sequence12 illustrated steps
- PreparationAfter your first folds
- ToolsNo glue or scissors
- TechniqueCollapse and layer control
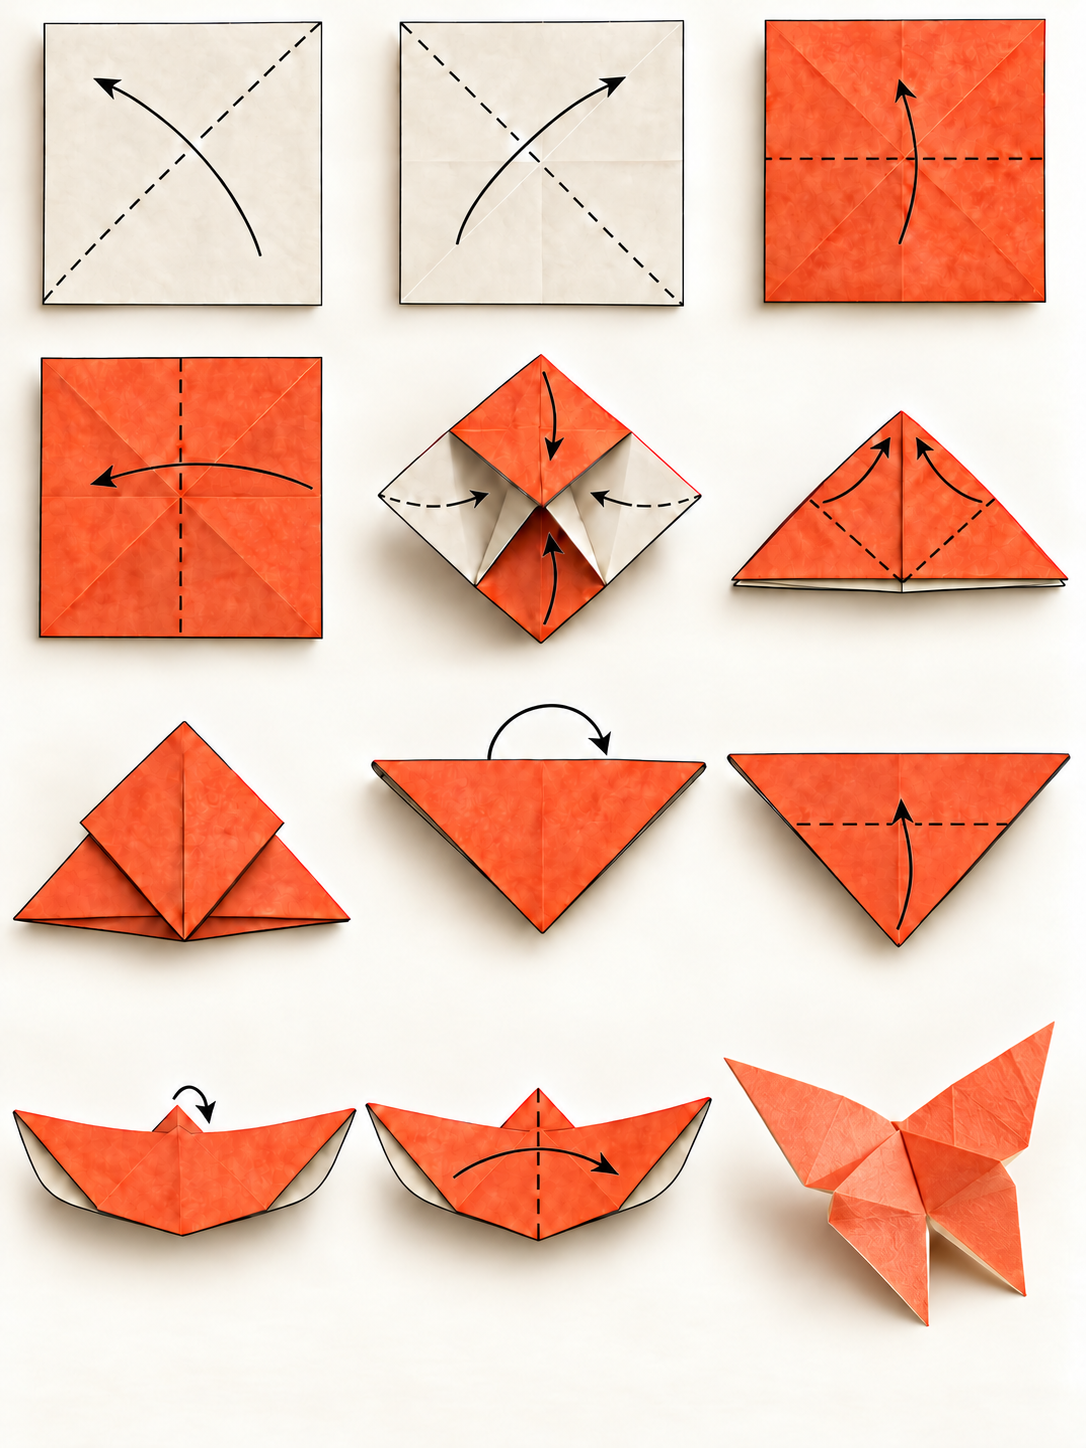
This lesson follows the familiar three-dimensional variation of Akira Yoshizawa’s butterfly. It starts with a waterbomb base and finishes with a small locking tip. The text and illustrations are original to this lesson; the folding construction is not claimed as a new invention.
Practice matching corners before beginning. The collapse is different from a single fold: several existing hinges move together. Read its explanation and pause after the base to identify the front layers. There is no fixed speed; checking one movement is more useful than rushing to the finished silhouette.
Prepare the square
One 15 × 15 cm square of thin paper. No glue or cuts.
Start with a ready-cut 15 cm square of thin origami paper with a contrasting reverse. Avoid card, coated stiff sheets and tiny squares on your first attempt: several layers meet in the center and the tab becomes difficult to grasp. Plain office paper can be used for practice after preparing an accurate square.
A rectangle must be made square before the lesson. Check opposite edges and all corners. Use a clean firm table with enough space to turn the whole model. Match each fold lightly before pressing from the center toward the edges. You need no glue, scissors or decoration for the folding sequence.
The downloads use A4, 210 × 297 mm. That is the instruction page size, not the folding sheet. Print at a comfortable reading scale; no printed measuring line defines the model. Keep the instructions beside the workspace and fold a separate blank square.
Read folds and layers
- New fold Bring the marked part toward you along the dashed line.
- Existing crease A faint line is already in the paper; use it as a guide.
- Movement Follow the moving corner or edge; other layers stay still.
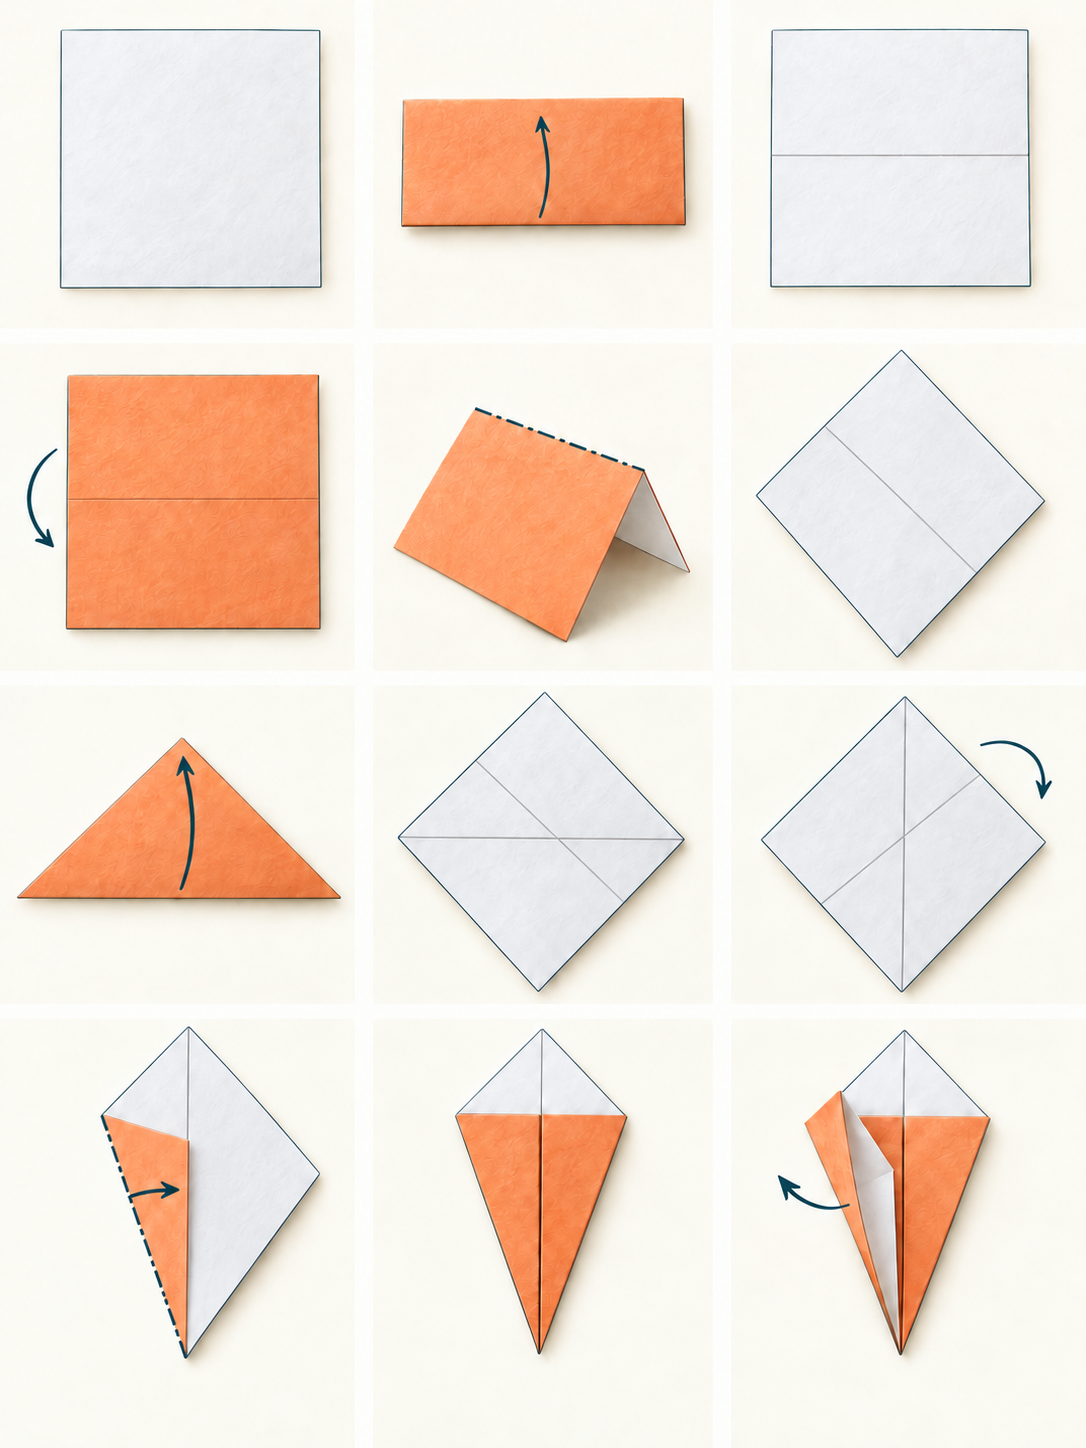
A dark contour is a paper edge, a faint line is an existing crease and a dashed line marks the next fold. Arrows identify the moving corner or edge. Some frames show the movement before completion; use the checkpoint to recognize the state you should reach.
Turning over moves the whole model like turning a page. Rotating changes its direction on the table. Neither action means opening a flap. From step 6, locate the rear triangle first and hold it gently against the table while lifting only the front corners.
Collapse the triangular base
-
Step 4 · Before: all reference creases are ready. -
Step 5 · During: the sides tuck into a tent. -
Step 6 · After: two triangular faces lie flat.
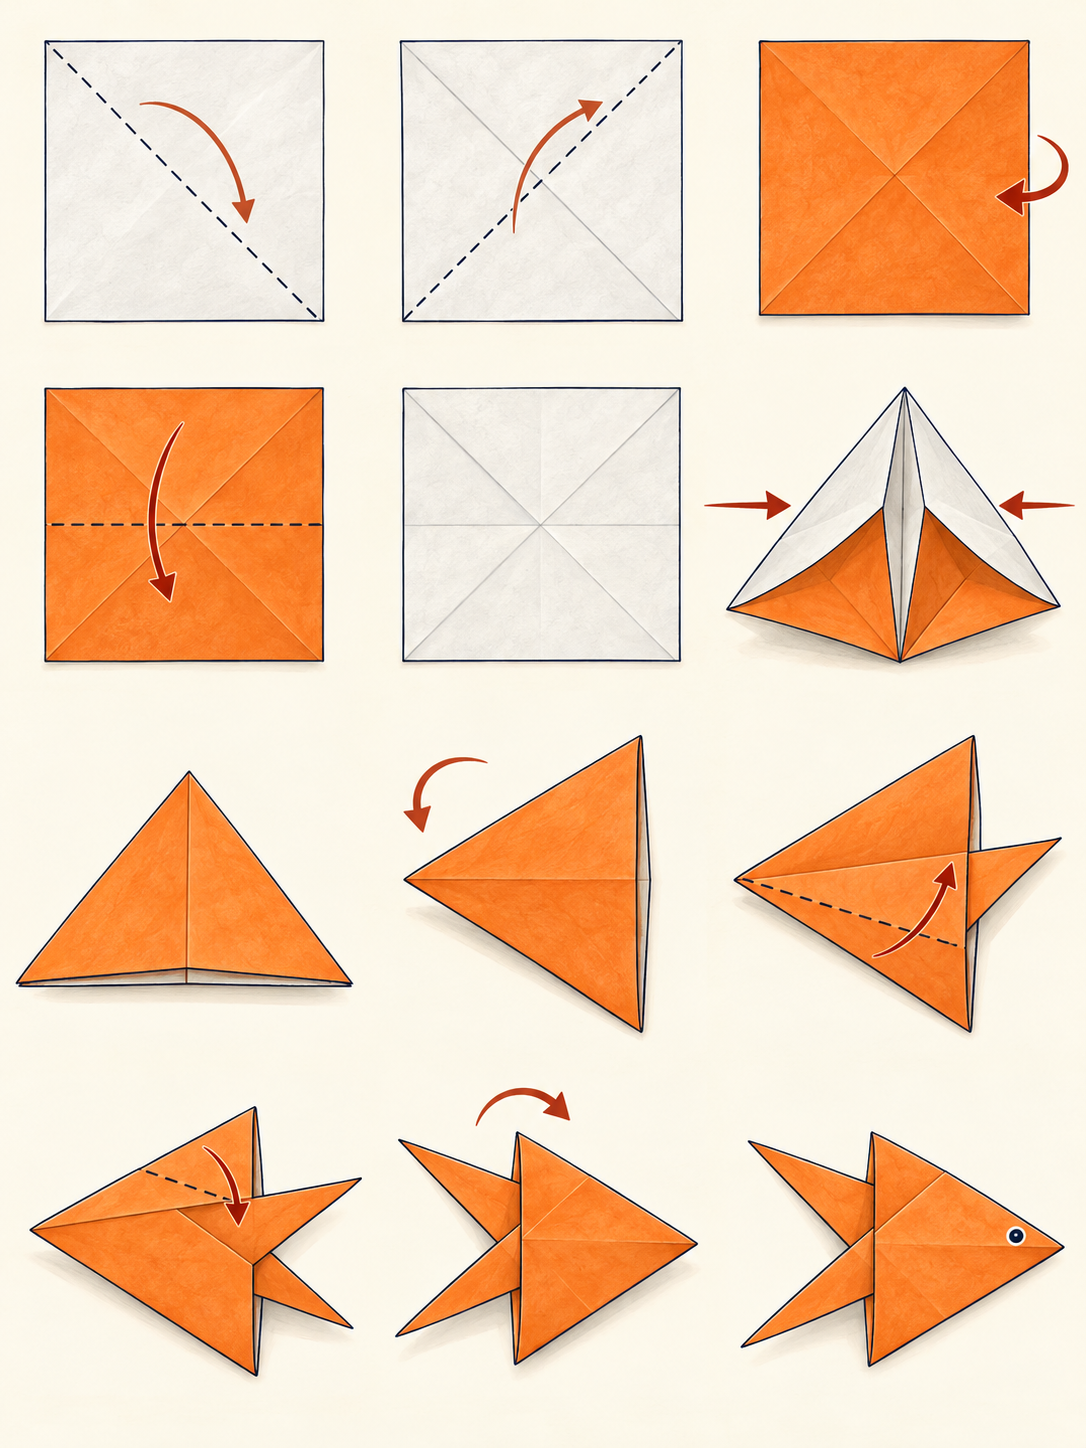
The base uses opposite crease directions. Diagonals are made with the reverse up, midpoint folds after turning over. Push the two side midpoints inward while the center stays raised like a small roof. Top and bottom become the broad triangular faces, with the side walls between them.
Do not sharpen a new crease during the collapse. If a wall bends outward, reopen the square and gently reverse its midpoint hinge. Flatten only when both sides are tucked evenly. At the final lift, keep the curved wing transitions unpressed; flat is the goal for the base, but not for every later part.
Illustrations reviewed on screen; physical folding trial not performed.
Fold the butterfly in 12 steps
Complete each movement and compare its checkpoint. Orange is the front of the sheet; cream is the reverse.
Reference creases
Steps 1–4. Prepare diagonals and midpoint hinges.
-
1 First diagonal
With the cream side up, bring the lower-right corner to the upper-left corner. Press and reopen.
Why: This crease provides a diagonal hinge.
- Check
- The crease runs from lower-left to upper-right.
- If it needs fixing
- Reopen and match both edges if the corners miss.
-
2 Second diagonal
Bring the lower-left corner to the upper-right corner. Press and reopen the square.
Why: The diagonals locate the center for the collapse.
- Check
- Two diagonal creases form an X.
- If it needs fixing
- Check that the original sheet is square if the intersection is off-center.
-
3 Horizontal reference
Turn the entire square over, orange side up. Bring the bottom edge to the top, crease, and reopen.
Why: Turning over reverses the new crease relative to the diagonals.
- Check
- A horizontal crease crosses the center.
- If it needs fixing
- If you forgot the turn, reopen, turn over and gently reverse this crease.
-
4 Vertical reference
Bring the right edge to the left edge, press, and reopen. Keep orange facing up.
Why: Both midpoint hinges let the sides tuck inward.
- Check
- An X and a cross meet at the center.
- If it needs fixing
- Match the complete edges before sharpening the fold.
Base and layers
Steps 5–8. Collapse the square and find the front flaps.
-
5 Start the collapse
Push the left and right edge midpoints inward. Bring top and bottom edges together while the center stays raised.
Why: Old creases guide this three-dimensional movement.
- Check
- A tent forms with side walls tucked inside.
- If it needs fixing
- Reopen if a wall bends outward; reverse its midpoint crease gently.
-
6 Flatten the base
Lower the tent into a double triangle, apex up. Flatten its faces; move only the two front bottom corners toward the apex.
Why: The base separates front flaps from an intact rear triangle.
- Check
- The front corners move independently of the rear corners.
- If it needs fixing
- Reopen the corner fold if the rear layer moves too.
-
7 Match front flaps
Align both front tips with the top apex and press their folds. Leave the rear triangle unchanged.
Why: Matching flaps make the smaller wings symmetrical.
- Check
- A front diamond lies over a wider rear triangle.
- If it needs fixing
- Reopen only the uneven flap and match its tip again.
-
8 Turn and rotate
Turn the whole model over. Rotate it until the long straight edge is at the top and the single apex points down.
Why: The smooth rear face exposes the locking point.
- Check
- A smooth inverted triangle faces you; the diamond is underneath.
- If it needs fixing
- If you see the diamond, turn the model without opening any flap.
Lock and volume
Steps 9–12. Secure the tab and shape the ridge.
-
9 Lift the point
Lift the downward point just past the long top edge. Let the side regions curve; press the center without crushing the wings.
Why: The protruding tip creates a lock; curved sides preserve volume.
- Check
- A small tip projects above the edge; both side regions curve.
- If it needs fixing
- Lower the point and try less overhang if a wing crumples.
-
10 Secure the tip
Fold the projecting tip backward over the upper edge. Press the tiny fold while supporting the wing layers.
Why: The small tab holds the lifted point against the model.
- Check
- The tip wraps over the edge instead of pointing up.
- If it needs fixing
- Reopen the lift and leave slightly more tip if the tab slips.
-
11 Shape the body
Turn the model over. Bring its wings gently together along the center, pinch a short ridge, then let the wings open.
Why: The ridge gives the butterfly its shallow three-dimensional shape.
- Check
- Two wing pairs open on either side of a short ridge.
- If it needs fixing
- Release the pinch and reopen evenly if one wing stays closed.
-
12 Check the result
Rest the butterfly with its central ridge up. Compare both sides and adjust only their opening angle.
Why: A final comparison distinguishes shaping from earlier layer mistakes.
- Check
- Four wings, a short ridge and a secure tab; no cuts or added pieces.
- If it needs fixing
- Return to step 7 for unequal small wings, or step 10 for a loose lock.
Repair a specific fold
Twisted base
Reopen and compare the midpoint hinges. Guide both side walls inward together instead of crushing an outward wall.
Back to step 5Unequal small wings
Compare front tips at the apex. Reopen only the uneven flap; keep the rear triangle intact.
Back to step 7Crumpled wing
Release the lifted point and try a smaller overhang. Leave the curved side transitions free.
Back to step 9Loose lock
The tab must wrap over the edge. The final pinch shapes the body and does not replace this lock.
Back to step 10Use the butterfly and try again
Place the butterfly beside a handmade card or on a dry shelf. Keep it away from moisture and avoid flattening the body. Mounting is a separate decision outside this folding lesson; the folded model itself needs no adhesive. Do not pull the tab repeatedly to imitate flapping.
Use an 18 cm square for an independent attempt and hide the pictures. Name each moving layer before lifting a corner. Compare symmetry, tab security and the raised center. Change only the wing opening angle first, so you can tell whether the difference comes from shaping or an earlier crease.
Fold again from an 18 cm square without pictures. Name each moving layer and compare the wing opening.
Printable instructions
Both PDFs are A4 instructions, not cutting templates. Print the overview for a reminder or the storyboard for larger frames and complete checks.
Questions about this butterfly
Can I use A4 paper?
Prepare a square first. Unequal sides change the base. The A4 file is an instruction sheet, not the paper that must be folded.
Do I need cuts or glue?
Neither is needed for a ready-cut square. Preparing a square from a rectangle happens before the lesson; there are no wing cuts.
Is this my first model?
Practice edge alignment first. The collapse and separate layers need more attention than a single triangle fold. Start with the beginners guide if unfamiliar.
Why keep curved regions?
The lifted point brings several layers together. Curved sides accommodate that movement and give volume. Pressing every region flat can wrinkle a wing.
Does it flap?
This is a shaped ornament, not a tested flapping mechanism. Opening the wings positions them; pulling the tab can loosen the model.
Which PDF should I print?
The one-page overview is a reminder. The four-page storyboard has larger frames and complete reasons, checks and repairs for a first attempt.
Who designed the model?
This follows the familiar three-dimensional variation of Akira Yoshizawa’s butterfly. Kiduverse created the lesson text and illustrations, not the underlying model.