kiduverse
How to fold an origami fish from one square
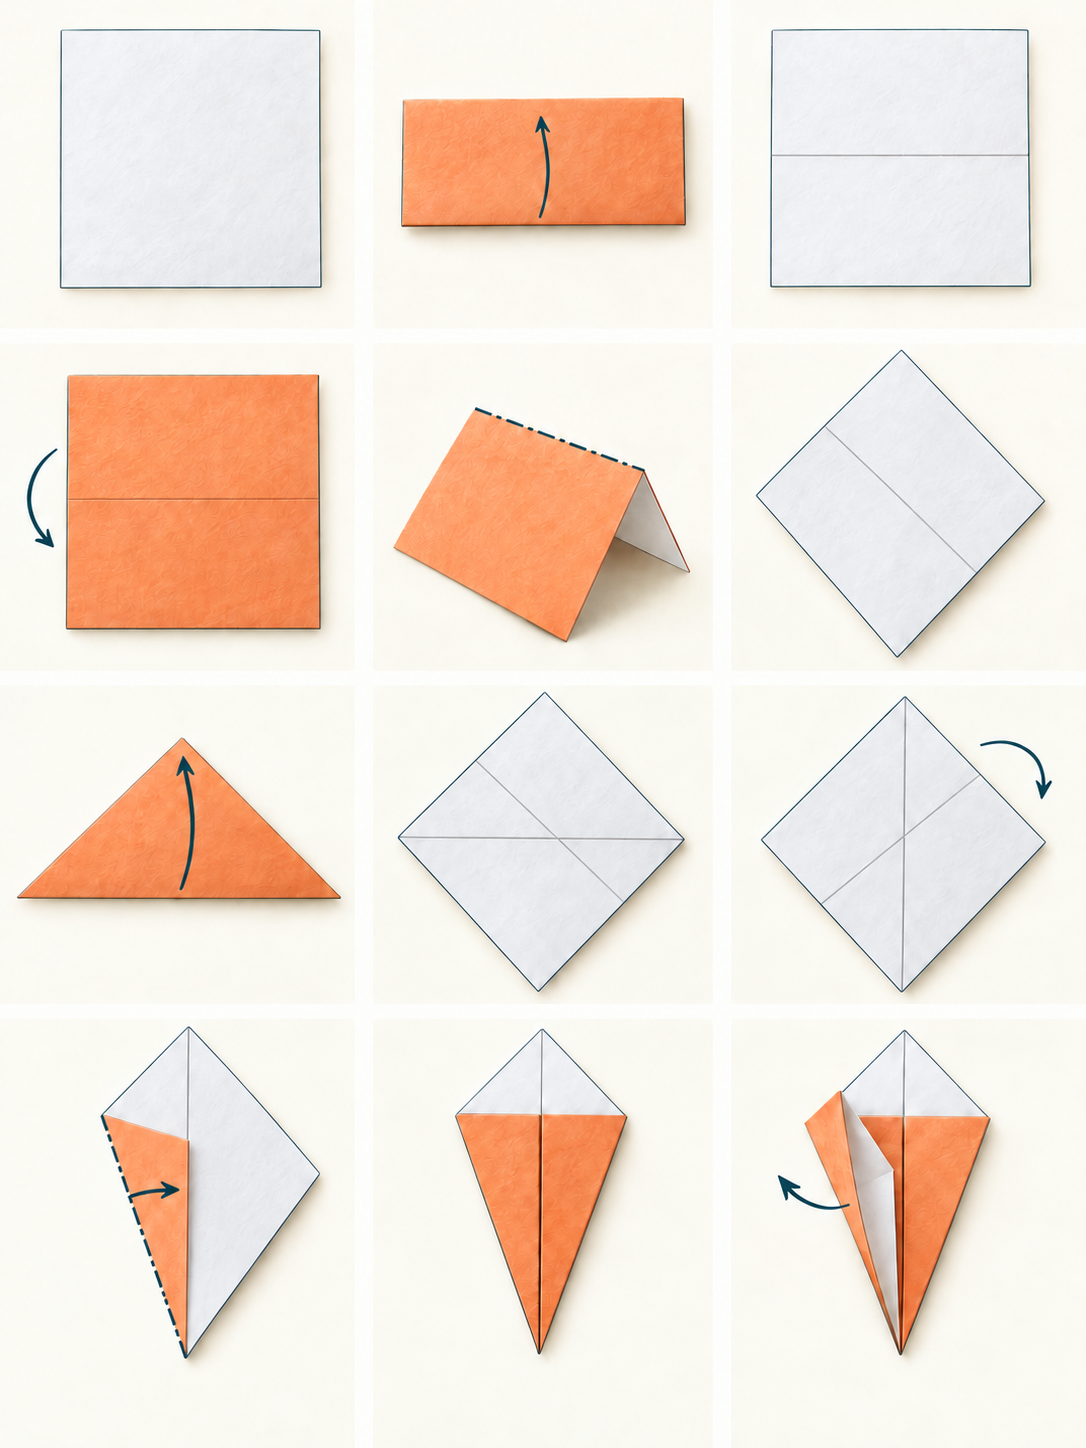
Fold a flat triangular fish with a crossed tail from one 15 × 15 cm square. These 12 steps teach you to prepare creases, collapse a waterbomb base and move a front flap separately from the back layers.
- Paper15 × 15 cm square
- Steps12, three stages
- LevelAfter your first folds
- ToolsNo glue or scissors
- TechniqueWaterbomb base
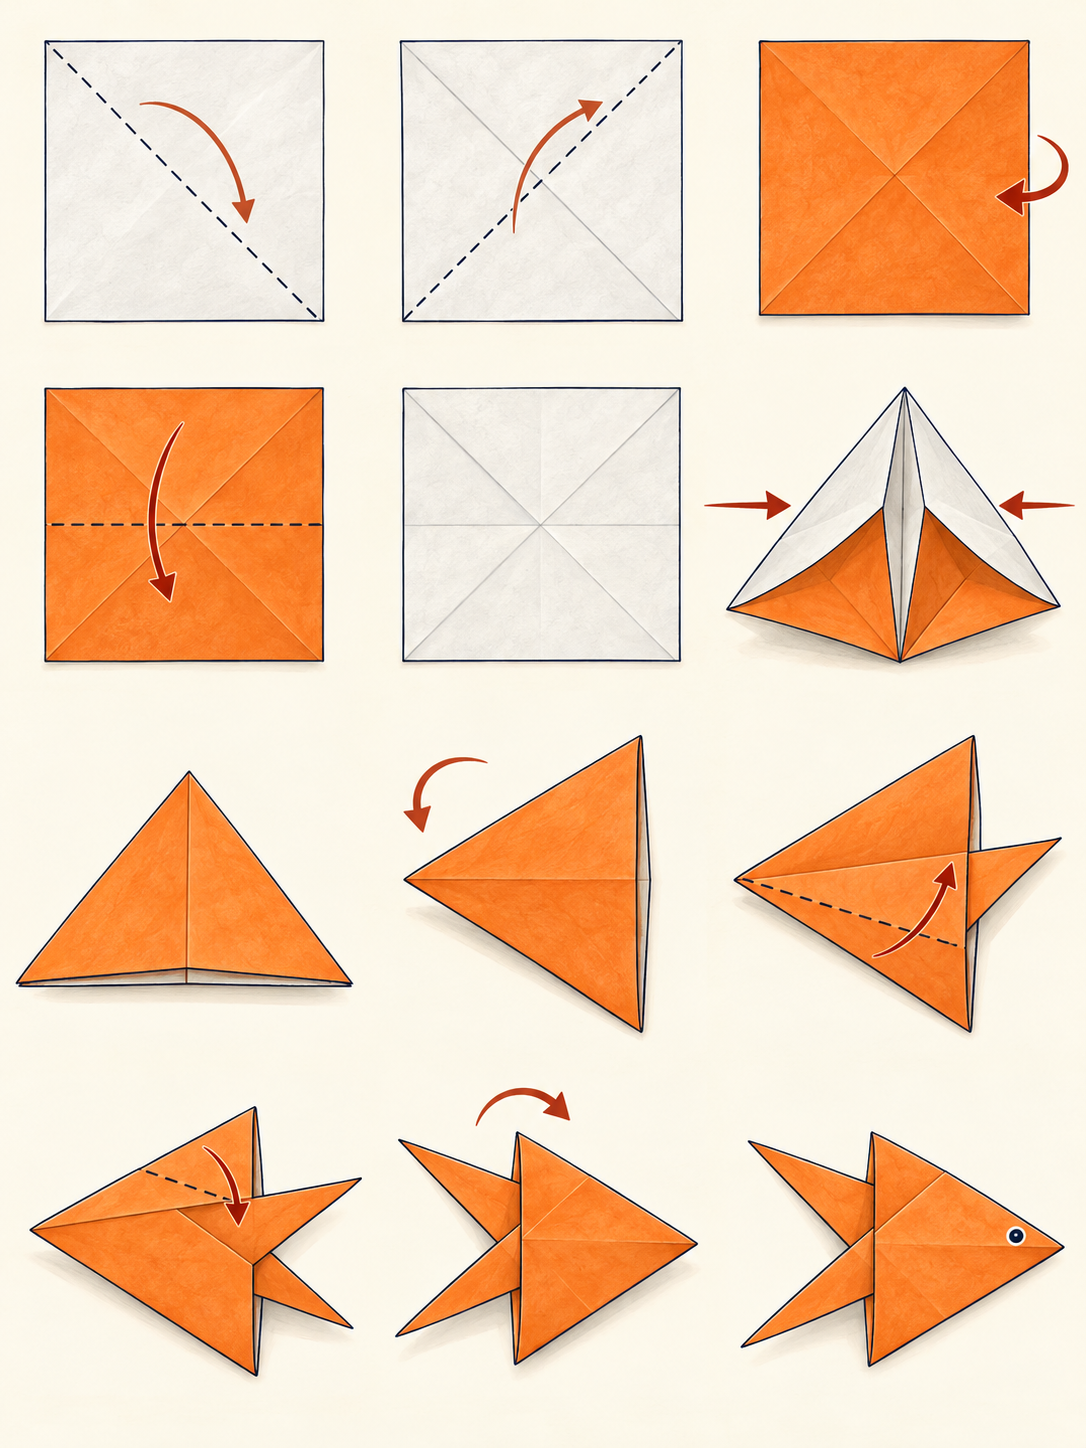
This lesson makes a flat fish with a triangular body and two projecting tail tips. It is a different construction from an inflated fish, a modular model or a pocket bookmark. Every folded part comes from one square; an eye is optional decoration.
The two main skills are collapsing a base along prepared creases and separating one flap from its neighbor. The opening folds are familiar from simpler models. During the collapse, the paper briefly rises above the table; do not press the whole sheet flat too soon.
Paper and preparation
Thin 15 × 15 cm square, colored front and pale reverse. No scissors or glue.
Start with a thin 15 × 15 cm square, preferably with differently colored sides. A pale reverse helps you notice a whole-sheet turn. Try 20 × 20 cm if the layers are difficult to separate. Cardstock resists the collapse and makes the tail bulky.
Prepare an even square first if you are using ordinary A4 paper. Scissors may be needed for that preparation, but the model uses no cuts or glue. A rectangle will not work with this sequence: the diagonals and center crease will no longer align.
Work on a flat table. Match the edges as well as the tips, then smooth each crease from its center toward its ends. Keep a spare square nearby to practice the base without repeatedly reopening the finished tail.
Reading the fish diagrams
- Dashed line The new fold in this step.
- Fine line A crease prepared earlier.
- Arrow Direction of a flap movement or whole-sheet turn.
A fine line marks an earlier crease; a dashed line marks the current fold. An arrow shows movement. Turning the sheet over changes the visible paper side; rotating it on the table changes its orientation. Neither action creates a new crease.
Compare the picture with your paper before moving it and use the checkpoint afterward. Only a front layer moves in each tail fold. The rear triangle stays intact and becomes the visible body after the last turn. Stop before pressing if all the layers move together.
Collapsing the waterbomb base
The waterbomb base uses two diagonal creases and a crosswise crease made from the opposite side. In step 6, gently bring the side midpoints toward each other. The upper and lower panels approach while the side triangles tuck between them.
While the base resembles a tent, avoid pulling the top point or adding a random crease. Check the direction of the crosswise crease, then flatten the upper and lower panels along the existing lines. The result is a triangle with separate front and back flaps.
This lesson has not yet been tested by physically folding the model.
Twelve steps to fold your fish
Prepare the creases, then collapse the base. Pause before folding the tail to identify the front and back layers.
Prepare the square
Steps 1–5. Two diagonals and a crosswise crease prepare the base.
-
1 Crease the first diagonal
White side up. Match the top-left corner to the bottom-right, crease diagonally and unfold.
Why: A reference crease guides the later collapse.
- Check
- The square is open, with one diagonal crease.
- If it needs fixing
- Reopen and match both corners and edges if the crease misses a corner.
-
2 Crease the other diagonal
Match the top-right corner to the bottom-left, crease and unfold the square.
Why: Two diagonals mark the center and divide the square into four triangles.
- Check
- An X meets at the middle of the open square.
- If it needs fixing
- If the two creases cross away from the middle, check that your paper is square and repeat the misaligned fold.
-
3 Turn the sheet over
Turn the whole open square over, colored side up; keep its edges horizontal.
Why: The next crease needs to bend in the opposite direction to the diagonals.
- Check
- The colored side faces you; the sheet is still fully open.
- If it needs fixing
- Do not make a new fold. Open any corner that curled up during the turn.
-
4 Crease across the middle
Match the top edge to the bottom edge, crease across the center and unfold.
Why: This straight crease lets the side midpoints move inward.
- Check
- A horizontal crease crosses the X at its center.
- If it needs fixing
- If the half-fold is uneven, align the full edges before pressing again.
-
5 Turn back to the lighter side
Turn the whole open sheet white side up, keeping its edges horizontal.
Why: Opposite crease directions allow a triangle to form without adding random folds.
- Check
- The lighter side is up, with an X and a horizontal ridge. The dash-dot line marks that ridge in this diagram.
- If it needs fixing
- If every crease bends the same way, turn the sheet over and check the horizontal fold again.
Waterbomb base
Steps 6–8. Push the side midpoints inward, flatten and rotate the base.
-
6 Bring the side midpoints together
Bring the side midpoints inward; tuck the side panels inside. Leave the base raised for now.
Why: The existing creases collapse the square into a layered triangle.
- Check
- The side midpoints are tucked inside; two broad triangular panels approach each other.
- If it needs fixing
- If the center jams, open the square and soften the three existing creases. Do not press a new diagonal through the middle.
-
7 Flatten the triangle
Bring the upper and lower tent panels together; flatten along the creases into a double triangle.
Why: Flattening finishes the triangle base and leaves separate front and back corner flaps.
- Check
- A wide triangle with two separate flaps at each lower corner. No loose square corner sticks out.
- If it needs fixing
- If one side folds outward, reopen just the collapse and guide that midpoint inward. Match the broad panels before pressing.
-
8 Rotate on the table
Rotate the triangle on the table until its point faces left and open edge faces right.
Why: The closed point becomes the head, while the two open ends are easy to reach for the tail.
- Check
- The closed point faces left. The open long edge is vertical on the right.
- If it needs fixing
- If the point faces right, rotate back half a turn. Keep all flaps closed.
Body and tail
Steps 9–12. Cross the two front flaps while keeping the rear layers intact.
-
9 Fold only the front lower flap
Fold only the lower front flap diagonally upward; its tip must project beyond the right edge.
Why: An angled fold makes the first tail tip project outside the body.
- Check
- The rear triangle remains unchanged. One tail tip sticks out to the right above the middle.
- If it needs fixing
- If the whole lower corner moves, reopen and separate the layers. If the tail stays inside, adjust the crease angle before pressing.
-
10 Cross the front upper flap
Fold only the upper front flap diagonally downward across the first; its tip also projects right.
Why: Mirrored crease angles create two tail tips; the flaps overlap near the middle.
- Check
- Two tips project right, one above and one below the middle. The rear triangle still has both original corners.
- If it needs fixing
- If one tip is much farther out, reopen only that front flap and adjust its angle. Do not fold the rear corner.
-
11 Turn the whole fish over
Turn the whole fish over: the intact triangular body faces you and the tail points left.
Why: The intact rear triangle becomes the smooth visible body and hides the crossed hinges.
- Check
- The head points right, the two tail tips project left, and the body is one smooth triangle.
- If it needs fixing
- If the tail disappears, check that you folded only the front flaps in the previous steps. Press their creases again if they lift.
-
12 Add an eye if you like
Draw a small eye near the right point; check the body and both tail tips.
Why: Decoration identifies the head without changing the paper construction.
- Check
- A flat triangular fish with two tail tips, made without cuts or glue.
- If it needs fixing
- If a tail flap springs open, hold the body flat and press that flap along its existing crease.
Fixing your paper fish
Creases miss the center
Check the square and repeat the uneven diagonal. Do not compensate by adding a new crease at the side.
Back to step 2The base will not collapse
Reopen to step 5. The crosswise crease must bend opposite to the diagonals; check both whole-sheet turns.
Back to step 6The tail fold moved the whole body
Reopen the latest fold. Separate the lower front flap with a fingernail, hold the rear layers on the table and repeat.
Back to step 9Tail tips are hidden
Return to the two tail folds. Adjust the angles until each tip extends beyond the straight edge of the base.
Back to step 10Your own fish and paper aquarium
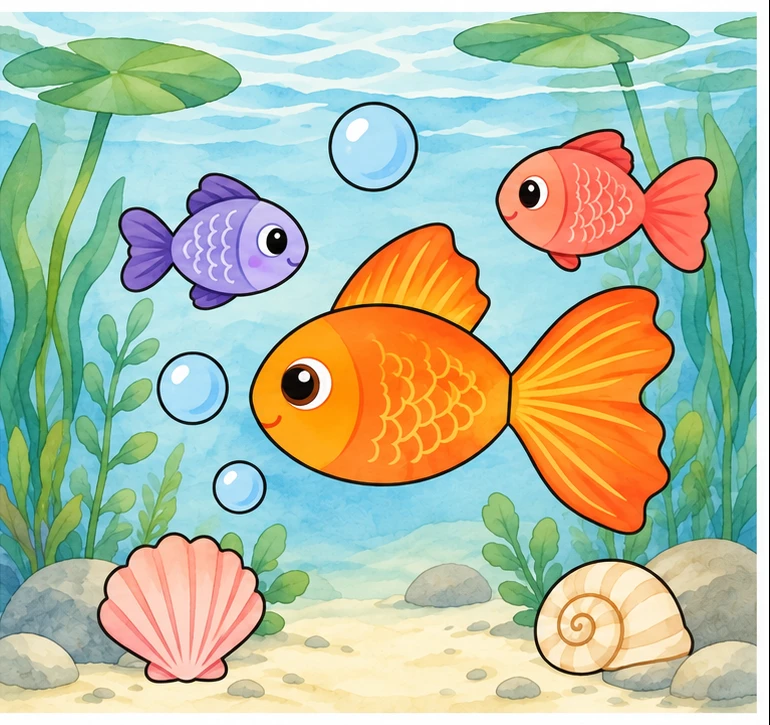
Place the finished fish on a separate blue sheet and choose its position in a paper aquarium. For a game without glue, simply move it around. Attaching it to a card is optional decoration after folding, rather than a necessary part of the construction.
Repeat the model on a new square of the same size first. Then change only the angles of the two tail folds. Compare the projecting tips and tail width. Keeping paper and size constant makes it easier to see what the changed fold angles do.
Take a fresh square and make another fish without following every picture. Before the tail folds, point to the front and rear flaps. Change both tail crease angles slightly to make a wider or narrower tail. Predict which tips will project, compare them before pressing, then explain why the rear triangle must stay unfolded.
Printable A4 fish instructions
The one-sheet A4 guide contains all 12 pictures and actions. The four-page storyboard adds reasons, checkpoints and repairs. These are instructions, not cutting templates. A4 describes the printed guide; the model starts from a separate square.
Questions about your paper fish
Can I fold the fish without scissors or glue?
Yes, from a prepared square. Scissors may be needed to turn a rectangle into a square; none of the twelve folding steps requires cutting.
Is this a three-dimensional fish?
This is a flat model. You do not inflate it or open the body; the intended result is a triangular shape with a crossed tail.
Which paper should I choose first?
Use thin paper with straight edges. Contrasting sides help track the layers. Small squares make flap separation harder, so begin with a 15 or 20 cm square.
Why turn the square over twice?
The crosswise crease is made from the opposite side to the diagonals. The second turn prepares the sheet for collapse, with the colored panels on the outside.
Must the tail be perfectly symmetrical?
Both tips should project while the rear layers stay intact. Start with similar angles, then deliberately change the tail width on a second model.
Can I print the guide on one sheet?
Yes, the overview fits on one A4 sheet. Use the four-page storyboard for more detail. The printed guide is a reference; fold the model from a separate square.
Can a complete beginner use the lesson?
Practice diagonal folds and matching edges first. Help may be useful when directing the creases during the collapse. A successful folding time or age range has not been tested.