 kiduverse
How to draw a unicorn: three levels
Choose one route and follow it from the first gesture to the last stroke. Learn to search for form, check it and use an eraser, rather than trace circles into a finished character. This lesson draws a head and neck, not the whole animal.
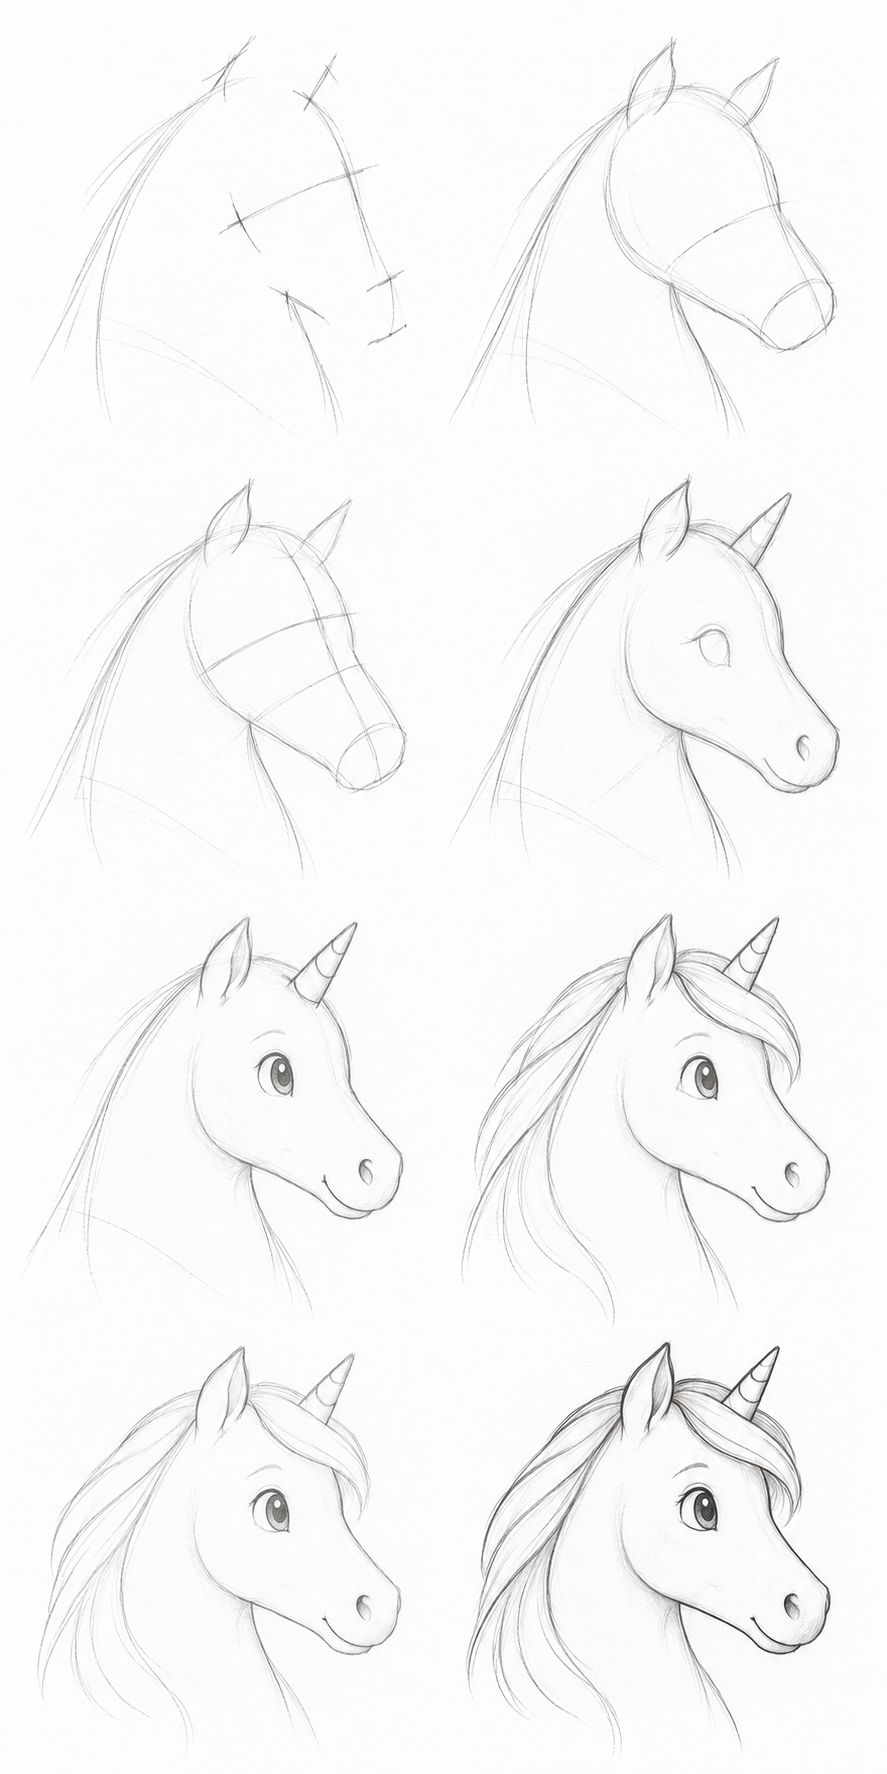
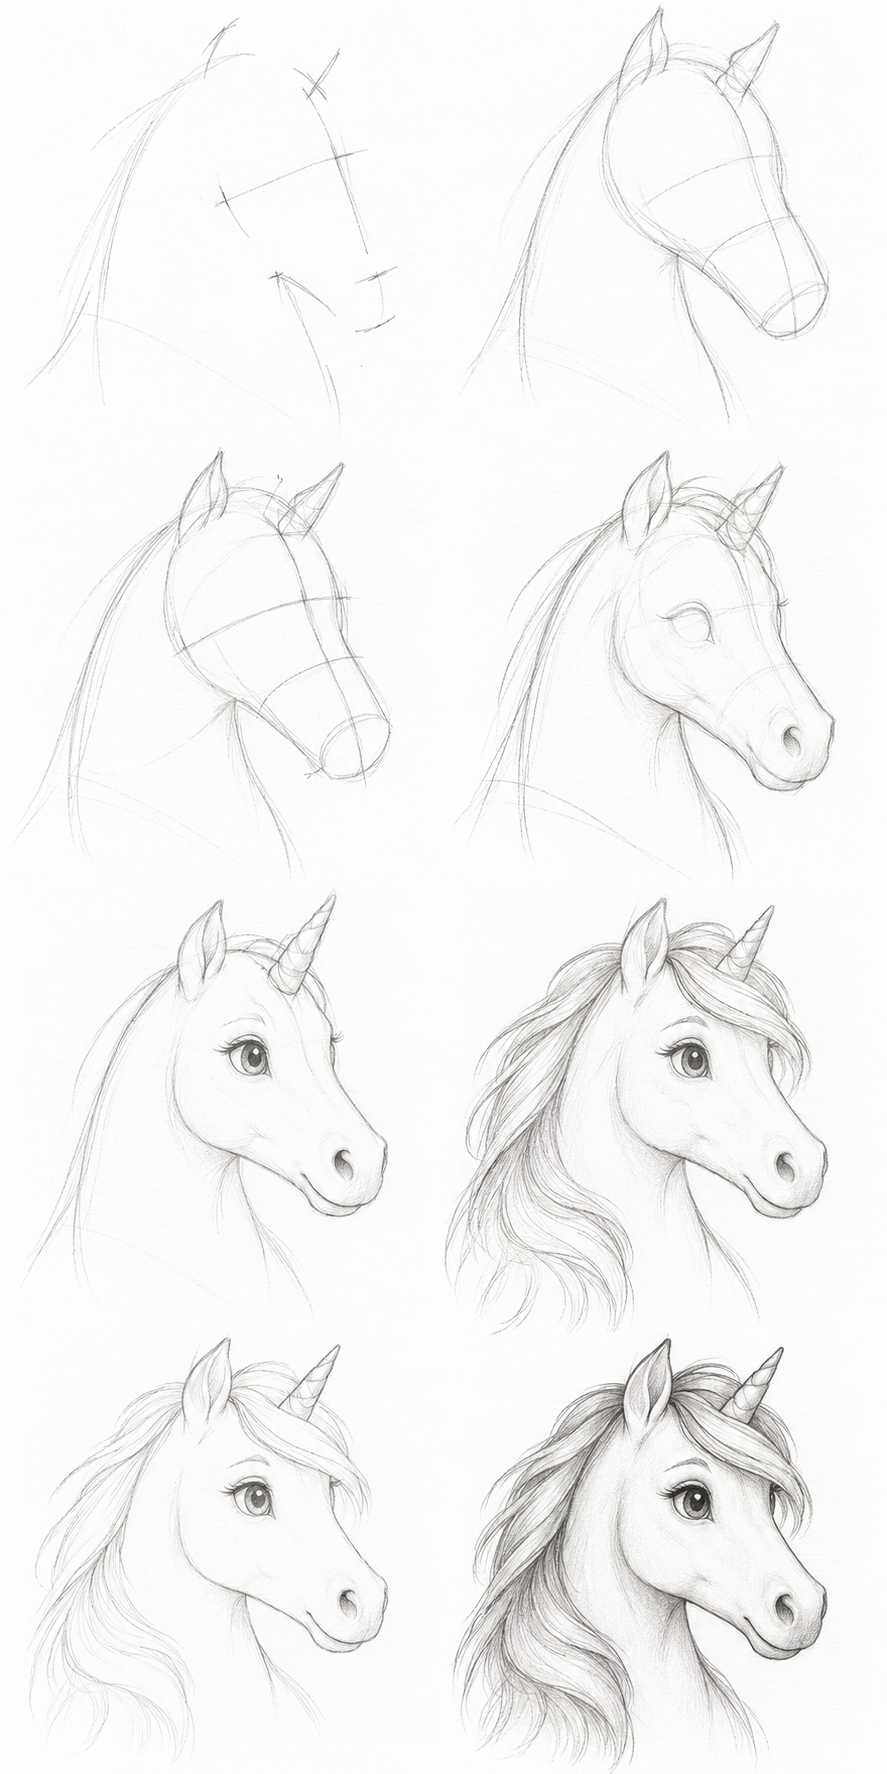
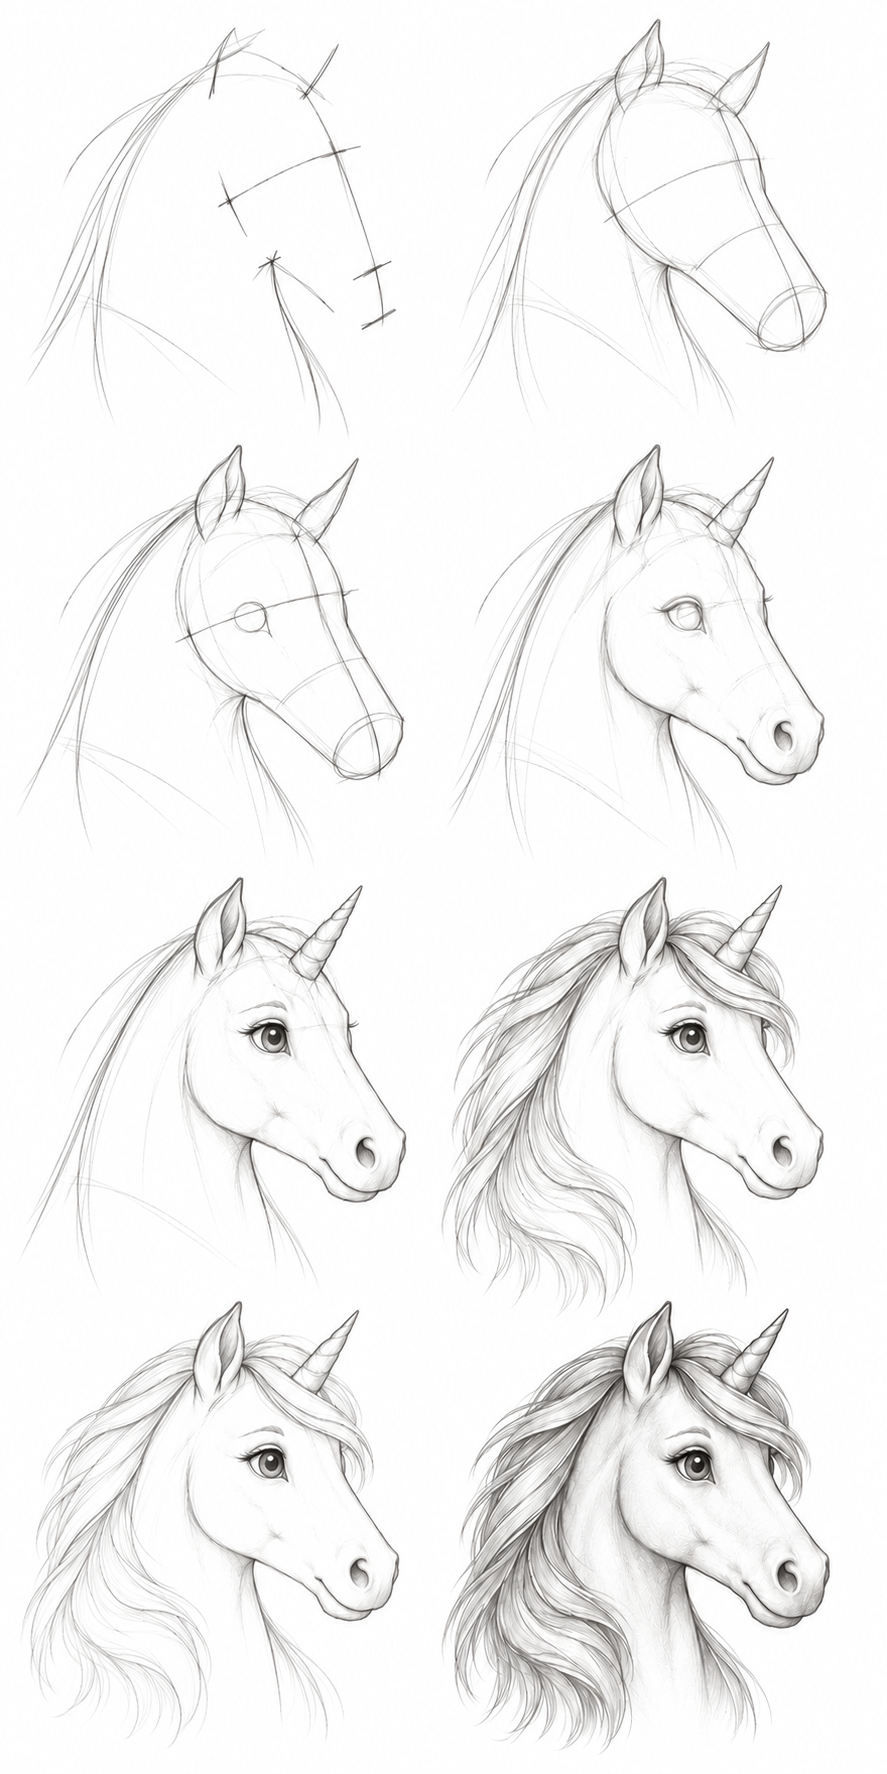
First drawing: short muzzle, simple eye, broad lock. Some practice: expressive eye and several locks. Explore form: muzzle planes, soft edges and deliberate pressure. Ages are suggestions; choose by experience. Anyone may use the simplest route, with adult help when useful.
Your goal and materials
Build a coherent portrait and explain two choices: how features sit on a turning surface, and why one contour hides behind another form. Uneven strokes are welcome; check decisions rather than likeness to the sample.
Use paper, an HB or 2B pencil and a soft eraser; a kneaded eraser is useful but optional. Allow about 25–45 minutes with breaks. Start with light marks and curves, without denting the paper. Erasers also remove scaffolding when its work is finished.
Surface line. Imagine a ribbon around the rounded head: its visible curve follows the surface. A guide locates the eye and muzzle direction, then is erased. Similar horn curves narrow toward its tip. Choose the ribbon’s position intentionally.
Overlap. An opaque foreground form hides part of the rear form. Neck lines stop at the mane; the far ear stops at the head. Choose what is in front before erasing an intersection. Transparent objects need a different decision.
Warm up with two small trials
On a spare corner, draw a small egg mass with a curved ribbon. Mark an eye on the ribbon, then lighten the guide with your eraser: the eye stays, the support disappears. In a second trial overlap two simple shapes, choose the front one and erase only the hidden rear edge. Swap their order on a new trial. Check: explain why that specific line disappeared. These are warm-ups, not the final lesson result.
Step 1. Find the gesture before the outline
First drawing: Make a light head tilt and two ticks for forehead and muzzle tip. Leave room for the horn.
Some practice: Sweep in the neck and broad direction of the future mane. This is gesture, not individual hair. Compare the forehead-to-nose distance.
Explore form: Find the head tilt and the neck’s counter-movement. Mark forehead, nose tip and throat without closing a silhouette.
Why: Gesture connects the head and neck before features compete for attention.
Check: Can you show the tilt with your hand? Is there room above and to the right?
Erase / repair: Lighten the wrong sweep with your eraser and move the endpoint ticks before adding masses.
Step 2. Place temporary masses
First drawing: Lightly place a head egg, short muzzle wedge and two leaf-like ear positions.
Some practice: Let the muzzle wedge overlap the lower head mass and turn right. Place the neck behind it.
Explore form: Compare skull mass, bridge length and narrower muzzle; place the neck and unequal visible ear widths.
Why: These shapes are scaffolding for proportion, not permanent boundaries of the animal.
Check: Does the muzzle continue the gesture? Is the far ear behind the head?
Erase / repair: Erase just the wrong outer wedge edge and shorten it. Keep the head and neck; their lines should remain pale.
Step 3. Place guides on a turning surface
First drawing: Use a pale curved eye guide and a short face axis. One visible eye is enough.
Some practice: Add eye and muzzle guides; make them wrap the same head rather than look like separate flat stickers.
Explore form: Connect forehead, bridge and nose with the axis; use cross-contours to check the eye direction and muzzle width.
Why: A surface line places features on a rounded turning form.
Check: Do the curves agree with the axis? Is the eye on the side of the head?
Erase / repair: Choose one axis and erase the competing one. Keep the useful light guide until you check the eye.
Step 4. Find an organic silhouette and erase the diagram edges
First drawing: Search for forehead, bridge, soft muzzle tip and chin with short strokes; mark eye and nostril lightly.
Some practice: Follow forehead → bridge → nose → chin → cheek, rounding the wedge or narrowing the egg where the actual silhouette needs it.
Explore form: Compare the fuller forehead, straighter bridge, soft nose and jaw turn; use deliberate changes of curvature.
Why: The masses now support one living surface. A horse head is not a circle with an outlined oval pasted onto it.
Check: Does the outer edge read as one head? Is there a closed oval seam inside the face?
Erase / repair: Lighten the egg and wedge. Erase the muzzle dividing arc and abandoned contour trials; keep useful axes for the next step.
Step 5. Refine the eye, muzzle and horn
First drawing: Make a plain oval eye and small pupil, short nostril curve and quiet mouth line; use two curves on a short cone horn.
Some practice: Refine lid and pupil without every eyelash. Place nose and mouth on the same muzzle; narrow horn bands toward its tip.
Explore form: Check eye-to-bridge distance and visible nose width. Use a few lid and nostril strokes; keep a clear horn attachment.
Why: Small details rely on large relationships; horn bands describe a curved tapering surface.
Check: Has the eye drifted onto the nose? Is the upper horn curve shorter?
Erase / repair: Erase the mistaken eye mark and replace it on the guide. Lighten unneeded guide segments without removing every useful support.
Step 6. Build large mane locks and overlap
First drawing: Use one broad flowing lock with only a couple of directional strokes. Let the forelock cover part of forehead and horn base.
Some practice: Choose two or three broad ribbons before adding a few internal strokes in their direction.
Explore form: Separate near and far locks; let marks follow each large mass, with some soft or open edges.
Why: Foreground hair hides the head, horn base or neck. A lock’s direction matters before individual hairs.
Check: Point to a rear contour that stops at a foreground lock. Which lock is nearer?
Erase / repair: Erase the covered forehead, horn-base and neck segments. Repair a crossing rear edge before adding more hair.
Step 7. Put the pencil down for an eraser pass
First drawing: Remove the axis, eye guide and egg/wedge remains. Dab at dark trials rather than scrubbing the whole page.
Some practice: Move from horn through muzzle to neck, removing scaffolding and covered rear lines while preserving visible contours.
Explore form: Lighten repeated search marks on brow, cheek and mane. Keep the one that describes the form; remove the hidden far-ear base.
Why: Drawing includes subtraction. This stage has fewer and lighter marks, yet reads more clearly.
Check: Compare frames six and seven. Which guides disappeared, and why did visible muzzle edges stay?
Erase / repair: Restore only an accidentally erased useful edge after checking its neighbours. Stop if the paper surface begins to wear.
Step 8. Choose pencil pressure instead of tracing everything
First drawing: Strengthen the eye, nostril and a few visible edges; keep the rest light.
Some practice: Use small groups of strokes on the cheek and along locks, leaving large light areas and a few stronger overlap accents.
Explore form: Deepen a few gaps between locks, under the cheek and at the nostril. Keep surface-following strokes and white paper; full lighting analysis belongs in another lesson.
Why: Equal dark outlines turn form into a sign. Varied pressure preserves a living drawing and a clear focus.
Check: Did the head circle or oval muzzle seam return? Can you read the turn and hair overlaps?
Erase / repair: Lighten one heavy edge or accidental dark stripe with the eraser, then restore just one useful stroke.
Repair a small problem
| What you notice | Possible cause | Small repair |
|---|---|---|
| An oval sticker remains on the face | Scaffolding became the final edge | Lighten the inner muzzle arc and find the nose-to-cheek transition |
| Eye points away from the head | Position ignored the guide | Erase the pale mark and place it on the surface curve |
| Transparent hair | Rear contour crosses a lock | Remove just the covered brow or neck segment |
| Every edge is equally dark | Pressure was not chosen | Lighten one secondary edge and keep the eye accent |
| Worn paper | Repeated scrubbing | Stop; begin the next trial with lighter pressure |
Make your own variation
On another part of the paper change one thing: head tilt, muzzle length or mane direction. Restart from gesture and masses rather than copying the finished edge. Decide which guide stays until the eye and which contour disappears behind the mane. Compare how clearly both drawings show the turn and overlap.
Three ideas for a more challenging drawing
Choose one idea for your next drawing. These examples suggest a direction, not a new result you are already expected to reproduce. Bodies, wings and architecture introduce separate challenges. Transfer the two familiar techniques and explain your choice.
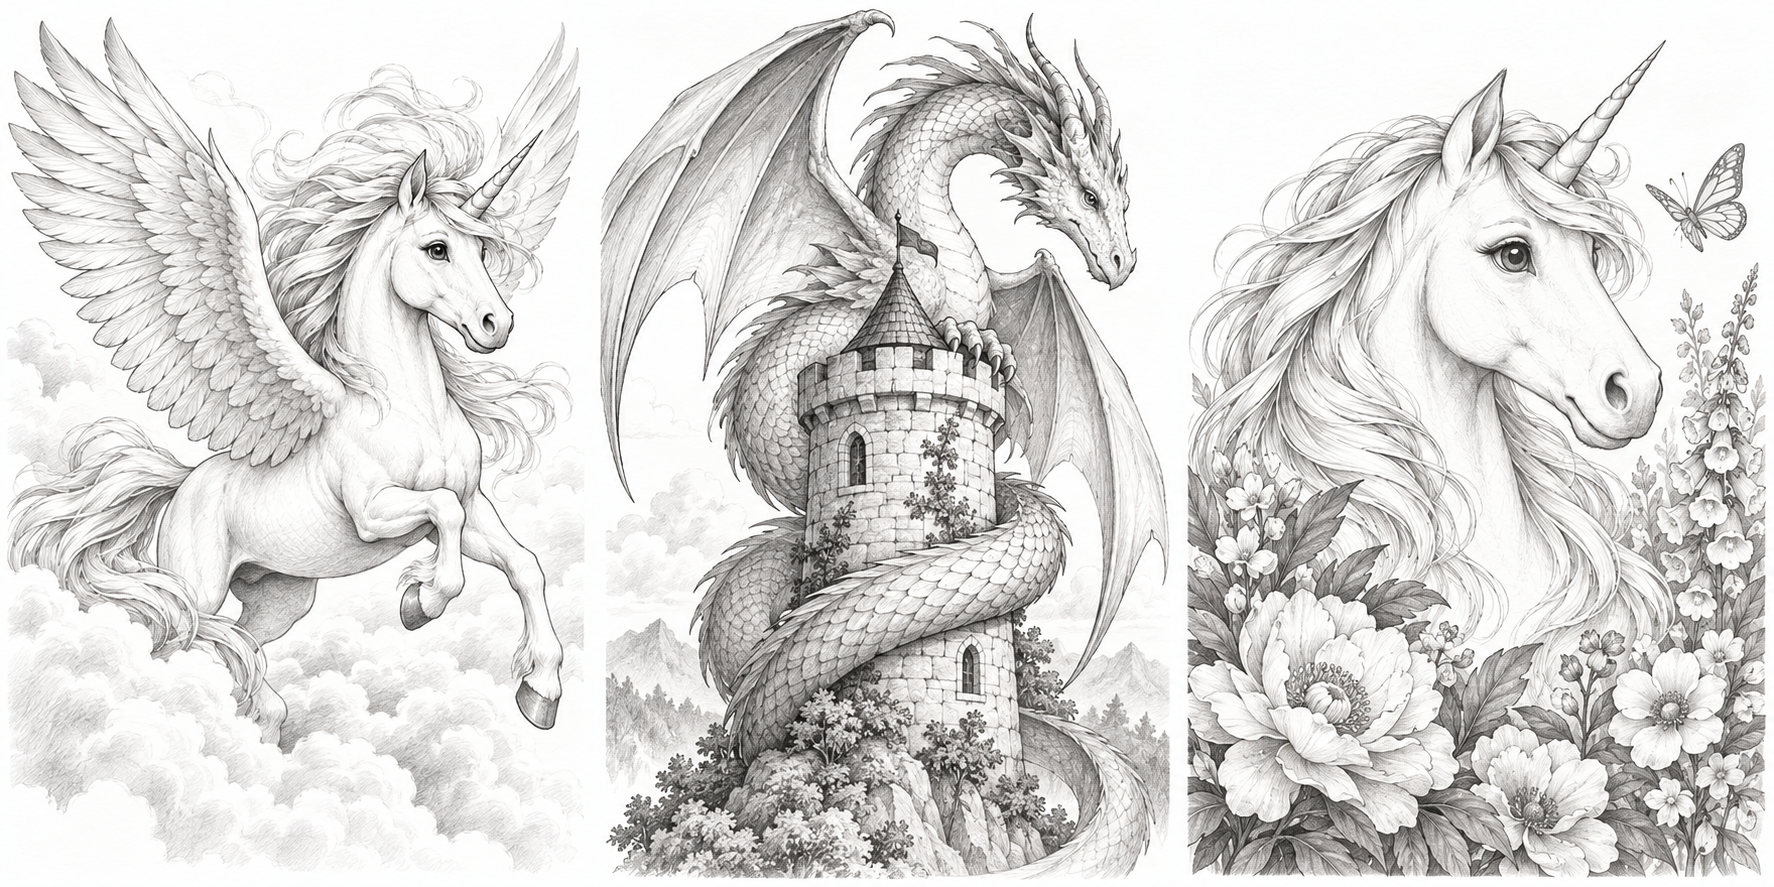
Pegasus above the clouds
Start with a body oval, neck gesture and two broad wing masses. Build the familiar head and let a cloud cover part of a far wing or leg.
Check: Which edge hides behind the cloud? The far wing line must stop instead of crossing it.
Repair: Erase one hidden edge before adding dozens of feathers.
Dragon around a tower
Begin with a tower cylinder and one curving body gesture. Add a large head and two coils, one behind the tower and one in front.
Check: Can you read the body turn and the tower surface? Which coil is nearer?
Repair: Remove the tower segment beneath the front coil and the rear-coil segment behind the tower; do not erase both at random.
Unicorn in a flower garden
Place the familiar portrait and three large flower groups. Let stems and petals cover part of the neck and keep the mane in broad locks.
Check: Does the partly hidden neck still connect the head? Are petals opaque?
Repair: Erase the covered neck contour and one redundant line inside overlapping petals.
Self-check question: in the dragon scene, why does the tower contour disappear in one place and the dragon contour disappear elsewhere?
Self-check answer: the front coil hides the tower, while the tower hides the rear coil. The order changes locally. Choose the foreground form, then remove only the covered rear edge. Point to both places and explain the difference to show transfer into a new composition.
Self-check: point to removed scaffolding and a hidden rear edge, explain the eye position and two overlaps in the dragon-and-tower idea.