kiduverse
How to make a modeling clay hedgehog
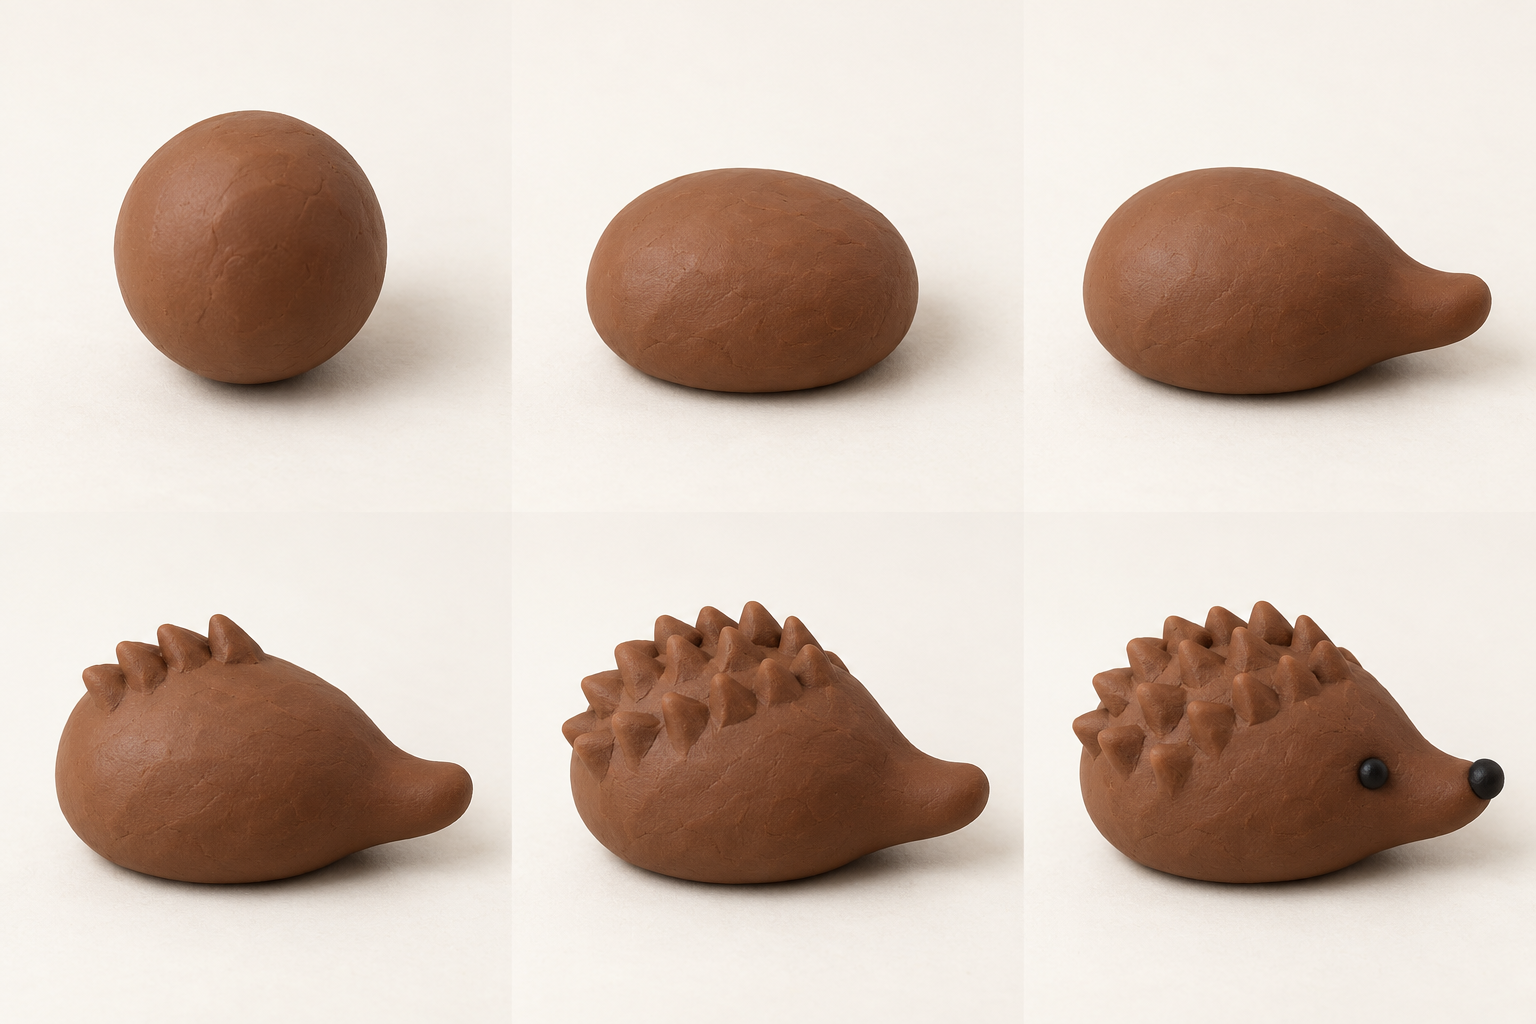
Roll a brown ball, turn it into a low oval and gently flatten its underside on the board. Pull a short snout from one end. Pinch short thick quills from the back, then press on a black clay nose and eyes.
- About ages 4–8 · help as needed
- 15–25 minutes · estimate
- 6 steps · beginner
- Pulling a short taper and pinching relief
Materials and a little practice
- Soft ordinary non-drying modeling clay: brown and a little black.
- A modeling board or washable mat.
- A cloth for your hands.
Use ordinary non-drying modeling clay with an age label suited to the child. No drying or baking is needed. Air-dry clay and pottery clay need different handling. Work with your fingers; no toothpicks, seeds, wire or glue are needed. An adult stays nearby; keep clay and small parts out of mouths.
Make a hedgehog from one brown piece: the head stays part of the body and the quills come from its surface. Practice pulling a short taper and pinching between thumb and forefinger. The low body rests on the board without separate feet.
Warm up with a spare piece. Squeeze its edge gently between two fingers and release without pulling clay away. Compare a short thick pinch with a long thin one: which holds its shape more easily? Gather the piece and try again with less pressure.
Modeling clay hedgehog: step by step
1 Soften and roll a ball
Knead the brown clay and roll one ball. Set the black piece aside for facial details.
Why: Soft clay is easier to pull and pinch without cracking.
- Check
- The brown ball is smooth and yields to gentle pressure.
- If it needs fixing
- Warm a stiff piece in your palms and knead it again.
2 Make a low oval
Roll the ball gently back and forth under your palm. Set the short oval down and press lightly from above to flatten its underside.
Why: A broad flat base helps the model stay still.
- Check
- The low body does not roll after a gentle touch.
- If it needs fixing
- If it rolls, widen the underside with a little more downward pressure; keep it thick.
3 Pull a short snout
Steady the body on the left. Gradually draw out the right end between two fingers. Taper only the tip and support it from underneath.
Why: A short snout with a broad base remains connected to the body.
- Check
- The short tip has a thick base and does not droop toward the board.
- If it needs fixing
- Gather an overlong snout back into the body and pull it out again shorter.
4 Try the first pinches
Steady the lower body. Make a few short pinches on the back farthest from the snout using thumb and forefinger. Release without pulling upward.
Why: Gentle squeezing makes relief from the surface without separate quills.
- Check
- The bumps are short and thick, with bases still joined to the back.
- If it needs fixing
- Press torn clay back into place and smooth it. Use less pressure for the next pinch.
5 Texture the back
Continue short pinches across the back, leaving some space between them. Keep the snout smooth. You do not need to copy the exact number of quills in the picture.
Why: Gaps give your fingers room without crushing earlier pinches.
- Check
- The face is smooth, the back textured and the body rests on a flat base.
- If it needs fixing
- Re-form a squashed bump gently; support the body underneath if it starts to stretch.
6 Add the nose and eyes
Roll a small black nose and press it onto the snout tip. Add two tiny eyes at the sides if wanted. Lift the hedgehog from underneath and set it down.
Why: A light press holds the details without crushing the short snout.
- Check
- The nose stays on, the snout is intact and the body stays still. The far eye may be hidden in side view.
- If it needs fixing
- Reduce an oversized detail, soften it and press it on again while supporting the snout underneath.
Fix common mistakes
The snout droops
Press the extended end back into the body. Pull it out again shorter and thicker, supporting it underneath with a finger.
Back to step 3Quills tear off
Press the loose clay back into the surface and smooth it. Take a smaller pinch and squeeze only slightly without pulling upward.
Back to step 4Make a second hedgehog independently
Without the pictures, make a smaller hedgehog with a rounder back. Decide where to leave a smooth face and how to support the body while pinching. Set it down: does it stay still, and are the quills intact? Explain why a short snout holds its shape.
With adult help
An adult steadies the low base while the child pulls the snout and makes a few large pinches. Eyes can be left off.
More independently
Make two hedgehogs with different back heights. Compare their stability and where the body needs support while pinching.
Printable modeling guide: A4 PDF
Two pages with materials, all six pictures, actions and checkpoints. Print the guide to work without a screen. A4 at 100% scale.
Download PDF · 2 pagesQuestions about this lesson
How can we make quills without toothpicks?
Gently squeeze the surface of the back between two fingers to make short thick bumps. Do not pull them into long thin points.
Why does the snout droop?
It may be too long or thin. Gather it back into the body, then pull out a shorter end with a broad base.
Can we leave off the tiny eyes?
Yes. The tapered snout and textured back already suggest a hedgehog. Add small details only when age appropriate and supervised.
Does the hedgehog need to dry?
Ordinary modeling clay stays soft and needs no drying or baking. Keep the model away from heat.