kiduverse
How to make a modeling clay ladybug
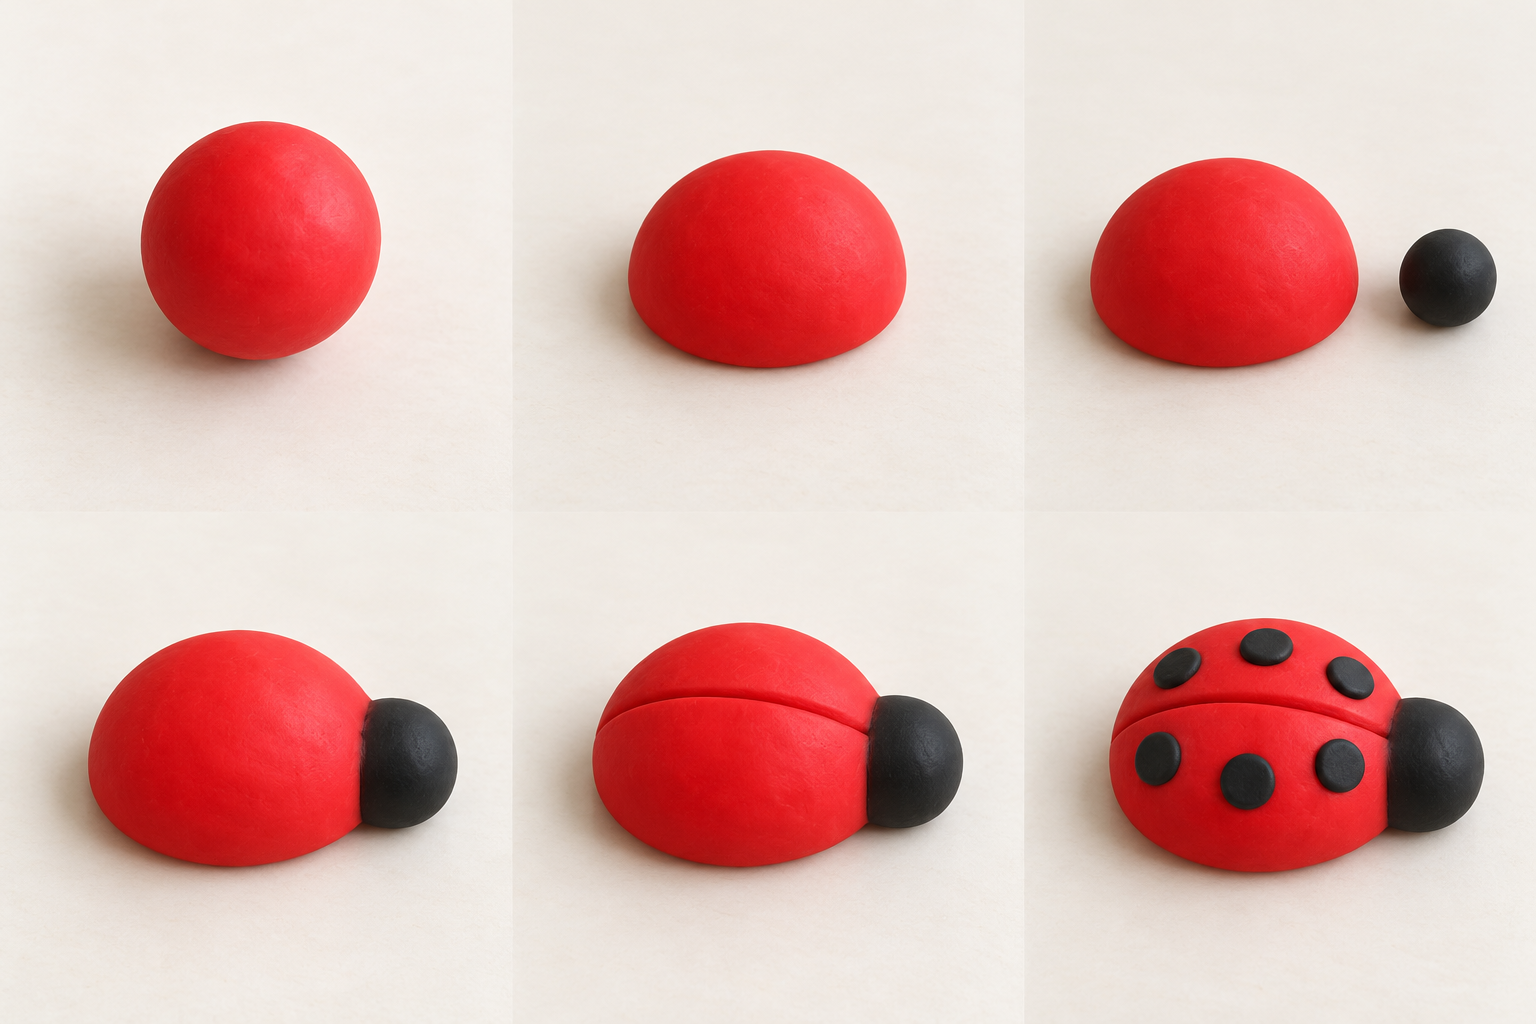
Roll a red ball and gently flatten its underside on the board, keeping the top rounded. Attach a small black head at one side. Press a shallow line along the back, then flatten six black clay balls into spots, three on each side.
- About ages 4–8 · help as needed
- 15–25 minutes · estimate
- 6 steps · beginner
- Broad joins and flat attached details
Materials and a little practice
- Soft ordinary non-drying modeling clay: red and a little black.
- A modeling board or washable mat.
- A blunt plastic modeling tool.
- A cloth for your hands.
Use ordinary non-drying modeling clay with an age label suited to the child. It stays soft and needs no drying or baking. Air-dry clay and polymer clay need different handling. An adult stays nearby; keep small clay pieces out of mouths. No glue, wire or toothpicks are needed.
Make a simple ladybug from a red dome and a small black head. Practice two techniques: joining parts across a broad contact patch and pressing a small ball into a flat spot. This beginner model has no separate legs, antennae or eyes; it rests directly on the board.
Warm up on a spare piece. Touch a small ball onto it lightly, then press with your finger pad. Compare which join holds better. On another part, press a small ball into a flat round spot without dragging it sideways.
Modeling clay ladybug: step by step
1 Roll a red ball
Soften the red clay and roll a ball between your palms. Set the black clay aside for now.
Why: A soft ball is easier to shape into an even rounded base.
- Check
- The surface has no large cracks and yields to gentle pressure.
- If it needs fixing
- Warm a stiff piece in your palms and knead it before rolling.
2 Make the rounded back
Set the ball on the board and press gently from above once. Flatten the underside while keeping the top rounded.
Why: A flat base keeps the model still; a thick back resists light pressure.
- Check
- The base does not roll and looks like a low dome rather than a thin pancake.
- If it needs fixing
- Gather an over-flattened base into a ball and press more gently.
3 Prepare a small head
Roll a little black clay into a ball about one-third the width of the red body. Set it separately on the right. Keep the remaining black clay for spots.
Why: A small head is easier to join and does not outweigh the base.
- Check
- The red body and much smaller black head are still separate.
- If it needs fixing
- Split an oversized ball and roll the head from a smaller portion.
4 Press the head onto the body
Flatten a small contact patch on the black ball. Steady the red base on the left and press the whole patch against its right side.
Why: A broad contact patch holds better than a single point of contact.
- Check
- The head touches the board and stays joined after a gentle touch.
- If it needs fixing
- Remove a loose head, soften its contact patch and press it on again a little more firmly.
5 Mark the center of the back
Use a blunt plastic tool to press a shallow line along the center of the red back, from the rear edge toward the head. Keep the base whole.
Why: A shallow groove suggests two wing covers without cutting the body apart.
- Check
- There is room for spots on both sides; red clay still joins the base underneath.
- If it needs fixing
- Smooth a deep cut closed with a finger and press a new line more lightly.
6 Attach six spots
Roll six small black balls. Place three on each side of the line and press each straight down into a flat round spot. Lift the model from underneath and set it down.
Why: Downward pressure joins a spot, while sideways movement smears it.
- Check
- All six spots stay on, the line is clear and the rounded back is not crushed.
- If it needs fixing
- Remove a smeared spot, roll a smaller ball and attach it with one short press.
Fix common mistakes
The head falls off
Remove the head, soften the join and make a small flat patch on it. Press this whole patch against the side of the body.
Back to step 4A spot smears
Lift off the smeared piece, roll a smaller ball and press straight down once without dragging.
Back to step 6Make a second ladybug independently
Without the pictures, make a smaller ladybug with four spots, two on each side. Decide how to attach the head without squashing the back. Lift the model from underneath and set it down: do the head and all the spots stay on?
With adult help
An adult steadies the base and helps divide the black clay. The child presses on the head and three or four larger spots.
More independently
Make two domes of different heights. Compare which is easier to steady while attaching spots, and explain why.
Printable modeling guide: A4 PDF
Two pages with materials, all six pictures, actions and checkpoints. Print the guide to work without a screen. A4 at 100% scale.
Download PDF · 2 pagesQuestions about this lesson
Why does the back turn into a pancake?
The pressure is too strong or lasts too long. Gather the red clay into a ball and press it down only slightly, keeping the top rounded.
How can we join the head without glue?
Soft modeling clay joins under pressure. Make a small flat patch on the head and press it against the body while supporting the red part on the other side.
How can we make neat spots?
Use small balls of similar size. Press each straight down without dragging your finger sideways. Leave space between the spots and keep the center line clear.
Should we cut right through the back?
No. A shallow groove made with a blunt plastic tool is enough; the red base stays whole. Smooth a deep cut closed and try again with less pressure.