kiduverse
How to draw a dinosaur: shapes, legs, light and shadow
Draw a long-neck dinosaur step by step: three levels, oval construction, overlapping legs and pencil shading, with complete A4 lesson and practice PDFs.
- 3 detail levels
- Paper, HB/2B pencil, eraser
- 19 parts
Tap a drawing below to choose your level. The other levels hide and the “trial → after checking” pairs get bigger.
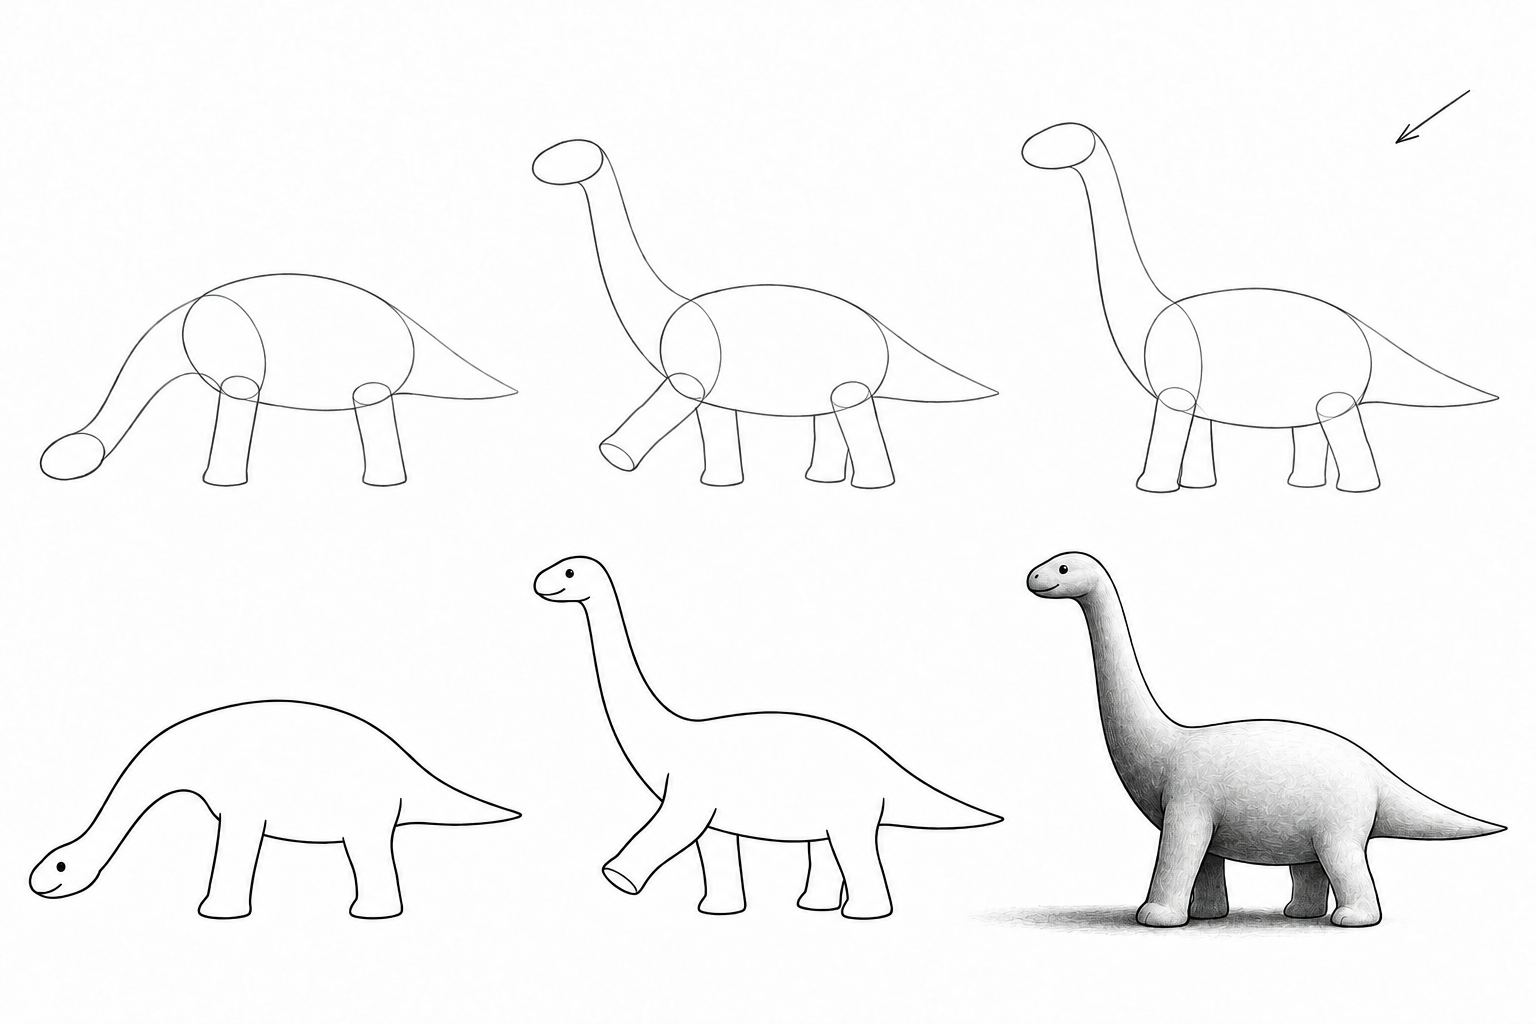
Draw a simplified long-neck dinosaur in profile. Begin with two ovals: a large body mass and a small head. The simple route ends at step 5, the middle at step 7 and the detailed route at step 12. Choose by the actions you want to practise, rather than by age.
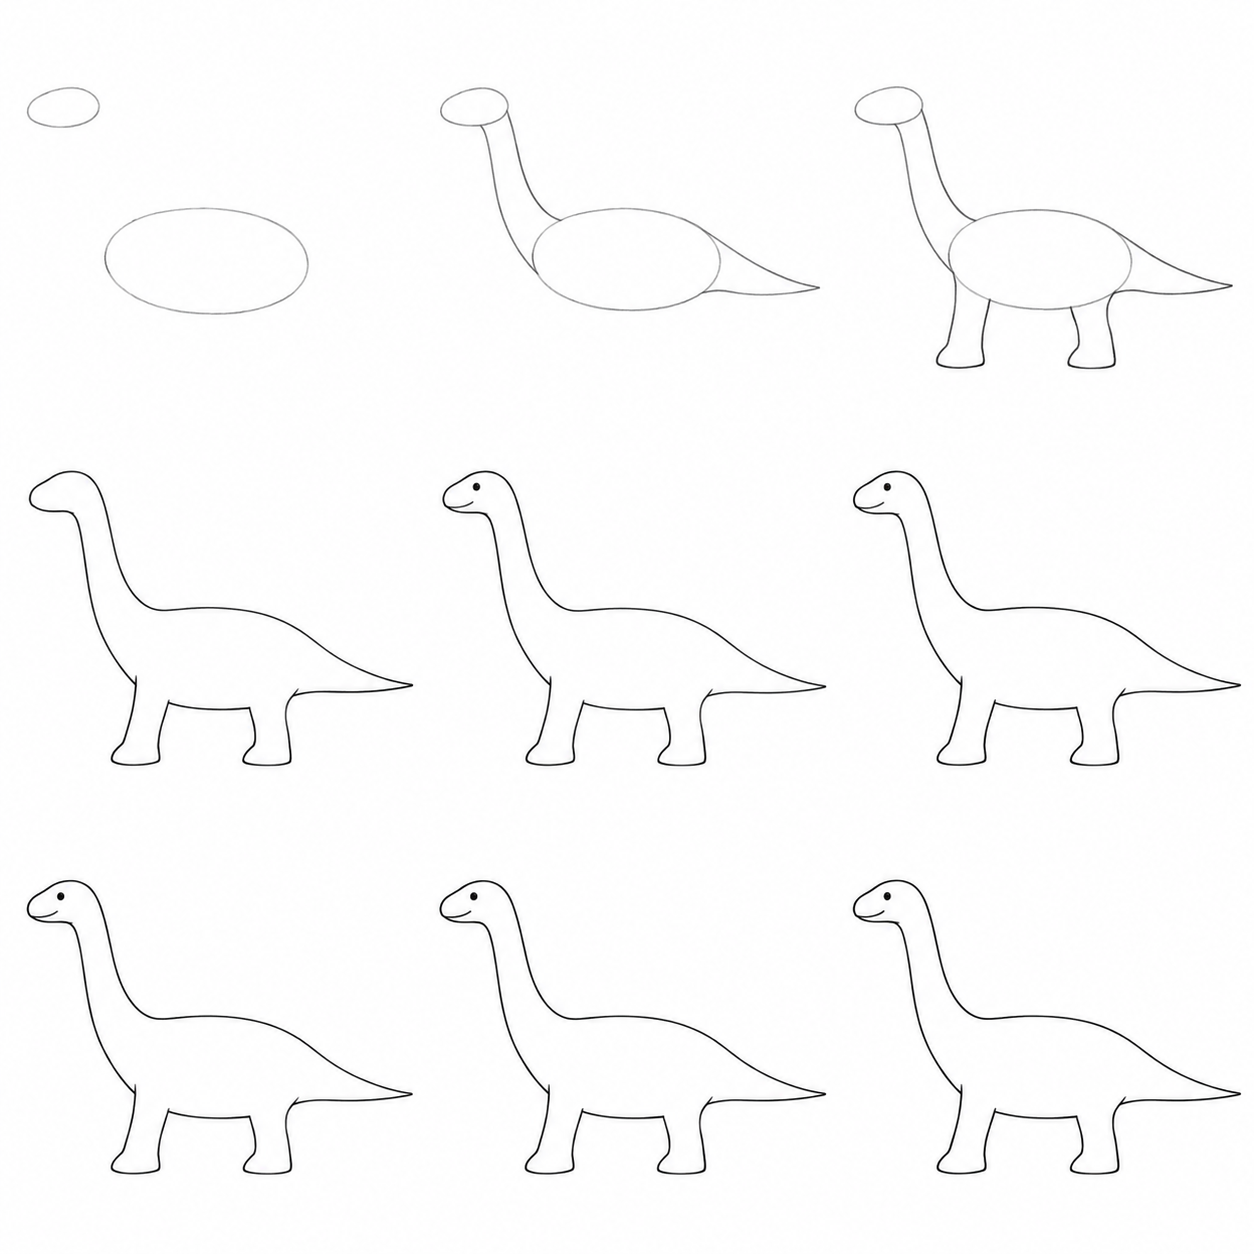
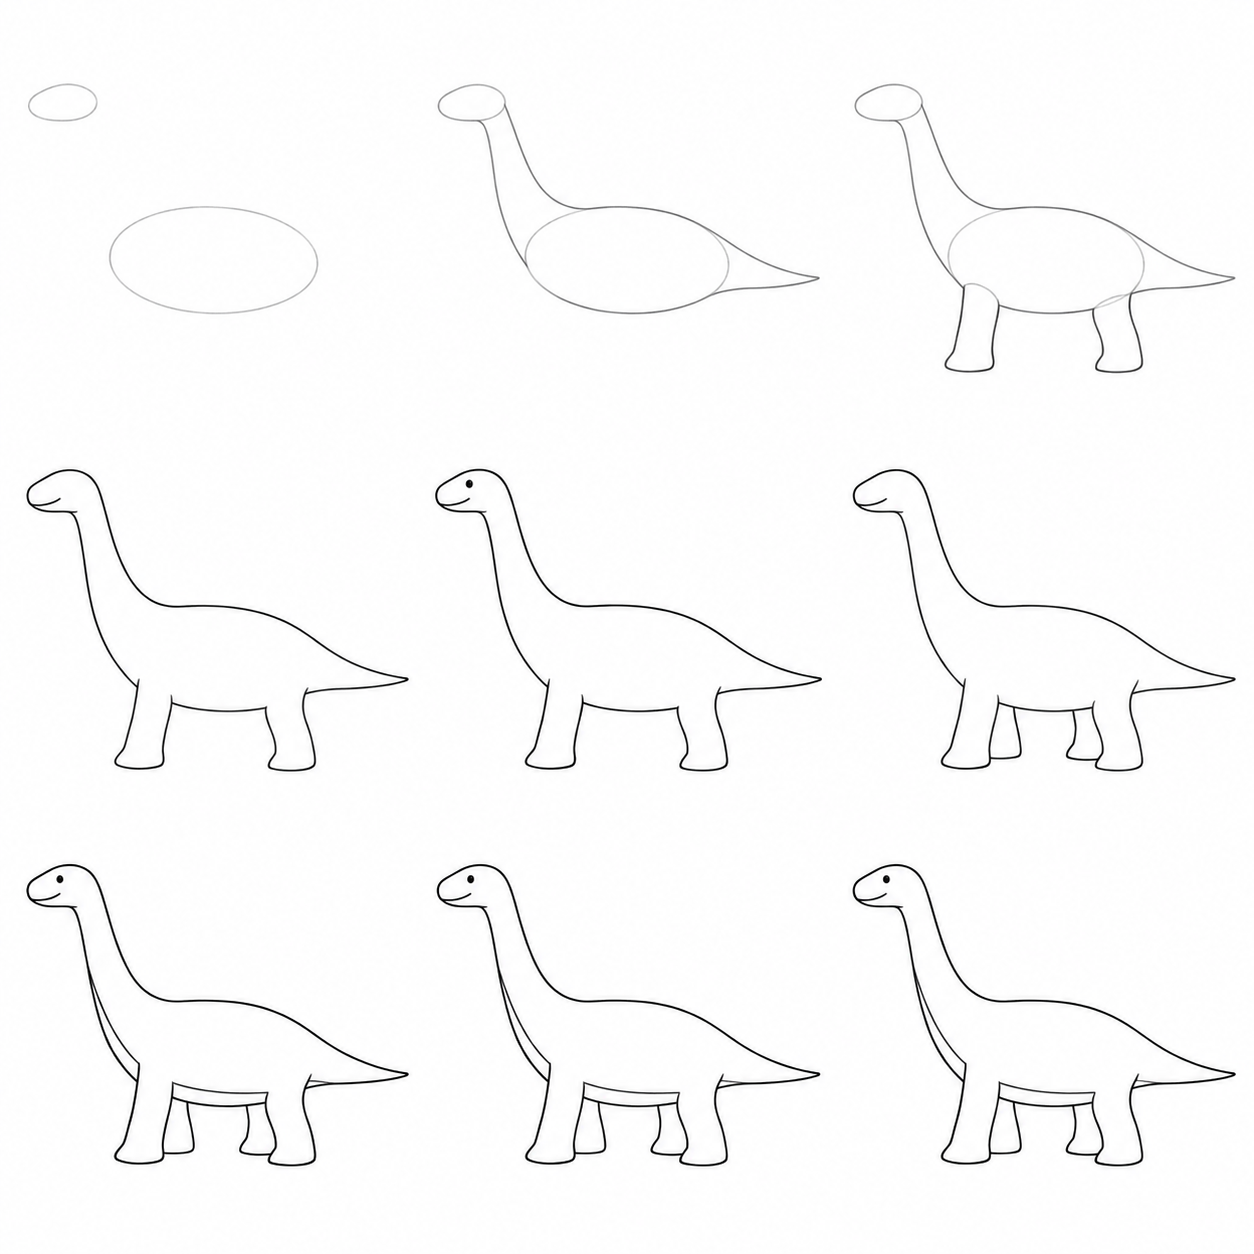
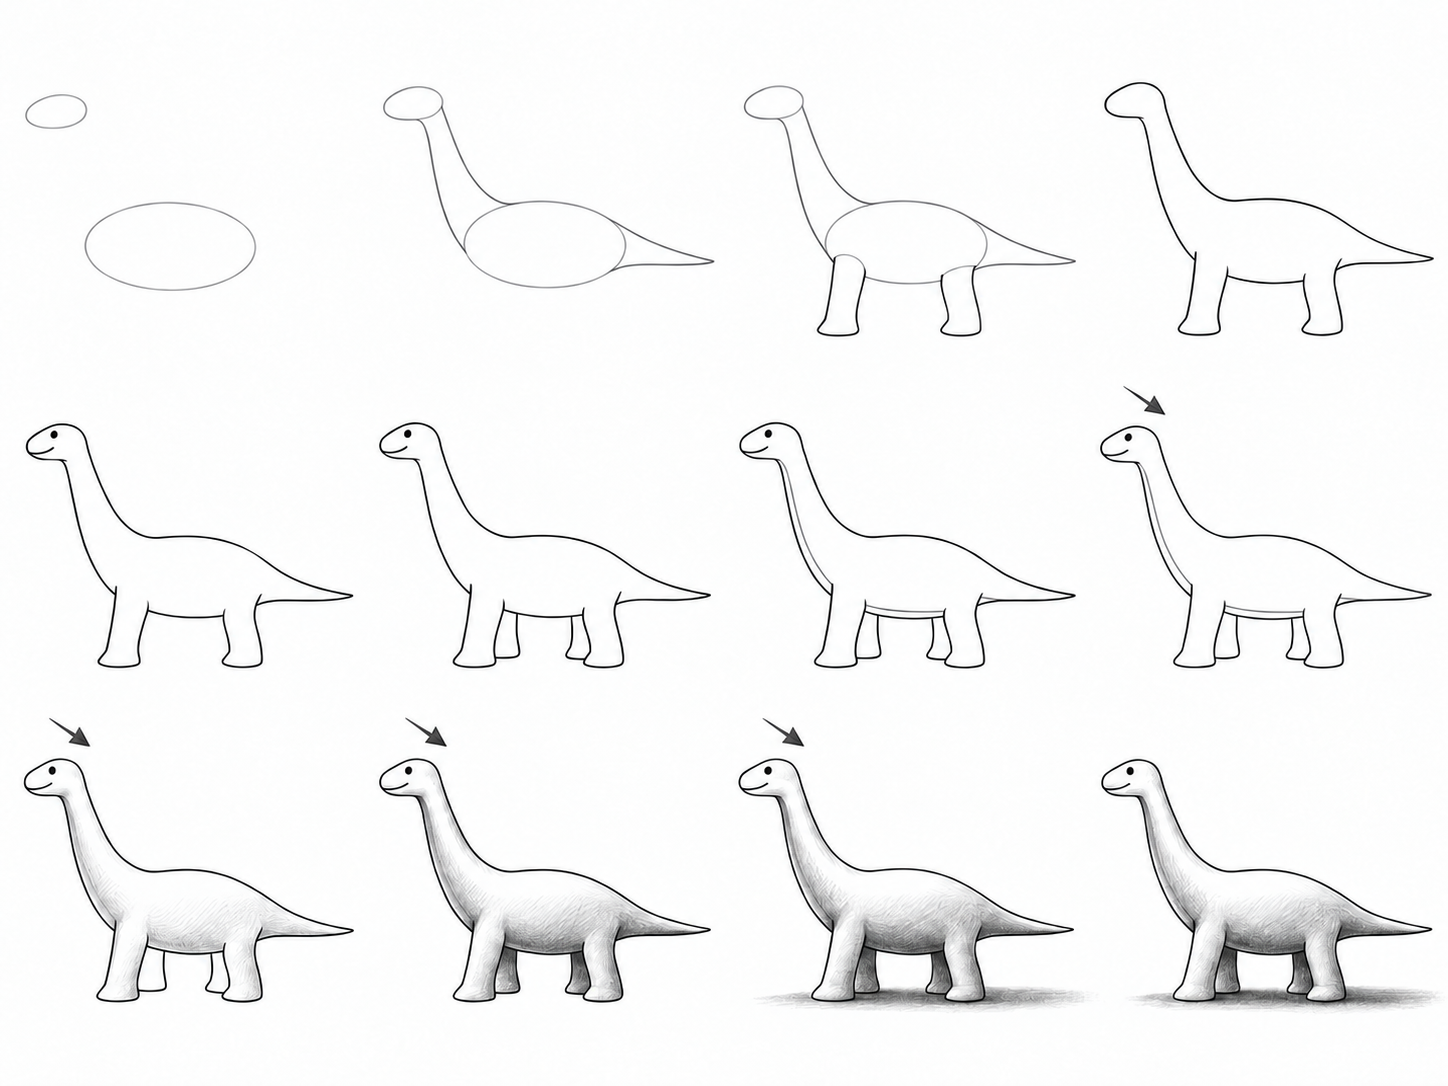
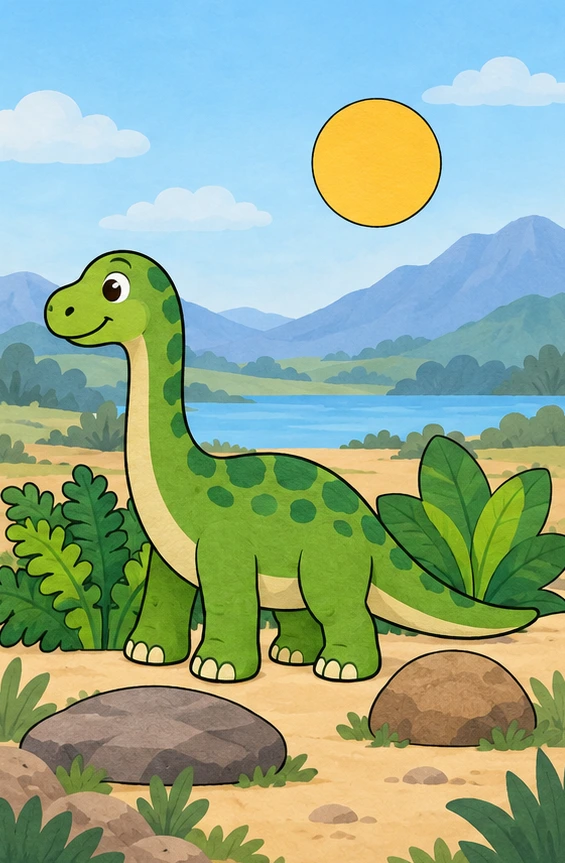
The first result is a clean outline with two simplified near legs. The second adds far legs and the turning underside; the third adds layered values and a ground shadow. This is an imagined character, not a species reconstruction. The illustrations are AI-generated in pencil style.
Goal and preparation
Draw a whole simplified sauropod in profile, joining masses into a connected outline and showing leg overlap. In the detailed route, build volume and a ground shadow under one light. Use paper, an HB/2B pencil and an eraser. A rough oval and curve are enough to begin. Allow about 20–45 minutes with breaks for your chosen route; this is a guide, not a promise. To simplify, stop at the clean outline. To extend, change the light in independent work. Reserve space for head and tail before adding details.
Technique 1. Construction and overlap
Two masses help you choose proportions. Joining curves replace unneeded oval sections. A near leg hides part of a far leg: the rear line ends at the front edge. In the margin join two ovals, then overlap two cylinders and erase the covered edge. Check: can you point to the foreground shape? Repair: remove only the line inside it. For the underside band, try two neighbouring curves following the same bend.
Technique 2. Light and volume
Before the detailed route, practise on a sphere. Choose upper-left light; reserve white there, lay a light midtone on the right and a second layer on the lower right. Extend a cast shadow right from the base. Surface value and a shadow on the ground are separate decisions. Check: can you see three values and contact with the support? Repair: lift excess tone with an eraser or move the shadow start to the sphere. You do not need to copy every sample pencil mark.
Warm-up
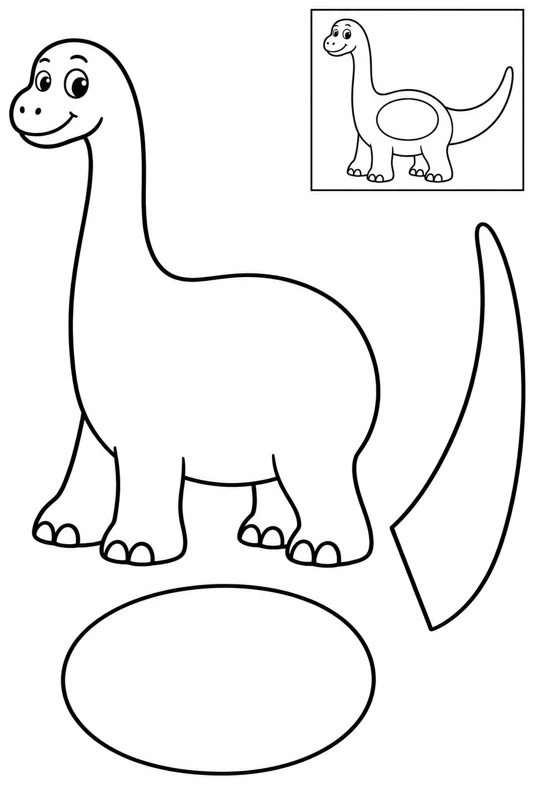
Each pair shows preparation above and a trial goal below. The first pair shows where the masses lead; add the legs and face through the lesson steps. In the second, erase the rear cylinder edge; in the third, layer the values using technique 2. Do not jump directly from a faint outline to a dark sphere.
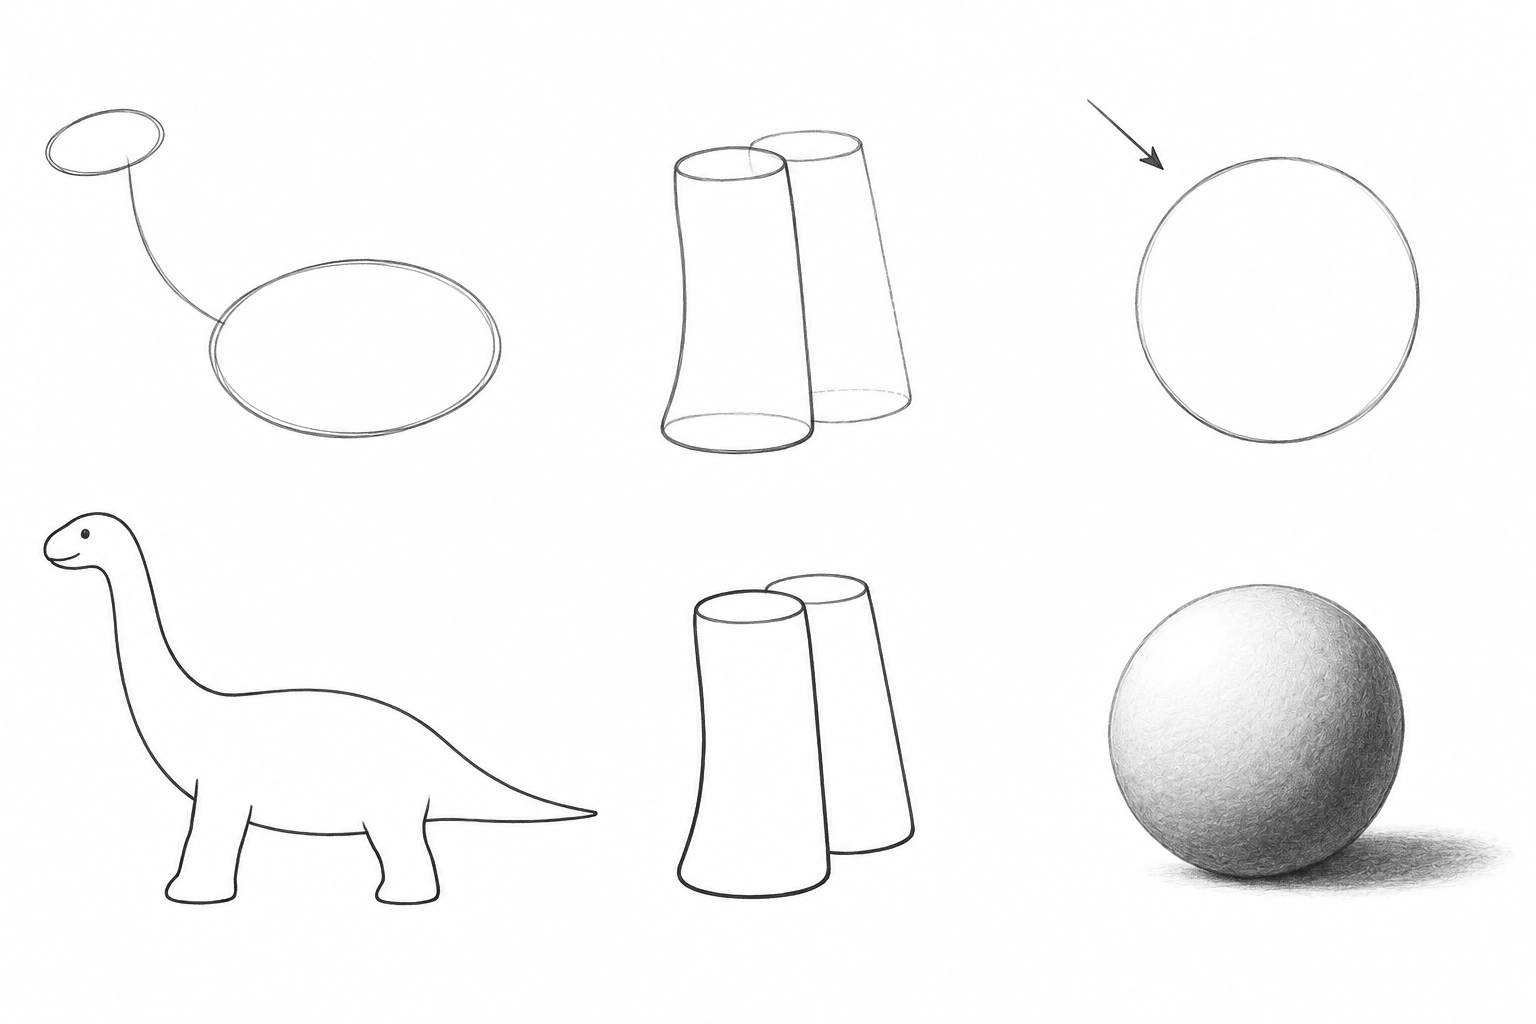
Masses and connection. Compare preparation and the trial goal; use the technique explanation for the action.
Front and rear edges. Compare preparation and the trial goal; use the technique explanation for the action.
Values and support. Compare preparation and the trial goal; use the technique explanation for the action.
Check: name the joining curve, erased edge and light area. Repair: repeat only the unclear trial.
Step 1. Two masses
Simplest: Sketch a horizontal body oval and a small head oval above and to its left. Leave room on the right for the tail. Why: Large proportions are easier to change before details; the head is much smaller than the body. Check: Are both ovals inside the margins, with room for a long neck between them? Repair: Lighten and move only the head oval if there is not enough neck space.
More detail: Sketch a horizontal body oval and a small head oval above and to its left. Leave room on the right for the tail. Why: Large proportions are easier to change before details; the head is much smaller than the body. Check: Are both ovals inside the margins, with room for a long neck between them? Repair: Lighten and move only the head oval if there is not enough neck space.
Best version: Sketch a horizontal body oval and a small head oval above and to its left. Leave room on the right for the tail. Why: Large proportions are easier to change before details; the head is much smaller than the body. Check: Are both ovals inside the margins, with room for a long neck between them? Repair: Lighten and move only the head oval if there is not enough neck space.
Step 2. Neck and tail
Before
After
Before
After
Before
After
Simplest: Join the head to the front of the body with two smooth neck curves. Extend a tapering tail to one tip on the right. Why: The ovals locate masses; the joining contour makes them one connected body. Check: Does the neck have width throughout, and does the tail join the back and underside? Repair: Widen one pinched neck section or shorten the tail tip while keeping the body oval.
More detail: Join the head to the front of the body with two smooth neck curves. Extend a tapering tail to one tip on the right. Why: The ovals locate masses; the joining contour makes them one connected body. Check: Does the neck have width throughout, and does the tail join the back and underside? Repair: Widen one pinched neck section or shorten the tail tip while keeping the body oval.
Best version: Join the head to the front of the body with two smooth neck curves. Extend a tapering tail to one tip on the right. Why: The ovals locate masses; the joining contour makes them one connected body. Check: Does the neck have width throughout, and does the tail join the back and underside? Repair: Widen one pinched neck section or shorten the tail tip while keeping the body oval.
Step 3. Near legs
Before
After
Before
After
Before
After
Simplest: Add two broad legs below the front and rear of the body, each with a flat foot. Keep the light body oval for now. Why: Two support positions anchor the figure and locate the later far legs. Check: Is there a front and a rear leg, with feet at roughly the same height? Repair: Move only the bottom of a short leg instead of changing the whole body.
More detail: Add two broad legs below the front and rear of the body, each with a flat foot. Keep the light body oval for now. Why: Two support positions anchor the figure and locate the later far legs. Check: Is there a front and a rear leg, with feet at roughly the same height? Repair: Move only the bottom of a short leg instead of changing the whole body.
Best version: Add two broad legs below the front and rear of the body, each with a flat foot. Keep the light body oval for now. Why: Two support positions anchor the figure and locate the later far legs. Check: Is there a front and a rear leg, with feet at roughly the same height? Repair: Move only the bottom of a short leg instead of changing the whole body.
Step 4. Erase construction
Before
After
Before
After
Before
After
Simplest: Erase the ovals and seams inside the neck, tail and leg joins. Keep the selected outside contour. Why: An oval was a construction aid, not a seam on the surface. Removing it joins the body. Check: Has the closed body oval disappeared, with no crosswise seams at the leg roots? Repair: Erase one remaining oval segment; restore only an outside edge touched by the eraser.
More detail: Erase the ovals and seams inside the neck, tail and leg joins. Keep the selected outside contour. Why: An oval was a construction aid, not a seam on the surface. Removing it joins the body. Check: Has the closed body oval disappeared, with no crosswise seams at the leg roots? Repair: Erase one remaining oval segment; restore only an outside edge touched by the eraser.
Best version: Erase the ovals and seams inside the neck, tail and leg joins. Keep the selected outside contour. Why: An oval was a construction aid, not a seam on the surface. Removing it joins the body. Check: Has the closed body oval disappeared, with no crosswise seams at the leg roots? Repair: Erase one remaining oval segment; restore only an outside edge touched by the eraser.
Step 5. Simple result
Before
After
Before
After
Before
After
Simplest: Place a small eye inside the head and a short mouth line near its front. The simple route finishes here. Why: Two features make the simplified silhouette readable without fine texture. Check: Is the eye inside the head, the mouth short, and both legs and tail fully visible? Repair: Reduce only the eye or shorten a mouth that has crossed into the neck.
More detail: Place a small eye inside the head and a short mouth line near its front. The simple route finishes here. Why: Two features make the simplified silhouette readable without fine texture. Check: Is the eye inside the head, the mouth short, and both legs and tail fully visible? Repair: Reduce only the eye or shorten a mouth that has crossed into the neck.
Best version: Place a small eye inside the head and a short mouth line near its front. The simple route finishes here. Why: Two features make the simplified silhouette readable without fine texture. Check: Is the eye inside the head, the mouth short, and both legs and tail fully visible? Repair: Reduce only the eye or shorten a mouth that has crossed into the neck.
Step 6. Far legs
Before
After
Before
After
Simplest: This route is complete. Keep this result without new details; later actions belong to the next level.
More detail: Add two narrower far legs behind the near legs. Stop covered edges at the foreground legs and belly. Why: Stopping a rear line at a front shape shows overlap instead of transparency. Check: Are there four feet, with no far-leg line running through a near leg? Repair: Erase only the covered segment; do not trace a complete rear leg through the front one.
Best version: Add two narrower far legs behind the near legs. Stop covered edges at the foreground legs and belly. Why: Stopping a rear line at a front shape shows overlap instead of transparency. Check: Are there four feet, with no far-leg line running through a near leg? Repair: Erase only the covered segment; do not trace a complete rear leg through the front one.
Step 7. Turning the underside
Before
After
Before
After
Simplest: This route is complete. Keep this result without new details; later actions belong to the next level.
More detail: Draw a narrow curved band along the underside of the neck and belly. Stop it at the near legs. Why: The bending band shows the turn of the long form; it is a teaching boundary, not a scale pattern. Check: Does the band follow the neck and belly without crossing near legs? The middle route is complete. Repair: Lighten one stiff section and replace it with a curve between the same endpoints.
Best version: Draw a narrow curved band along the underside of the neck and belly. Stop it at the near legs. Why: The bending band shows the turn of the long form; it is a teaching boundary, not a scale pattern. Check: Does the band follow the neck and belly without crossing near legs? The middle route is complete. Repair: Lighten one stiff section and replace it with a curve between the same endpoints.
Step 8. Choose the light
Before
After
Simplest: This route is complete. Keep this result without new details; later actions belong to the next level.
More detail: This route is complete. Keep this result without new details; later actions belong to the next level.
Best version: Mark upper-left light outside the figure. Reserve white paper on the back and upper-left part of the head. Why: One source connects the later values on the head, neck, body and legs. Check: Can you point to the white area and the side turned away from light before shading? Repair: Remove a second arrow or stray trial tone; keep one source.
Step 9. First light layer
Before
After
Simplest: This route is complete. Keep this result without new details; later actions belong to the next level.
More detail: This route is complete. Keep this result without new details; later actions belong to the next level.
Best version: Use the side of the pencil for a light midtone on the lower and right body and neck. Leave the reserved white area untouched. Why: A broad light layer shows the surface turning and can still be lifted with an eraser. Check: Are white paper and light grey distinct, instead of the whole body becoming equally grey? Repair: Lift excess tone from the light area; do not darken everything to create contrast.
Step 10. Own shadow
Before
After
Simplest: This route is complete. Keep this result without new details; later actions belong to the next level.
More detail: This route is complete. Keep this result without new details; later actions belong to the next level.
Best version: Build a second layer along the underside and far legs. Keep a midtone between the white and dark areas. Why: Own shadow lies on surfaces receiving less of the chosen light. Check: Can you see white, midtone and dark, with a shadow area rather than just a thick outline? Repair: Lighten a dark rim and spread a gentler transition into the form.
Step 11. Shadow on the ground
Before
After
Simplest: This route is complete. Keep this result without new details; later actions belong to the next level.
More detail: This route is complete. Keep this result without new details; later actions belong to the next level.
Best version: Start a soft cast shadow at the feet and extend it right. Make it darker near contact and lighter farther away. Why: The cast shadow lies on the ground and starts where the figure blocks light at its support. Check: Is there no white gap at the feet, with shadow extending right away from the light? Repair: Move the shadow start to the feet or soften an overly sharp distant edge.
Step 12. Final check
Before
After
Simplest: This route is complete. Keep this result without new details; later actions belong to the next level.
More detail: This route is complete. Keep this result without new details; later actions belong to the next level.
Best version: Remove the outside light arrow and stray construction marks. Keep the reserved white, midtone and both kinds of shadow. Why: The finished drawing should communicate volume through its values, without a working arrow. Check: Are four legs clear, one light consistent, shadow attached, and neck and tail inside the margins? Repair: Repair one spot: a covered edge, excess tone in the light, or a gap under a foot.
If the drawing is unclear
The body looks like a pasted oval. Cause: A construction seam became a finished edge. Repair: Return to step 4: erase the seam and retain the outside contour.
The legs look transparent. Cause: A rear edge crosses a near leg. Repair: At step 6 stop the rear line at the foreground edge.
The neck is pinched. Cause: The joining curves almost meet. Repair: At step 2 widen a short section of one curve.
The whole dinosaur is grey. Cause: The first layer covered the reserved light. Repair: At step 9 lift tone on the upper-left surface with an eraser.
The feet float above the ground. Cause: A white gap separates feet and shadow. Repair: At step 11 move the start of the shadow to the feet.
Independent tasks
Choose one new condition. Cover the finished example and decide your own construction first; then compare using the checkpoint. All variants remain available at every selected level.
1. Head below the body
Place the head near knee height on the left, then choose two descending neck curves. Keep simple legs.
Why: The new head position requires a new neck path, not a mirrored old outline. Check: Is the head below the back, with a neck that has width and joins smoothly? Repair: Lighten one shoulder curve while keeping the head position.
2. Front foot lifted
Aim the near front leg forward and up; place the other three on the ground. Then hide their covered edges.
Why: A raised leg changes overlap and which feet contact the ground. Check: Is there a gap beneath the raised foot, with three planted feet and correctly stopped rear lines? Repair: Lift only the selected foot or erase one covered segment.
3. Light from upper right
Keep the pose and choose right-hand light. Decide where to reserve white, layer the values and extend the shadow.
Why: Changing light changes surface values and the cast-shadow direction while the contour stays the same. Check: Is the right side lighter, the left darker, and the attached ground shadow extending left? Repair: Lift the former dark on the right and move one light layer to the left.
Self-check
Name one erased construction edge and show which leg is in front. In the detailed drawing, find white, midtone, own shadow and cast shadow. Question: why does the cast shadow extend left when light comes from the right? Answer: the figure blocks light on the support away from the source; surface values also change with the light. A rough oval is fine. Exact copying is unnecessary. No classroom trial has been performed.
What to draw next
All drawing lessons 3 levels
How to draw an apple
Draw an apple at three levels: simple forms, a recessed top and bent leaf, then pencil light and shadow. Clear stages, small repairs and A4/Letter PDFs.
 3 levels
How to draw balloons
Three balloon drawing routes, from two simple ovals to tapered necks and pencil volume. Illustrated steps, checks, small repairs and practice PDFs.
 3 levels
How to draw a bear in pencil
Draw a sitting bear from simple forms: paws, muzzle, overlaps and shading. Three levels, illustrated steps and A4 lesson and practice PDFs.