kiduverse
How to make a dinosaur origami bookmark
Make a dinosaur-themed origami corner bookmark from one square, then draw its face. This is a flat page marker with a pocket, made without glue or cutting. Twelve illustrated actions separate the guide creases, single-layer fold and two pocket tucks.
- Paper15 × 15 cm square
- Steps12 illustrated actions
- LevelFirst pocket folds
- ToolsPaper and dry pencil
- Main skillSeparate one layer · tuck two tabs
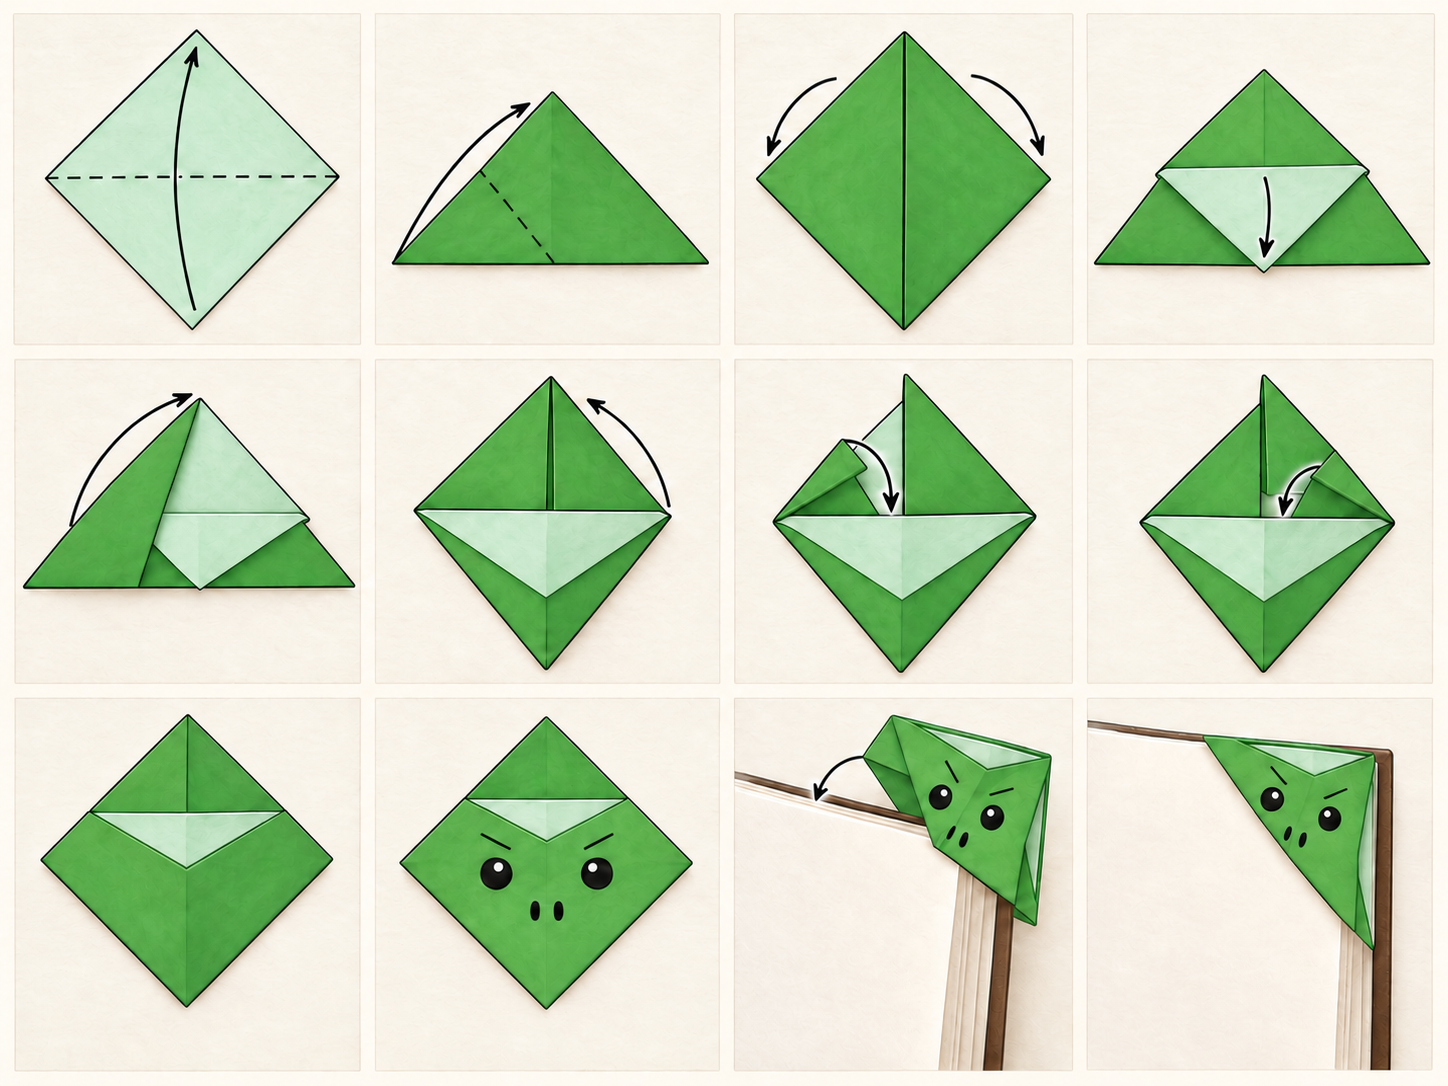
This dinosaur is a reading companion: a folded corner pocket with a face drawn on its front. The paper construction is a traditional bookmark base. The dinosaur identity comes from the decoration, so no extra horns, teeth or glued pieces are required.
The lesson concentrates on two reusable skills: separating a single layer and guiding a loose tip into a pocket. You can pause at each check before pressing the next crease. The finished model is flat and is intended for one page corner.
Paper and setup
One 15 × 15 cm square of thin paper and a dry pencil. No glue or cutting.
Start with thin 15 × 15 cm origami paper. A green face and pale reverse make the pocket wall easier to identify. Plain paper also works; draw the face after folding. Heavy card makes the double tuck stiff and can push against a book page.
The downloadable A4 files contain instructions, not a printed sheet that must become the model. Prepare a separate square. If starting from rectangular paper, ask for help making a square before this sequence. Once the square is ready, no scissors or glue are used.
Work on a clean firm table. Keep a dry pencil nearby for the final face. Do not add wet paint or thick decorations where the bookmark touches a page. Leave the paper unmarked until the pocket has been checked.
How to read the folding guide
- Dashed line. Make this new crease.
- Fine line. Keep this earlier crease as a guide.
- Curved arrow. Move the named corner in this direction.
- Inset mark. Slide the point inside the pocket.
A dashed line names the new fold; a thin line is an existing crease. A curved arrow shows the moving corner. Read which layer moves before following the arrow: the front top tip and the rear top tip are different pieces of the same sheet.
Keep the triangle’s long edge below through step 4. The two side corners then make a diamond. Keep that diamond upright for the face; turn the whole bookmark only when fitting it to a book corner.
One layer, then two separate tucks
-
Step 6 · Two loose tabs above an open pocket. -
Step 7 · The first tip slides behind the front wall. -
Step 8 · The second tip enters the same pocket.
At step 4, hold the rear apex still and peel the front tip away with a fingertip. Fold that front tip to the base midpoint. This creates the pocket wall; moving both layers closes the space that will receive the tabs.
At steps 7–8, the upper tips bend down behind that wall. Open the rim only enough to admit one tab. Keep the second tab outside until the first is fully seated. If the paper bunches, withdraw the moving tab and reopen the rim instead of pushing harder.
A physical folding trial has not been performed. Check the illustrated layers against your paper before continuing.
Fold the dinosaur bookmark
The frame shows the paper state or movement for the action. Read its layer instruction, fold, then compare your result with the check.
Mark the pocket
Steps 1–4. Make the triangle, mark both side creases and lower just the front tip.
-
1 Fold the diagonal
Place the square pale side up. Bring the bottom corner to the top; match the edges and press.
Why: The colored side will face outward.
- Check
- A green triangle points up; its long folded edge lies below.
- If it needs fixing
- Open the fold and align the two tips before smoothing outward.
-
2 Raise the left corner
Bring the left base corner to the top apex. Align its lower edge with the triangle’s center line.
Why: This crease marks the left pocket wall.
- Check
- The left tip meets the apex without crossing it.
- If it needs fixing
- Lift the flap and match the apex before pressing the hinge.
-
3 Mark the right crease
Bring the right base corner to the apex. Press, then reopen both side flaps to restore the wide triangle.
Why: Both creases will guide the final tucks.
- Check
- A wide triangle has two diagonal guide creases.
- If it needs fixing
- Reopen only the two side folds; keep the first diagonal closed.
-
4 Lower one layer
Separate the two top tips. Bring only the front tip down to the midpoint of the long base edge.
Why: The folded layer makes the front wall of an open pocket.
- Check
- The rear triangle still points up; a pale front flap points down.
- If it needs fixing
- If the rear tip also moved, open this fold and separate the layers.
Tuck both tabs
Steps 5–9. Return each corner to the apex, tuck one at a time and preserve the pocket opening.
-
5 Raise the left flap
Bring the left base corner back to the rear apex along its existing crease.
Why: A familiar crease keeps the flap aligned with the pocket.
- Check
- One green flap points up; the pale pocket wall stays below it.
- If it needs fixing
- Release the flap if it pulls the pale front layer upward.
-
6 Raise the right flap
Bring the right base corner to the same apex along its crease. Keep the two tips separate.
Why: Separate tabs can tuck one at a time without crumpling.
- Check
- A diamond has two loose green tips above the pocket.
- If it needs fixing
- Reopen the right flap and follow its first crease, not the pocket edge.
-
7 Tuck the left tip
Bend the left upper tip down. Slide it behind the pale pocket wall; flatten its outer crease gently.
Why: The tab turns inside the pocket instead of lying on its front.
- Check
- The left loose tip disappears; the right tip still points up.
- If it needs fixing
- Lift the pocket rim a little. Stop if the tip catches rather than forcing it.
-
8 Tuck the right tip
Bend the right upper tip down into the same pocket. Keep the left tab inside while sliding the second one behind the rim.
Why: Both hidden tabs hold the bookmark together without glue.
- Check
- Neither tip sticks out above the pocket.
- If it needs fixing
- Back out the right tab and separate the opening from the already tucked left tab.
-
9 Flatten the pocket
Smooth the outer edges lightly. Leave the pocket mouth open; do not glue or seal its layers.
Why: A page needs space between the front and back walls.
- Check
- A flat diamond has a small opening along its upper sides.
- If it needs fixing
- Use a fingertip to separate the mouth without pulling out the tabs.
Add the face and use it
Steps 10–12. Draw the dinosaur expression and test the bookmark gently on one page.
-
10 Draw the dinosaur face
Keep the diamond upright. Draw two eyes, two short eyebrows and two small nostrils on the green front below the pocket.
Why: The face gives the plain folded bookmark its dinosaur theme.
- Check
- The pocket is clear of pencil marks and all decoration lies on the outside.
- If it needs fixing
- Test the face lightly in pencil before darkening the marks.
-
11 Fit one page corner
Slide the pocket over the upper right corner of one page. Support the page while easing the bookmark into place.
Why: The test reveals a closed pocket or a tab tucked into the wrong layer.
- Check
- The page corner enters the pocket without bending.
- If it needs fixing
- Remove the bookmark, reopen the mouth and check the two tucks at steps 7–8.
-
12 Check before closing
Close the book gently, then reopen it. Remove the bookmark by sliding it away from the corner.
Why: A flat, dry bookmark should not catch or mark the page.
- Check
- The page remains flat and the drawn face stays on the front.
- If it needs fixing
- If it catches, remove it and smooth the outer folds; use dry pencil instead of wet ink.
Common repairs
There is no pocket
Open the last fold and leave the rear apex pointing up. Fold only the front layer down to the base midpoint.
Back to step 4The left tab stays outside
Lift the pale front wall and slide the tip behind it. A tab resting on the outside has not entered the pocket.
Back to step 7The second tab crumples
Withdraw only that tab. Separate the pocket opening from the left tab and guide the right point into the free space.
Back to step 8The page will not enter
Remove the bookmark and open its mouth with a fingertip. Do not force a fragile book page into closed layers.
Back to step 11Try a variation
Take a fresh 12 × 12 cm square and build the same pocket without the pictures. Before lowering the front apex, point to the layer that must stay still. Before each tuck, predict where the tip will disappear.
Test the smaller bookmark on a page before decorating it. Compare its grip and bulk with the first one. Change the face by moving the eyebrows or widening the nostrils; keep the pocket construction unchanged. Explain which changes affect appearance and which would affect the fit.
Use a fresh 12 × 12 cm square without the pictures. Predict which layer makes the pocket, tuck both tabs and test one page corner before drawing a different dinosaur expression.
Printable A4 instructions
Both files use A4 pages. The overview places the short actions on one sheet; the detailed storyboard gives the same folds larger frames, checks and repairs. Neither file is a cutting template.
Questions
Is this a full dinosaur figure?
It is a dinosaur-themed corner bookmark. The folds make a flat pocket; the drawn face supplies the dinosaur character. It has no separate legs, tail or standing body.
Can I leave out the face?
Yes. The pocket works before any drawing is added. Keep it plain or add a light pencil expression after checking the fit.
Why are the side corners folded twice?
Their first folds create guides and are reopened. After the front tip is lowered, the corners follow those guides again so their tips can enter the pocket.
Which side goes against the page?
The page corner enters between the front and back walls. Keep the drawn face outside, rather than putting a page between the two tucked tabs.
Can I use double-sided green paper?
Yes. The folds are the same, but the pale pocket wall will no longer be a color cue. Identify its rim by gently separating the layers at step 4.
Does the PDF need actual-size printing?
The PDF is an instruction sheet, so there is no physical-size template to preserve. Choose A4 for a readable copy and fold a separate square.
Can it hold a whole chapter?
Use it on one page corner. A thick stack can stretch the pocket and undo the tucks; avoid forcing it over several pages.